Sony SPA-TA1 Käyttöohje
Lue alta 📖 käyttöohje suomeksi merkille Sony SPA-TA1 (174 sivua) kategoriassa Sportscam. Tämä opas oli hyödyllinen 33 henkilölle ja sai 4.0 tähden keskimäärin 9 käyttäjältä
Sivu 1/174
お買い上げいただきありがとうございます。
この取扱説明書には、事故を防ぐための重要な注
意事項と製品の取り扱いかたを示しています。
この取扱説明書をよくお読みのうえ、製品を安全にお使いくだ
さい。お読みになったあとは、いつでも見られるところに必ず
保管してください。
75 mm - 96 mm
(3 in. - 3 7/8 in.)
96 mm - 117 mm
(3 7/8 in. - 4 5/8 in.)
117 mm - 138 mm
(4 5/8 in. - 5 1/2 in.)
138 mm - 159 mm
(5 1/2 in. - 6 3/8 in.)
159 mm - 180 mm
(6 3/8 in. - 7 1/8 in.)
180 mm - 200 mm
(7 1/8 in. - 8 in.)
4-534-218-01(1)
タブレットアタッチメント
Tablet Attachment
Accessoire pour tablette
取扱説明書/Operating instructions/Mode d’emploi/
Manual de instrucciones/Bedienungsanleitung/
Gebruiksaanwijzing/Bruksanvisning/Istruzioni per
l’uso/Manual de instruções/Οδηγίες λειτουργίας/
Instrukcja obsługi/Návod na obsluhu/Használati
útmutató/Instrucţiuni de utilizare/Betjeningsvejledning/
Návod k obsluze/Käyttöohjeet/Инструкция по
эксплуатации/
///
SPA-TA1
©2014 Sony Corporation Printed in China
本書のカメライラストは、
DSC-QX10
を使用しております。
下記の注意事項を守らない
と、事故により
死亡
や
大
けが
の原因となります。
製品及び同梱物を、乳幼児の手の届く範囲に放置しな
いでください。
幼児の手の届かない場所に置き、口に入れないよう注
意する。万一、飲み込んだ場合は、ただちに医師に相談
してください。
使用上のご注意
使いかたについては、カメラの取扱説明書もご確認ください。
カメラに本機を取り付けてご使用の際は、落下防止のためス
トラップを使用してください。
スマートフォン
/
タブレット取り付け時のご注意
カメラとスマートフォンアタッチメントは付属していませ
ん。
取り付けるとき、スマートフォン
/
タブレットのボタンを挟ま
ないようご注意ください
本機を装着時にスマートフォン
/
タブレットの液晶画面を強
く押すと、破損する恐れがありますのでご注意ください。
ご使用前に本機がしっかり装着されていることをご確認くだ
さい。
スマートフォン
/
タブレットと本機の間に砂やほこりなどの
ゴミが入ると、スマートフォン
/
タブレットに傷がつく恐れが
あります。
スマートフォン
/
タブレットを本機に装着し、カメラを取り付
けた状態で振り回したり、強い衝撃を与えないようご注意く
ださい。
スマートフォン
/
タブレットに本機を装着し、カメラを取り付
けた状態で、カメラだけを持たないでください。スマートフォ
ン
/
タブレットが落下する恐れがあります。
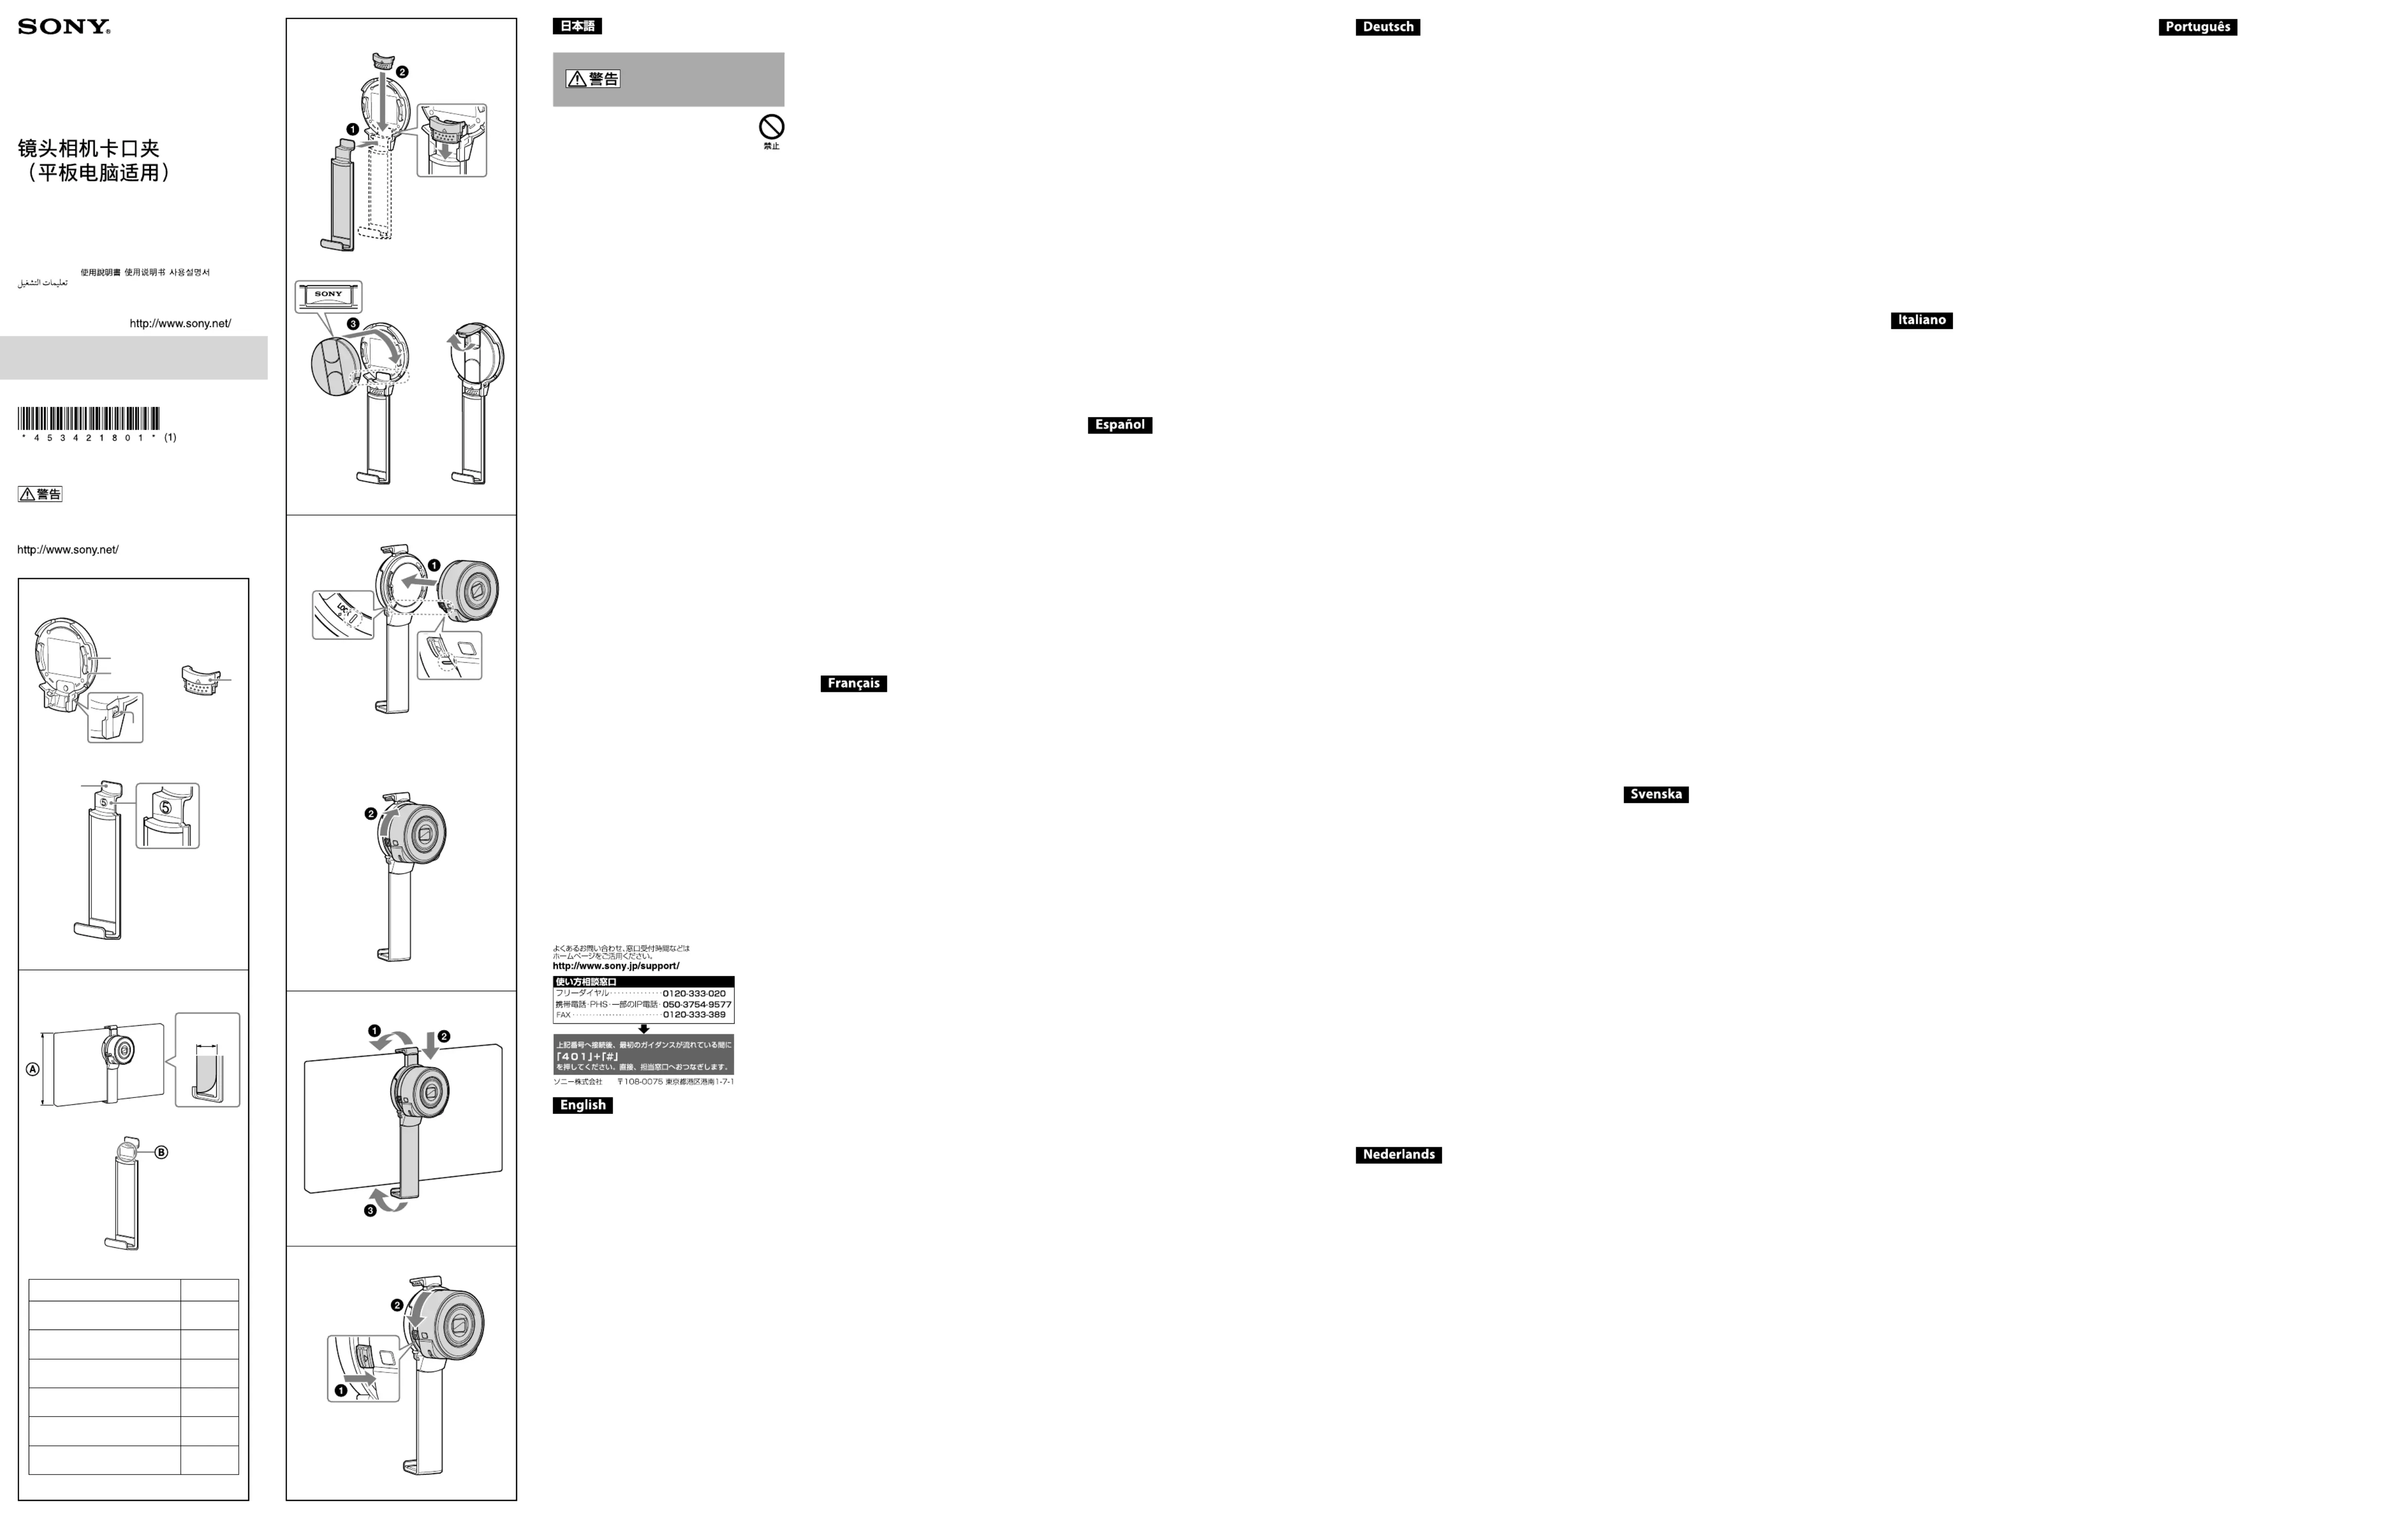
各部の名前
1
ホルダー
2
指標
3
スライドカバー
4
アーム
5
アーム番号
6
ストラップ穴
対応アームを選ぶ
表を参照し、スマートフォン
/
タブレットにあった長さのアー
ムとからの刻印の番号を確認する。
本機を組み立てる
アームをホルダーの溝にはめる。
スライドカバーを「カチッ」というまで押し込み、ホルダーと
アームを固定する。
ホルダーとスマートフォンアタッチメント(別売り)の指標
を合わせて溝に入れ、「カチッ」というまで回す。スマート
フォンアタッチメントの上側のみ広げる。
カメラを取り付ける
本機の反対側に、カメラと本機の指標を合わせて溝に入れ
る。
「カチッ」という音がするまで「
LOCK
」の方向へカメラを回
す。
本機をスマートフォン
/
タブレットに取
り付ける
スマートフォンアタッチメントの上側をスマートフォン
/
タ
ブレットに引っ掛ける。
タブレットアタッチメントを下に引く。
アームの下側をスマートフォン
/
タブレットの下側にはめ
る。
カメラを取りはずす
カメラの取りはずしレバーをスライドしながら、取り付けのと
きと逆方向へ回して取りはずす。
主な仕様
外形寸法(約):
65.6 mm x 85 mm x 33.9 mm
65.6 mm x 106 mm x 33.9 mm
65.6 mm x 127 mm x 33.9 mm
65.6 mm x 148 mm x 33.9 mm
65.6 mm x 169 mm x 33.9 mm
65.6 mm x 190 mm x 33.9 mm
(幅
/
高さ
/
奥行き)
質量(約):
31 g (
)
同梱物:
ホルダー
(
1)
、
アーム
(
6
)、
スライドカバー
(
1
)、印刷物一式
仕様および外観は、改
良のため予告なく変更することがありま
すが、ご了承ください。
Notice for the customers in the countries applying
EU Directives
Manufacturer: Sony Corporation, 1-7-1 Konan
Minato-ku Tokyo, 108-0075 Japan
For EU product compliance: Sony Deutschland GmbH,
Hedelfinger Strasse 61, 70327 Stuttgart, Germany
The illustrations of the camera in this manual show
the DSC-QX10.
Notes on Use
For details on use, also refer to the instruction
manual supplied with your camera.
When using this Tablet attachment Attached to
your camera, use the strap to prevent dropping
the camera.
Notes on attaching to a smartphone/tablet
A camera and Smartphone Attachment are not
supplied with this Tablet Attachment.
Make sure no buttons are caught when the
smartphone/tablet is attached.
If you press the LCD screen of the smartphone/
tablet strongly when this Tablet Attachment is
attached, the smartphone/tablet and this Tablet
Attachment may be damaged.
Make sure that this Tablet Attachment is firmly
attached to the smartphone/tablet before use.
If any sand or dirt gets between the smartphone/
tablet and this Tablet Attachment, the
smartphone/tablet may be damaged.
When the smartphone/tablet is attached to this
Tablet Attachment and the camera is attached, do
not swing them around or subject them to a
strong impact.
Do not swing the camera around with a
smartphone/tablet attached to it, as the
smartphone/tablet may slip out of the Tablet
Attachment.
Identifying the Parts
1 Holder
2 Index
3 Slide Cover
4 Arm
5 Arm Number
6 Strap Hole
Selecting a suitable arm
Referring to the table, confirm the length of your
smartphone/tablet and Arm Number stamp ,
- .
Assembling the Tablet
attachment
Place the Arm into the slot of the Holder.
Press Slide Cover until it clicks to secure the
Holder and Arm.
Fix the Smartphone Attachment (not supplied) to
the Holder, aligning the index marks, then rotate
the Smartphone Attachment until it clicks. Open
the upper clamp.
Attaching the camera
Attach the camera to the other side, aligning the
index marks.
Rotate the camera to the "LOCK" position until it
clicks.
Fixing the Tablet Attachment to
your smartphone/tablet
Latch the upper clamp to the smartphone/tablet.
Pull the Tablet Attachment downward.
Latch the lower clamp to the smartphone/tablet.
Removing the camera
Slide and hold the removal lever and rotate the
camera.
Specifications
Dimensions
65.6 mm x 85 mm x 33.9 mm
(Approx.):(2 5/8 in. x 3 3/8 in. x 1 3/8 in.)
65.6 mm x 106 mm x 33.9 mm
(2 5/8 in. x 4 1/4 in. x 1 3/8 in.)
65.6 mm x 127 mm x 33.9 mm
(2 5/8 in. x 5 in. x 1 3/8 in.)
65.6 mm x 148 mm x 33.9 mm
(2 5/8 in. x 5 7/8 in. x 1 3/8 in.)
65.6 mm x 169 mm x 33.9 mm
(2 5/8 in. x 6 3/4 in. x 1 3/8 in.)
65.6 mm x 190 mm x 33.9 mm
(2 5/8 in. x 7 1/2 in. x 1 3/8 in.)
(w/h/d)
Mass:
Approx. 31 g (1.1 oz) ()
Included items :Holder (1), Arm (6), Slide Cover (1),
Set of printed documentation
Design and specifications are subject to change
without notice.
Avis aux consommateurs des pays appliquant les
Directives UE
Fabricant: Sony Corporation, 1-7-1 Konan Minato-ku
Tokyo, 108-0075 Japon
Pour toute question relative à la conformité des
produits dans l’UE: Sony Deutschland GmbH,
Hedelfinger Strasse 61, 70327 Stuttgart, Allemagne
L’appareil photo illustré dans ce manuel est le
DSC-QX10.
Remarques sur l’emploi
Pour des détails sur l’utilisation, reportez-vous
également au mode d’emploi fourni avec l’appareil
photo.
Lorsque vous fixez cet accessoire pour tablette à
votre appareil photo, attachez la lanière pour
empêcher l’appareil photo de tomber.
Remarques sur la fixation à un smartphone/
tablette
Aucun appareil photo et support pour téléphone
intelligent n’est fourni avec ce accessoire pour
tablette.
Assurez-vous qu’aucune touche n’est entravée
lorsque le smartphone/tablette est fixé.
Si vous appuyez fort sur l’écran LCD du
smartphone/tablette lorsque cet accessoire pour
tablette est fixé, le smartphone/tablette et cet
accessoire pour tablette risquent d’être
endommagés.
Assurez-vous que cet accessoire pour tablette est
solidement fixé au smartphone/tablette avant
utilisation.
Si du sable ou de la saleté est pris entre le
smartphone/tablette et cet accessoire pour
tablette, le smartphone/tablette risque d’être
endommagé.
Lorsque le smartphone/tablette est fixé à cet
accessoire pour tablette et que l’appareil photo est
en place, ne les balancez pas et ne les soumettez
pas à un impact puissant.
Lorsqu’un smartphone/tablette est fixé à l’appareil
photo, ne le balancez pas, car le smartphone/
tablette risque de glisser hors de l’accessoire pour
tablette.
Identification des éléments
1 Monture
2 Index
3 Couvercle coulissant
4 Bras
5 Numéro du bras
6 Orifice de la lanière
Sélection d’un bras adapté
En vous reportant au tableau, vérifiez la longueur
de votre smartphone/tablette ainsi que le numéro
de bras indiqué - , .
Assemblage de l’accessoire pour
tablette
Placez le bras dans la fente de la monture.
Appuyez sur le couvercle coulissant jusqu’à ce
qu’il verrouille la monture et le bras en émettant
un déclic.
Fixez le support pour téléphone intelligent (non
fourni) à la monture en alignant les repères
d’index, puis faites pivoter le support pour
téléphone intelligent jusqu’à ce qu’il émette un
déclic. Ouvrez la pince supérieure.
Fixation de l’appareil photo
Fixez l’appareil photo de l’autre côté en alignant
les repères d’index.
Faites pivoter l’appareil photo vers la position
«LOCK» jusqu’à ce qu’il émette un déclic.
Fixation de l’accessoire pour
tablette à votre smartphone/
tablette
Accrochez la pince supérieure au smartphone/
tablette.
Tirez l’accessoire pour tablette vers le bas.
Accrochez la pince inférieure au smartphone/
tablette.
Retrait de l’appareil photo
Faites glisser le levier de retrait et, tout en le
maintenant, faites pivoter l’appareil photo.
Spécifications
Dimensions
65,6mm x 85mm x 33,9mm
(Environ):
(2 5/8 po. x 3 3/8 po. x 1 3/8 po.)
65,6mm x 106mm x 33,9mm
(2 5/8 po. x 4 1/4 po. x 1 3/8 po.)
65,6mm x 127mm x 33,9mm
(2 5/8 po. x 5 po. x 1 3/8 po.)
65,6mm x 148mm x 33,9mm
(2 5/8 po. x 5 7/8 po. x 1 3/8 po.)
65,6mm x 169mm x 33,9mm
(2 5/8 po. x 6 3/4 po. x 1 3/8 po.)
65,6mm x 190mm x 33,9mm
(2 5/8 po. x 7 1/2 po. x 1 3/8 po.)
(l/h/p)
Poids:
Environ 31g (1,1 on) ()
Articles inclus:Monture (1), bras (6), couvercle
coulissant (1), Jeu de documents
imprimés
La conception et les spécifications peuvent être
modifiées sans préavis.
Aviso para los clientes de países en los que se
aplican las directivas de la UE
Fabricante: Sony Corporation, 1-7-1 Konan Minato-ku
Tokyo, 108-0075 Japón
Para la conformidad del producto en la UE: Sony
Deutschland GmbH, Hedelfinger Strasse 61, 70327
Stuttgart, Alemania
Las ilustraciones de la cámara de este manual
muestran la DSC-QX10.
Notas sobre la utilización
Con respecto a los detalles sobre la utilización,
consulte el manual de instrucciones suministrado
con su cámara.
Cuando utilice este acoplamiento de la tableta
conectado a la cámara, use la correa para evitar
que se caiga la cámara.
Notas sobre la fijación a un smartphone/
tableta
El acoplamiento de la tableta no incluye ninguna
cámara ni acoplamiento del smartphone.
Asegúrese de que no quede ningún botón
atrapado cuando se acople el smartphone/tableta.
Si presiona con fuerza la pantalla LCD del
smartphone/tableta cuando esté fijado este
acoplamiento de la tableta, el smartphone/tableta
y este acoplamiento de la tableta pueden dañarse.
Cerciórese de que este acoplamiento de la tableta
esté firmemente fijado al smartphone/tableta
antes de utilizarlo.
Si entra polvo o suciedad entre el smartphone/
tableta y este acoplamiento de la tableta, el
smartphone/tableta puede dañarse.
Cuando el smartphone/tableta esté fijado a este
acoplamiento de la tableta y fije la cámara, no los
oscile ni los someta a golpes fuertes.
No zarandee la cámara si tiene un smartphone/
tableta acoplado a ella, p1-ya que el smartphone/
tableta podría resbalarse del acoplamiento.
Identificación de las partes
1 Soporte
2 Índice
3 Tapa deslizante
4 Brazo
5 Número del brazo
6 Orificio para correa
Selección del brazo adecuado
Consultando la tabla, confirme la longitud del
smartphone/tableta y el sello con el número del
brazo - , .
Fijación del acoplamiento de la
tableta
Coloque el brazo en la ranura del soporte.
Presione la tapa deslizante hasta que escuche un
clic para fijar el soporte y el brazo.
Fije el acoplamiento del smartphone (no
suministrado) al soporte, alineando las marcas
del índice, y seguidamente gire el acoplamiento
del smartphone hasta que escuche un clic. Abra
la abrazadera superior.
Fijación de la cámara
Fije la cámara en el otro lado, alineando las
marcas del índice.
Gire la cámara a la posición “LOCK”, hasta que
escuche un clic.
Fijación del acoplamiento de la
tableta a su smartphone/tableta
Conecte la abrazadera superior al smartphone/
tableta.
Tire del acoplamiento de la tableta hacia abajo.
Conecte la abrazadera inferior al smartphone/
tableta.
Extracción de la cámara
Mientras desliza la palanca de extracción, gire la
cámara.
Especificaciones
Dimensiones
65,6 mm x 85 mm x 33,9 mm
(Aprox.):
65,6 mm x 106 mm x 33,9 mm
65,6 mm x 127 mm x 33,9 mm
65,6 mm x 148 mm x 33,9 mm
65,6 mm x 169 mm x 33,9 mm
65,6 mm x 190 mm x 33,9 mm
(an/al/pr)
Peso:
Aprox. 31 g ()
Elementos
incluidos:
Soporte (1), Brazo (6), Tapa
deslizante (1), Juego de
documentación impresa
El diseño y las especificaciones están sujetos a
cambio sin previo aviso.
Hinweis für Kunden in Ländern, in denen
EU-Richtlinien gelten
Hersteller: Sony Corporation, 1-7-1 Konan Minato-ku
Tokio, 108-0075 Japan
Für EU Produktkonformität: Sony Deutschland
GmbH, Hedelfinger Strasse 61, 70327 Stuttgart,
Deutschland
Die Abbildungen der Kamera in diesem Handbuch
zeigen die DSC-QX10.
Hinweise zur Verwendung
Erläuterungen zur Verwendung finden Sie in der
Bedienungsanleitung zur Kamera.
Verwenden Sie den Riemen, wenn Sie diese
Tablet-Halterung an der Kamera anbringen, damit
die Kamera nicht herunterfallen kann.
Hinweise zum Anbringen an ein Smartphone/
Tablet
Die Tablet-Halterung wird ohne Kamera und
Smartphone-Halterung geliefert.
Achten Sie beim Anbringen eines Smartphones/
Tablets darauf, dass keine Tasten eingeklemmt
werden.
Wenn Sie beim Anbringen der Tablet-Halterung
starken Druck auf den LCD-Bildschirm des
Smartphones/Tablets ausüben, können das
Smartphone/Tablet und die Tablet-Halterung
beschädigt werden.
Vergewissern Sie sich vor dem Gebrauch, dass die
Tablet-Halterung fest am Smartphone/Tablet sitzt.
Wenn Sand oder Schmutz zwischen das
Smartphone/Tablet und die Tablet-Halterung
gelangt, kann das Smartphone/Tablet beschädigt
werden.
Wenn das Smartphone/Tablet an der Tablet-
Halterung angebracht und die Kamera daran
befestigt ist, schlenkern Sie die Geräte nicht und
schützen Sie sie vor starken Stößen.
Schlenkern Sie die Kamera nicht mit daran
angebrachtem Smartphone/Tablet, da das
Smartphone/Tablet sonst aus der Tablet-Halterung
rutschen könnte.
Identifikation der Teile
1 Halter
2 Markierung
3 Schiebeabdeckung
4 Arm
5 Armnummer
6 Öse für den Riemen
Auswählen des geeigneten
Arms
Ermitteln Sie anhand der Angaben zur Länge
Ihres Smartphones/Tablets in der Tabelle die
Nummer des passenden Arms - .
Zusammenbauen der Tablet-
Halterung
Setzen Sie den Arm in die Aussparung am Halter
ein.
Drücken Sie die Schiebeabdeckung an, bis sie mit
einem Klicken einrastet, um den Halter am Arm
zu befestigen.
Befestigen Sie die Smartphone-Halterung (nicht
mitgeliefert) am Halter, indem Sie die
Markierungen aneinander ausrichten und die
Smartphone-Halterung drehen, bis sie mit einem
Klicken einrastet. Öffnen Sie die obere Klammer.
Anbringen der Kamera
Richten Sie die Markierungen aneinander aus
und bringen Sie die Kamera an der anderen Seite
an.
Drehen Sie die Kamera in die Position „LOCK“, bis
sie mit einem Klicken einrastet.
Befestigen der Tablet-Halterung
am Smartphone/Tablet
Schieben Sie die obere Klammer über den Rand
des Smartphones/Tablets.
Ziehen Sie die Tablet-Halterung nach unten.
Schieben Sie die untere Klammer über den Rand
des Smartphones/Tablets.
Abnehmen der Kamera
Verschieben Sie den Lösehebel, halten Sie ihn in
dieser Position und drehen Sie die Kamera.
Technische Daten
Abmessungen
65,6mm x 85mm x 33,9mm
(ca.):
65,6mm x 106mm x 33,9mm
65,6mm x 127mm x 33,9mm
65,6mm x 148mm x 33,9mm
65,6mm x 169mm x 33,9mm
65,6mm x 190mm x 33,9mm
(B/H/T)
Gewicht:
ca. 31 g ()
Mitgelieferte Teile:Halter (1), Arm (6),
Schiebeabdeckung (1), Satz
gedruckter Dokumentation
Änderungen, die dem technischen Fortschritt
dienen, bleiben vorbehalten.
Kennisgeving voor klanten in de landen waar
EU-richtlijnen van toepassing zijn
Producent: Sony Corporation, 1-7-1 Konan Minato-ku
Tokyo, 108-0075 Japan
Voor EU-product conformiteit: Sony Deutschland
GmbH, Hedelfinger Strasse 61, 70327 Stuttgart,
Duitsland
Voor de illustraties van de camera in deze
handleiding wordt de DSC-QX10 gebruikt.
Opmerkingen over het gebruik
Raadpleeg ook de gebruiksaanwijzing van uw
camera voor meer informatie over het gebruik.
Als u het tabletbevestigingsstuk bevestigt aan uw
camera, is het aan te raden de riem te gebruiken
om te voorkomen dat de camera valt.
Opmerkingen bij het bevestigen aan een
smartphone/tablet
Bij dit tabletbevestigingsstuk zijn geen camera en
smartphonebevestigingsstuk geleverd.
Zorg ervoor dat er geen knoppen ingedrukt blijven
na het bevestigen van de smartphone/tablet.
Als u krachtig op het lcd-scherm van de
smartphone/tablet drukt terwijl het
tabletbevestigingsstuk bevestigd is, kunnen de
smartphone/tablet en het tabletbevestigingsstuk
beschadigd raken.
Zorg ervoor dat het tabletbevestigingsstuk stevig
bevestigd is aan de smartphone/tablet voor u het
in gebruik neemt.
Als er zand of stof tussen de smartphone/tablet
en het tabletbevestigingsstuk terechtkomt, kan de
smartphone/tablet beschadigd raken.
Wanneer de smartphone/tablet bevestigd is aan dit
tabletbevestigingsstuk en de camera eveneens
bevestigd is, mag u deze niet krachtig heen en weer
bewegen of blootstellen aan krachtige schokken.
Beweeg de camera nooit krachtig heen en weer
als er een smartphone/tablet aan bevestigd is.
Doet u dit wel, dan kan de smartphone/tablet
losraken uit het tabletbevestigingsstuk.
Overzicht van de onderdelen
1 Houder
2 Index
3 Schuifdeksel
4 Arm
5 Armnummer
6 Opening voor riem
Een geschikte arm selecteren
Raadpleeg de tabel om de lengte van uw
smartphone/tablet en het armnummer - te
bepalen.
Het tabletbevestigingsstuk
monteren
Plaats de arm in de sleuf in de houder.
Druk het schuifdeksel omlaag tot u een klik hoort
om de houder en de arm te vergrendelen.
Bevestig het smartphonebevestigingsstuk (niet
bijgeleverd) aan de houder. Zorg ervoor dat de
indexmarkeringen hierbij op een lijn liggen.
Verdraai vervolgens het
smartphonebevestigingsstuk tot u een klik hoort.
Open de bovenste klem.
De camera bevestigen
Bevestig de camera aan de andere kant. Zorg
ervoor dat de indexmarkeringen hierbij op een
lijn liggen.
Verdraai de camera naar de "LOCK"-positie tot u
een klik hoort.
Het tabletbevestigingsstuk
bevestigen aan uw smartphone/
tablet
Haak de bovenste klem vast aan de smartphone/
tablet.
Trek het tabletbevestigingsstuk omlaag.
Haak de onderste klem vast aan de smartphone/
tablet.
De camera verwijderen
Verschuif de verwijderhendel en houd deze vast, en
verdraai de camera.
Technische gegevens
Afmetingen
65,6 mm x 85 mm x 33,9 mm
(ong.):
65,6 mm x 106 mm x 33,9 mm
65,6 mm x 127 mm x 33,9 mm
65,6 mm x 148 mm x 33,9 mm
65,6 mm x 169 mm x 33,9 mm
65,6 mm x 190 mm x 33,9 mm
(b/h/d)
Gewicht:
Ong. 31 g ()
Bijgeleverde
items:
Houder (1), arm (6), schuifdeksel
(1), gedrukte documentatie
Wijzigingen in ontwerp en technische gegevens
voorbehouden zonder voorafgaande kennisgeving.
Anmärkning för kunder i de länder som följer
EU-direktiv
Tillverkare: Sony Corporation, 1-7-1 Konan Minato-ku
Tokyo, 108-0075 Japan
För EU:s produktöverensstämmelse: Sony
Deutschland GmbH, Hedelfinger Strasse 61, 70327
Stuttgart, Tyskland
På bilderna i denna manual visas kameran
DSC-QX10.
Att observera angående
användning
Mer information om användning finns i den
bruksanvisning som medföljer kameran.
Använd remmen när handdatorfästet som sitter på
kameran ska användas, så att du inte tappar den.
Att observera angående montering på en
smartphone/handdator
Ett kamera- och smartphonefäste följer inte med
detta handdatorfäste.
Se till så att inga knappar hamnar i kläm när du
monterar din smartphone/handdator.
Om du trycker på LCD-skärmen på din
smartphone/handdator med våld när detta
handdatorfäste är monterat kan det hända att din
smartphone/handdator och detta handdatorfäste
skadas.
Se till så att handdatorfästet sitter fast ordentligt i
din smartphone/handdator före användning.
Det kan hända att din smartphone/handdator
skadas om det kommer sand eller smuts mellan
din smartphone/handdator och detta
handdatorfäste.
Sväng inte omkring med kameran eller utsätt inte
komponenterna för kraftiga stötar när din
smartphone/handdator är monterad i detta
handdatorfäste och på kameran.
Sväng inte runt kameran med din smartphone/
handdator monterad eftersom din smartphone/
handdator kan ramla ur handdatorfästet.
Identifiera delarna
1 Hållare
2 Indexering
3 Skjutlock
4 Arm
5 Armnummer
6 Hål för rem
Välja en passande arm
Bekräfta längden på din smartphone/handdator
och armnummer - , genom att använda
tabellen.
Montera handdatorfästet
Placera armen i hållarens spår.
Tryck på skjutlocket tills det klickar för att låsa
fast hållaren och armen.
Fäst smartphonefästet (medföljer ej) i hållaren
och rikta in det efter indexeringen, vrid sedan på
smartphonefästet tills det klickar till. Öppna den
övre klämman.
Montera kameran
Montera kameran på den andra sidan och rikta in
den efter indexeringen.
Vrid kameran till läget ”LOCK” tills den klickar till.
Fästa handdatorfästet vid din
smartphone/handdator
Lås fast den övre klämman i din smartphone/
handdator.
Dra handdatorfästet nedåt.
Lås fast den undre klämman i din smartphone/
handdator.
Avlägsna kameran
Skjut lossningsspaken åt sidan och vrid kameran.
Specifikationer
Mått
65,6 mm x 85 mm x 33,9 mm
(Ca.):
65,6 mm x 106 mm x 33,9 mm
65,6 mm x 127 mm x 33,9 mm
65,6 mm x 148 mm x 33,9 mm
65,6 mm x 169 mm x 33,9 mm
65,6 mm x 190 mm x 33,9 mm
(b/h/d)
Vikt:
Ca. 31 g ()
Medföljande
delar:
Hållare (1), Arm (6), Skjutlock (1),
Uppsättning tryckt dokumentation
Design och specifikationer kan ändras utan
föregående meddelande.
Avviso per i clienti residenti nei paesi che
applicano le direttive UE
Produttore: Sony Corporation, 1-7-1 Konan Minato-ku
Tokyo, 108-0075 Giappone
Per la conformità del prodotto in ambito UE: Sony
Deutschland GmbH, Hedelfinger Strasse 61, 70327
Stuttgart, Germania
Le illustrazioni presenti in questo manuale
mostrano la fotocamera DSC-QX10.
Note sull’uso
Per informazioni sull’uso, consultare anche il
manuale delle istruzioni in dotazione con la
fotocamera.
Quando il supporto per tablet è montato sulla
fotocamera, utilizzare la cinghia per evitare che la
fotocamera cada.
Note per l’applicazione su uno smartphone/un
tablet
Con questo supporto per tablet non è fornito in
dotazione alcun supporto per fotocamera e
smartphone.
Assicurarsi che nessun pulsante venga premuto
quando si applica lo smartphone/il tablet.
Se nell’applicare il supporto per tablet si esercita
una forte pressione sullo schermo LCD dello
smartphone/del tablet, lo smartphone/il tablet e il
supporto per tablet potrebbero rimanere
danneggiati.
Prima dell’uso, assicurarsi che il supporto per tablet
sia fissato saldamente allo smartphone/al tablet.
Lo smartphone o il tablet potrebbero rimanere
danneggiati dall’eventuale presenza di sabbia o
sporco tra questi ultimi e il supporto per tablet.
Quando si applica lo smartphone o il tablet al
supporto per tablet con la fotocamera montata, non
ruotarli bruscamente né sottoporli a forti impatti.
Non ruotare bruscamente la fotocamera con lo
smartphone o il tablet applicati su di essa, poiché
questi ultimi potrebbero scivolare fuori dal
supporto per tablet.
Identificazione delle parti
1 Sostegno
2 Indice
3 Coperchio a scorrimento
4 Braccio
5 Numero del braccio
6 Foro della cinghia
Selezione del braccio adatto
Riferendosi alla tabella, regolare la lunghezza del
proprio smartphone/tablet e l’indicatore relativo al
numero del braccio - , .
Montaggio del supporto per
tablet
Posizionare il braccio nell’alloggiamento del
sostegno.
Per fissare il sostegno e il braccio, premere il
coperchio a scorrimento fino a udire uno scatto.
Fissare al sostegno il supporto per smartphone
(non in dotazione) allineando i segni dell’indice,
quindi ruotare il supporto per smartphone fine a
udire uno scatto. Aprire il morsetto superiore.
Applicazione della fotocamera
Montare la fotocamera sull’altro lato, allineando i
segni dell’indice.
Ruotare la fotocamera fino a raggiungere la
posizione “LOCK” e a udire uno scatto.
Fissaggio del supporto per
tablet allo smartphone/al tablet
Fissare il morsetto superiore allo smartphone/al
tablet.
Tirare il supporto per tablet verso il basso.
Fissare il morsetto inferiore allo smartphone/al
tablet.
Rimozione della fotocamera
Far scorrere e tenere premuta la leva di rimozione,
quindi ruotare la fotocamera.
Caratteristiche tecniche
Dimensioni
65,6 mm x 85 mm x 33,9 mm
(circa):
65,6 mm x 106 mm x 33,9 mm
65,6 mm x 127 mm x 33,9 mm
65,6 mm x 148 mm x 33,9 mm
65,6 mm x 169 mm x 33,9 mm
65,6 mm x 190 mm x 33,9 mm
(L/H/P)
Peso:
circa 31 g ()
Accessori inclusi:Sostegno (1), Braccio (6),
Coperchio a scorrimento (1),
Corredo di documentazione
stampata
Il design e le caratteristiche tecniche sono soggetti a
modifiche senza preavviso.
Nota para os clientes nos países que apliquem as
Directivas da UE
Fabricante: Sony Corporation, 1-7-1 Konan Minato-ku
Tokyo, 108-0075 Japão
Para a conformidade dos produtos na EU: Sony
Deutschland GmbH, Hedelfinger Strasse 61, 70327
Stuttgart, Alemanha
As ilustrações da câmara neste manual
apresentam a DSC-QX10.
Notas de utilização
Para mais detalhes sobre a utilização, consulte o
manual de instruções fornecido com a câmara.
Quando utilizar este acessório para tablet na sua
câmara, utilize a correia para evitar deixar cair a
câmara.
Notas sobre a fixação de um smartphone/
tablet
A câmara e o acessório para smartphone não são
fornecidos com este acessório para tablet.
Certifique-se de que os botões não ficam presos
quando coloca o smartphone/tablet.
Se pressionar o ecrã LCD do smartphone/tablet
com força quando este acessório para tablet for
instalado, o smartphone/tablet e o acessório para
tablet poderão ficar danificados.
Certifique-se de que este acessório para tablet
está devidamente fixo no smartphone/tablet
antes de o utilizar.
Se areia ou sujidade se alojar entre o smartphone/
tablet e este acessório para tablet, o smartphone/
tablet poderá ficar danificado.
Quando o smartphone/tablet estiver instalado
neste acessório para tablet e a câmara fixa no
mesmo, não os baloice nem os sujeite a um forte
impacto.
Não baloice a câmara com um smartphone/tablet
fixo à mesma, uma vez que o smartphone/tablet
poderá soltar-se do acessório para tablet.
Identificação das peças
1 Suporte
2 Índice
3 Tampa deslizante
4 Braço
5 Número do braço
6 Orifício para a correia
Selecionar um braço adequado
Consultando a tabela, confirme o comprimento
do smartphone/tablet e a marca do número do
braço - , .
Montar o acessório para tablet
Coloque o braço na ranhura do suporte.
Pressione a tampa deslizante até ouvir um
estalido para fixar o suporte e o braço.
Fixe o acessório para smartphone (não fornecido)
ao suporte alinhando as marcas de índice e, em
seguida, rode o acessório para smartphone até
ouvir um estalido. Abra o grampo superior.
Colocar a câmara
Coloque a câmara do outro lado alinhando as
marcas de índice.
Rode a câmara para a posição “LOCK” até ouvir
um estalido.
Fixar o acessório para tablet ao
smartphone/tablet
Fixe o grampo superior ao smartphone/tablet.
Puxe o acessório para tablet para baixo.
Fixe o grampo inferior ao smartphone/tablet.
Retirar a câmara
Faça deslizar e segure a patilha de remoção e rode a
câmara.
Especificações
Dimensões
65,6 mm x 85 mm x 33,9 mm
(Aprox.):
65,6 mm x 106 mm x 33,9 mm
65,6 mm x 127 mm x 33,9 mm
65,6 mm x 148 mm x 33,9 mm
65,6 mm x 169 mm x 33,9 mm
65,6 mm x 190 mm x 33,9 mm
(l/a/p)
Peso:
Aprox. 31 g ()
Itens incluídos:Suporte (1), Braço (6), Tampa
deslizante (1), Documentos
impressos
O design e as especificações estão sujeitos a
alterações sem aviso prévio.
- 13 mm
(- 17/32 in.)
4
5
3
1
2
6
Tuotetiedot
| Merkki: | Sony |
| Kategoria: | Sportscam |
| Malli: | SPA-TA1 |
Tarvitsetko apua?
Jos tarvitset apua merkille Sony SPA-TA1 esitä kysymys alla ja muut käyttäjät vastaavat sinulle
Sportscam Sony Käyttöohjeet

21 Joulukuuta 2024
21 Joulukuuta 2024
21 Joulukuuta 2024
21 Joulukuuta 2024
21 Joulukuuta 2024
21 Joulukuuta 2024
21 Joulukuuta 2024
21 Joulukuuta 2024
21 Joulukuuta 2024
20 Joulukuuta 2024
Sportscam Käyttöohjeet
Viimeisimmät Sportscam Käyttöohjeet
6 Helmikuuta 2025
18 Tammikuuta 2025
14 Tammikuuta 2025
14 Tammikuuta 2025
10 Tammikuuta 2025
31 Joulukuuta 2025
27 Joulukuuta 2024
27 Joulukuuta 2024
25 Joulukuuta 2024
23 Joulukuuta 2024