Vimar 20175 Käyttöohje
Lue alta 📖 käyttöohje suomeksi merkille Vimar 20175 (4 sivua) kategoriassa Himmennin. Tämä opas oli hyödyllinen 50 henkilölle ja sai 4.2 tähden keskimäärin 4 käyttäjältä
Sivu 1/4
Eikon
20175
Arké
19175
Idea
16625
Viale Vicenza, 14
36063 Marostica VI - Italy
www.vimar.com
49400459A0 03 1806
Plana
14175
Ricevitore ad infrarossi con regolatore 230 V~ 50 Hz per
lampade a incandescenza 40-450 W, trasformatori ferro-
magnetici 40-450 VA e trasformatori elettronici con com-
portamento induttivo 40-300 VA, comando e regolazione
con pulsante incorporato, con telecomando 01849 o da
più punti con pulsanti NO, funzione MASTER, tecnologia
MOSFET + TRIAC, individuazione al buio, grigio.
CARATTERISTICHE.
• Tensione di alimentazione: 230 V~ 50 Hz.
• Accensione, regolazione e spegnimento del carico mediante
pulsante incorporato, da telecomando ad infrarossi 01849 e
normali pulsanti in chiusura non luminosi collegati in parallelo.
• Memorizzazione, allo spegnimento del carico, della regolazio
-
ne impostata (salvo interruzione di rete).
• Accensione graduale (soft start): garantisce un passaggio
graduale dallo stato di spento a quello di luminosità massima
o precedentemente impostata; questo contribuisce all’au-
mento della vita della lampada riducendo lo stress subito
dal filamento durante l’accensione a freddo ed evita l’effetto
abbagliante per le persone.
• Spegnimento graduale (soft end): garantisce un passaggio
graduale dallo stato di acceso a quello di spento.
• Protezione contro i cortocircuiti all’accensione con segnala-
zione di intervento mediante spia lampeggiante.
• Protezione termica con segnalazione di intervento mediante
spia lampeggiante.
• Funzione MASTER-SLAVE: ponendo attenzione a non supe-
rare la potenza massima comandabile da ciascun regolatore,
ad un dispositivo MASTER possono essere aggiunti fino a 4
dispositivi SLAVE per un carico massimo totale di 2450 W
(VA) - vedi figura 3.
• Distanza massima per comando da più punti: 100 m.
• Comando ad infrarossi su protocollo RC5.
• Temperatura di funzionamento: -5 °C - +35 °C.
COLLEGAMENTI.
Il collegamento deve avvenire in associazione a un portafusibile
con fusibile rapido ad alto potere di interruzione tipo F2,5AH
250 V~ (07050.HF.2.5) come risulta dalle figure 2 e 3 riportate
in ultima pagina.
CARICHI COMANDABILI.
• Lampade a incandescenza e alogene : 40-450 W.
• Trasformatori ferromagnetici per lampade alogene in bassis-
sima tensione : 40-450 VA.
• Trasformatori elettronici dedicati VIMAR 01860.60 max 4,
oppure VIMAR 01860.105 max 3.
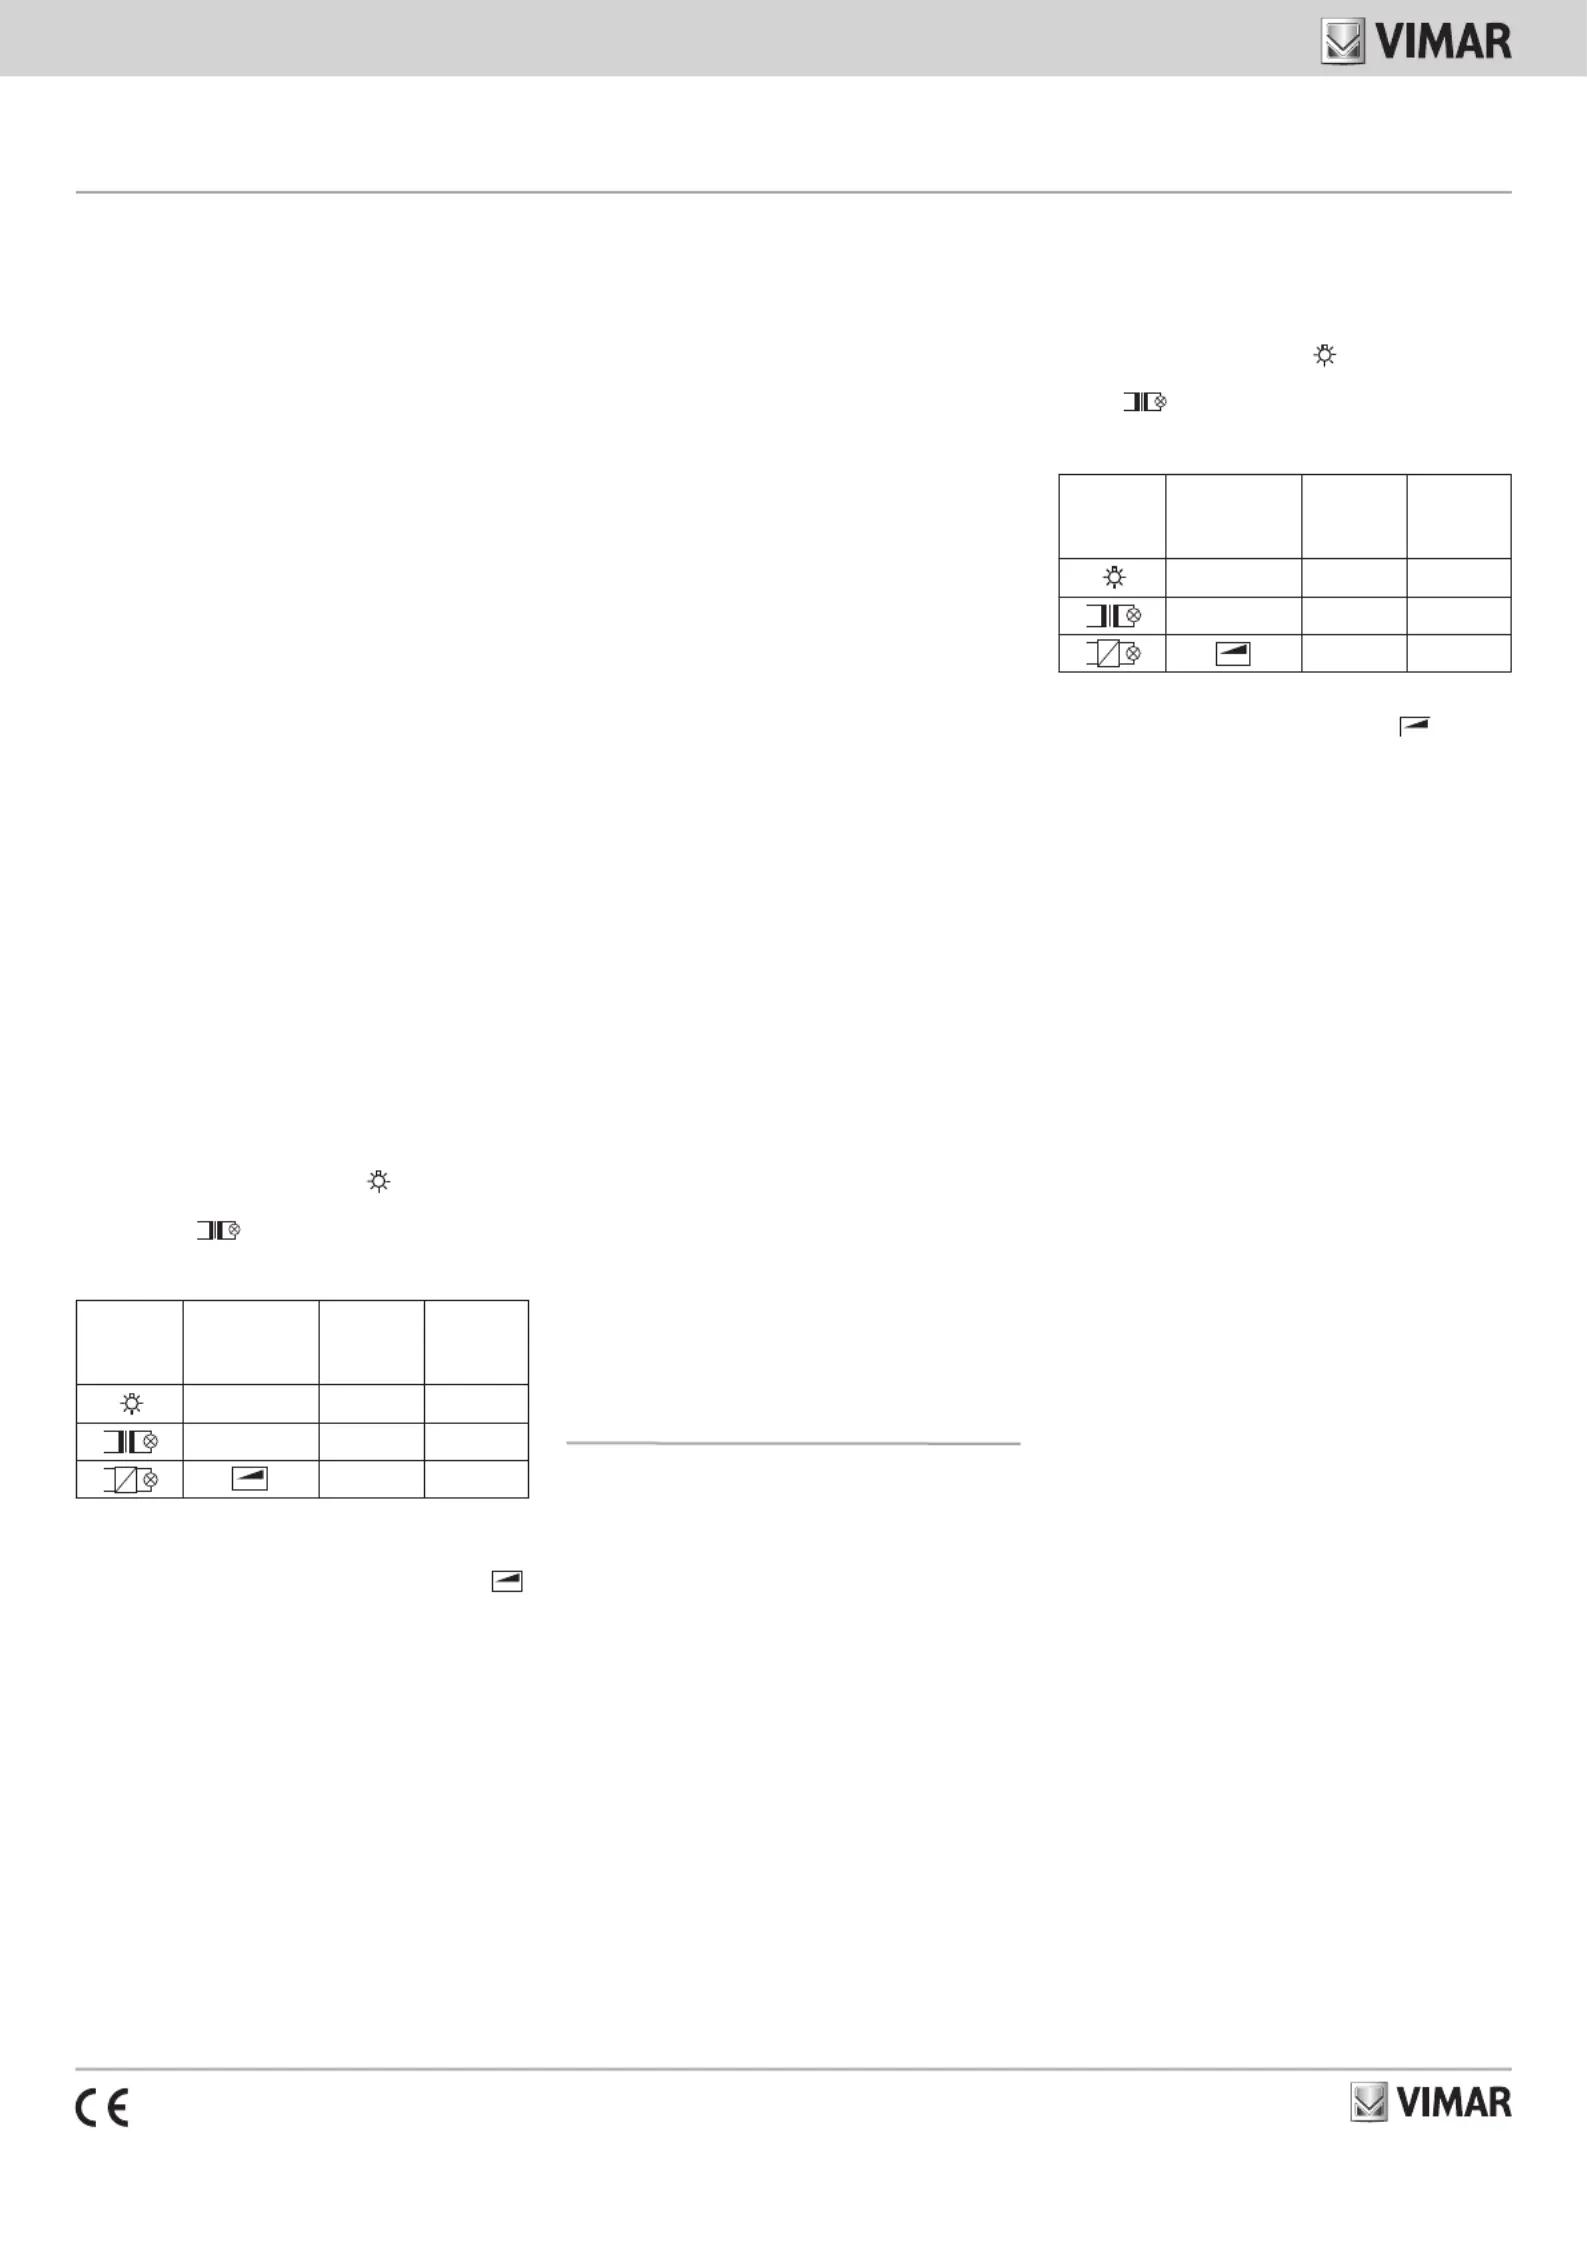
Carichi
comandabili
Caratteristica
del trasformatore
comandabile
20175
16625
14175
MASTER
20161
16601
14161
SLAVE
–
40 - 450 W40 - 500 W
–
40 - 450 VA40 - 500 VA
L
40 - 300 VA40 - 300 VA
• Se la spia luminosa lampeggia all’accensione controllare ed
eventualmente sostituire il carico (carico in cortocircuito).
• Se la spia luminosa lampeggia dopo che il carico è stato
acceso, l’installazione non è stata effettuata eseguita cor-
rettamente provocando l’intervento della protezione termica.
Far verificare l’installazione da un tecnico specializzato.
CODIFICA DEL RICEVITORE A INFRAROSSI
E PROGRAMMAZIONE.
• Spegnere il carico.
• Premere contemporaneamente per circa 4 s i seguenti tasti
del telecomando: 1 sinistro e 7 destro. Il LED del ricevitore
da configurare inizierà a lampeggiare (se ci sono più ricevitori
in una stessa stanza, tutti inizieranno a lampeggiare).
• Premere il pulsante del ricevitore da configurare; durante la
pressione di tale pulsante si noterà, per un breve intervallo di
tempo, una modifica del lampeggio del LED.
• Premere, sul telecomando, il tasto che si vuole associare al rice-
vitore di cui sopra; il led diminuisce la velocità del lampeggio.
• Mediante il telecomando, selezionare la modalità di funziona-
mento del LED:
- premendo un qualsiasi dei tasti di sinistra si seleziona la
modalità LED sempre acceso;
- premendo un qualsiasi dei tasti di destra si seleziona la
modalità LED sempre spento;
Attendere, quindi, che il led del dispositivo diventi acceso
fisso o spento a seconda della modalità selezionata.
• Il ricevitore può ora essere comandato dal pulsante prescelto
del telecomando (il comando può essere effettuato anche da
più telecomandi premendo sempre lo stesso tasto in quanto
la memorizzazione avviene sul dispositivo).
Nota: Ognuna delle operazioni sopra descritte deve essere
effettuata entro 30 secondi; allo scadere di tale intervallo di
tempo il dispositivo esce dalla modalità di programmazione.
AVVERTENZE.
• La potenza nominale non deve essere mai superata.
• Non collegare più regolatori in serie tra loro.
•Non utilizzare pulsanti con spia luminosa incorporata.
• Non interporre oggetti fra ricevitore e telecomando (figura 5).
• Non esporre il ricevitore alla luce solare diretta, ne sottoporlo
all’azione diretta di fonti di calore.
• Il regolatore non è provvisto di interruzione meccanica nel cir-
cuito principale e non fornisce quindi separazione galvanica.
• Il circuito sul lato carico deve essere considerato sempre
in tensione.
REGOLE DI INSTALLAZIONE.
L’installazione deve essere effettuata da personale qualificato con
l’osservanza delle disposizioni regolanti l’installazione del mate-
riale elettrico in vigore nel paese dove i prodotti sono installati.
CONFORMITÀ NORMATIVA.
Direttiva BT. Direttiva EMC. Norma EN 60669-2-1.
Infrared receiver with 230 V~ 50 Hz dimmer for 40-450 W incan
-
descent lamps, 40-450 VA ferromagnetic transformers and
40-300 VA inductive response electronic transformers, control
and regulation with built-in button, with 01849 remote control
or from several positions with NO buttons, MASTER function,
MOSFET + TRIAC technology, visible in darkness, grey.
CHARACTERISTICS.
• Power supply: 230 V~ 50 Hz.
• Load on, regulation and off with built-in button, with infrared remote
control 01849 or NO non-luminous buttons connected in parallel.
• Stores the set regulation when the load is switched off
(except in case of power failure).
• Soft start: slowly brings the load up from off to maximum or to
the regulated setting; this increases bulb life by reducing stress
on the filament due to cold starts and avoids dazzling the user.
• Soft end: slowly brings the load down from on to off.
• Protection against short circuits at on with flashing LED warning.
• Protection against overheating with flashing indicator unit.
• MASTER-SLAVE function: so long as the maximum permis-
sible load of each dimmer is not exceeded, a single MASTER
unit can be combined with up to 4 SLAVE devices, for a total
maximum load of 2450 W (VA) - see figure 3.
• Maximum range of operation for multiple position control: 100 m.
• Infrared control, protocol RC5.
• Operating temperature: -5 °C - +35 °C.
CONNECTIONS.
Install the unit with a fuse carrier with fast-blow fuse with high
breaking capacity type F2.5AH 250 V~ (07050.HF.2.5) as
shown in figures 2 and 3 on the last page.
LOADS CONTROLLED.
• Incandescent and halogen lights : 40-450 W.
• Ferromagnetic transformers for very low voltage halogen
lamps : 40-450 VA.
• Dedicated VIMAR 01860.60 electronic transformers, max 4
units, or VIMAR 01860.105, max 3 units.
Loads
controlled
Characteristics
of the transformer
20175
16625
14175
MASTER
20161
16601
14161
SLAVE
–
40 - 450 W40 - 500 W
–
40 - 450 VA40 - 500 VA
L
40 - 300 VA40 - 300 VA
CONSTRUCTOR FURTHER INFORMATION.
• Electronic transformers with inductive response
L
: 40-300 VA
230 V~ 50 Hz (300 VA max up to 3 transformers, 240 VA max
for 4 transformers; do not connect more than 4 transformers).
• Not suited to motor control (e.g. ceiling fans, extractors).
• If installing 2 dimmer in the same mounting box, the loads
controlled by each dimmer must be reduced so that their total
does not exceed the indicated values.
DICHIARAZIONI SUPPLEMENTARI A CURA
DEL COSTRUTTORE
.
• Trasformatori elettronici con comportamento induttivo
L
: 40-300 VA 230 V~ 50 Hz (300 VA max nel caso vengano
collegati da 1 a 3 trasformatori, 240 VA max nel caso vengano
collegati 4 trasformatori; non collegare più di 4 trasformatori).
• Non adatti al comando di motori (es. agitatori d’aria, aspiratori).
• Nel caso di installazione di 2 regolatori nella stessa scatola, i
carichi comandabili da ciascun regolatore devono essere ridotti
in modo che la loro somma non superi i valori indicati.
FUNZIONAMENTO.
• L’accensionespegnimentoe lo avvengono premendo rapida-
mente uno dei pulsanti collegati, quello incorporato sul dispositivo
o il tasto del telecomando che è stato associato al ricevitore.
• La regolazione avviene tenendo premuto il pulsante o il
tasto del telecomando; per invertire il senso di regolazione
interrompere e ripristinare la pressione. Quando si è raggiunta
la massima o la minima accensione del carico, la regolazione
si interrompe e può essere invertita rilasciando e premendo
nuovamente il pulsante o il tasto.
• Se la spia luminosa non si accende controllare il fusibile ed
eventualmente sostituirlo con un altro dello stesso modello.
OPERATION.
• Loads can be by briefly pressing one switched on and off
of the connected buttons, the button on the unit itself or the
button on the remote control assigned to the receiver.
• To regulatethe load, hold down the button on the unit or the
remote control; to reverse the direction of regulation, release the
button and then hold it down again. When the maximum or mini-
mum value of the load is reached, the regulation stops and can be
reversed by releasing and then holding down the button again.
• If the LED does not light up, check the fuse and replace it
with another of the same type if necessary.
• If the LED flashes when switching a load on, check and
replace the load if necessary (load short circuit).
• If the LED flashes after a load has been switched on, the system
has not been correctly installed and the thermal cutout has
tripped. Have the installation checked by a qualified technician.
CODING THE INFRARED RECEIVER AND
PROGRAMMING.
• Switch off the load.
• Hold the following remote control buttons down together for
4 seconds: 1 left and 7 right. The receiver’s LED will start
flashing (If there are several receivers in the room, they will all
start flashing).
• Press the button on the receiver being configured; the LED will
flash differently for a short time when you press the button.
• On the remote control, press the key you wish to assign to the
receiver; the LED blinks more slowly.
• Using the remote control, select the LED operating mode:
- pressing any one of the left-hand keys selects the LED
always on mode;
- pressing any one of the right-hand keys selects the LED
always off mode;
Then wait for the device’s LED to come on with a steady light
or turn off according to the selected mode.
• The receiver can now be operated with the selected remote
control button (this can be done with any remote control
using the same button, since the assignment is made on the
receiver itself).
Note: Each of the above operations must be completed within
30 seconds, otherwise the unit will exit from programming
mode.
WARNINGS.
• Do not exceed the nominal power
• Do not hook up regulators in series
•Do not use buttons with built-in indicator unit
• Do not place anything between the receiver and remote
control (see figure 5)
• Do not expose the receiver to direct sunlight or sources of heat.
• The regulator is not equipped with a mechanical circuit
breaker and thus does not provide galvanic circuit breaking
Tuotetiedot
| Merkki: | Vimar |
| Kategoria: | Himmennin |
| Malli: | 20175 |
Tarvitsetko apua?
Jos tarvitset apua merkille Vimar 20175 esitä kysymys alla ja muut käyttäjät vastaavat sinulle
Himmennin Vimar Käyttöohjeet

9 Joulukuuta 2024
9 Joulukuuta 2024
9 Joulukuuta 2024
9 Joulukuuta 2024
9 Joulukuuta 2024
9 Joulukuuta 2024
9 Joulukuuta 2024
9 Joulukuuta 2024
9 Joulukuuta 2024
9 Joulukuuta 2024
Himmennin Käyttöohjeet
Viimeisimmät Himmennin Käyttöohjeet
2 Huhtikuuta 2025
12 Maaliskuuta 2025
11 Tammikuuta 2025
11 Tammikuuta 2025
11 Tammikuuta 2025
10 Tammikuuta 2025
4 Joulukuuta 2024
17 Lokakuuta 2024
17 Lokakuuta 2024
17 Lokakuuta 2024