Crestron CLW-DIMFLVEX-P Käyttöohje
Lue alta 📖 käyttöohje suomeksi merkille Crestron CLW-DIMFLVEX-P (2 sivua) kategoriassa Himmennin. Tämä opas oli hyödyllinen 62 henkilölle ja sai 4.0 tähden keskimäärin 9 käyttäjältä
Sivu 1/2
CLW-DIMFLVEX-P/CLW-DIMFLVEX-277-P
In-Wall 0–10 V Dimmer
Installation Guide
Description
The Crestron
®
CLW-DIMFLVEX-P and CLW-DIMFLVEX-277-P are Cameo
®
in-wall
0–10 V dimmers designed for dimming 0–10 V ballasts or LED drivers, which features
eld-replaceable, engravable buttons. Along with the entire line of Cameo products, they
can be congured with various button layouts and designer colors, making the dimmers
more versatile and affordable than previous generations of in-wall dimmers. Their
streamlined design matches the entire line of Cameo dimmers, switches, and keypads,
making them a great addition to new or retrot installations. In addition to their attractive
look and feel, inNET EX
®
communications technology brings proven reliability to the
CLW-DIMFLVEX-P and CLW-DIMFLVEX-277-P.
The CLW-DIMFLVEX-P and CLW-DIMFLVEX-277-P are functionally identical. For
simplicity within this guide, the term “CLW-DIMFLVEX-P” is used except where noted.
Installation
WARNING: To avoid re, shock, or death, turn off the power at the circuit breaker or
fuse and test that the power is off before wiring!
CAUTION: Check new installations for short circuits prior to installing a
CLW-DIMFLVEX-P dimmer. With the power off, close the circuit and then restore
power. If the lights do not work, or a breaker trips, check and correct the wiring or
xture (if necessary). Install the dimmer only when the short is no longer present. The
warranty is void if the dimmer is installed and operated with a shorted load.
NOTE: There is no air-gap switch within the unit. Turning the unit off by pressing
bottom button provides a mechanical air-gap. Turning the power off at the breaker
before performing any servicing on lamps is recommended.
NOTE: Observe the following points:
• Install and use this product in accordance with appropriate electrical codes and
regulations.
• A licensed electrician should install this product.
NOTE: Before using the CLW-DIMFLVEX-P, ensure the device is using the latest
rmware. Check for the latest rmware for the CLW-DIMFLVEX-P at
www.crestron.com/rmware. Load the rmware onto the device using Crestron
Toolbox™ software.
NOTE: Multigang installations do not require derating.
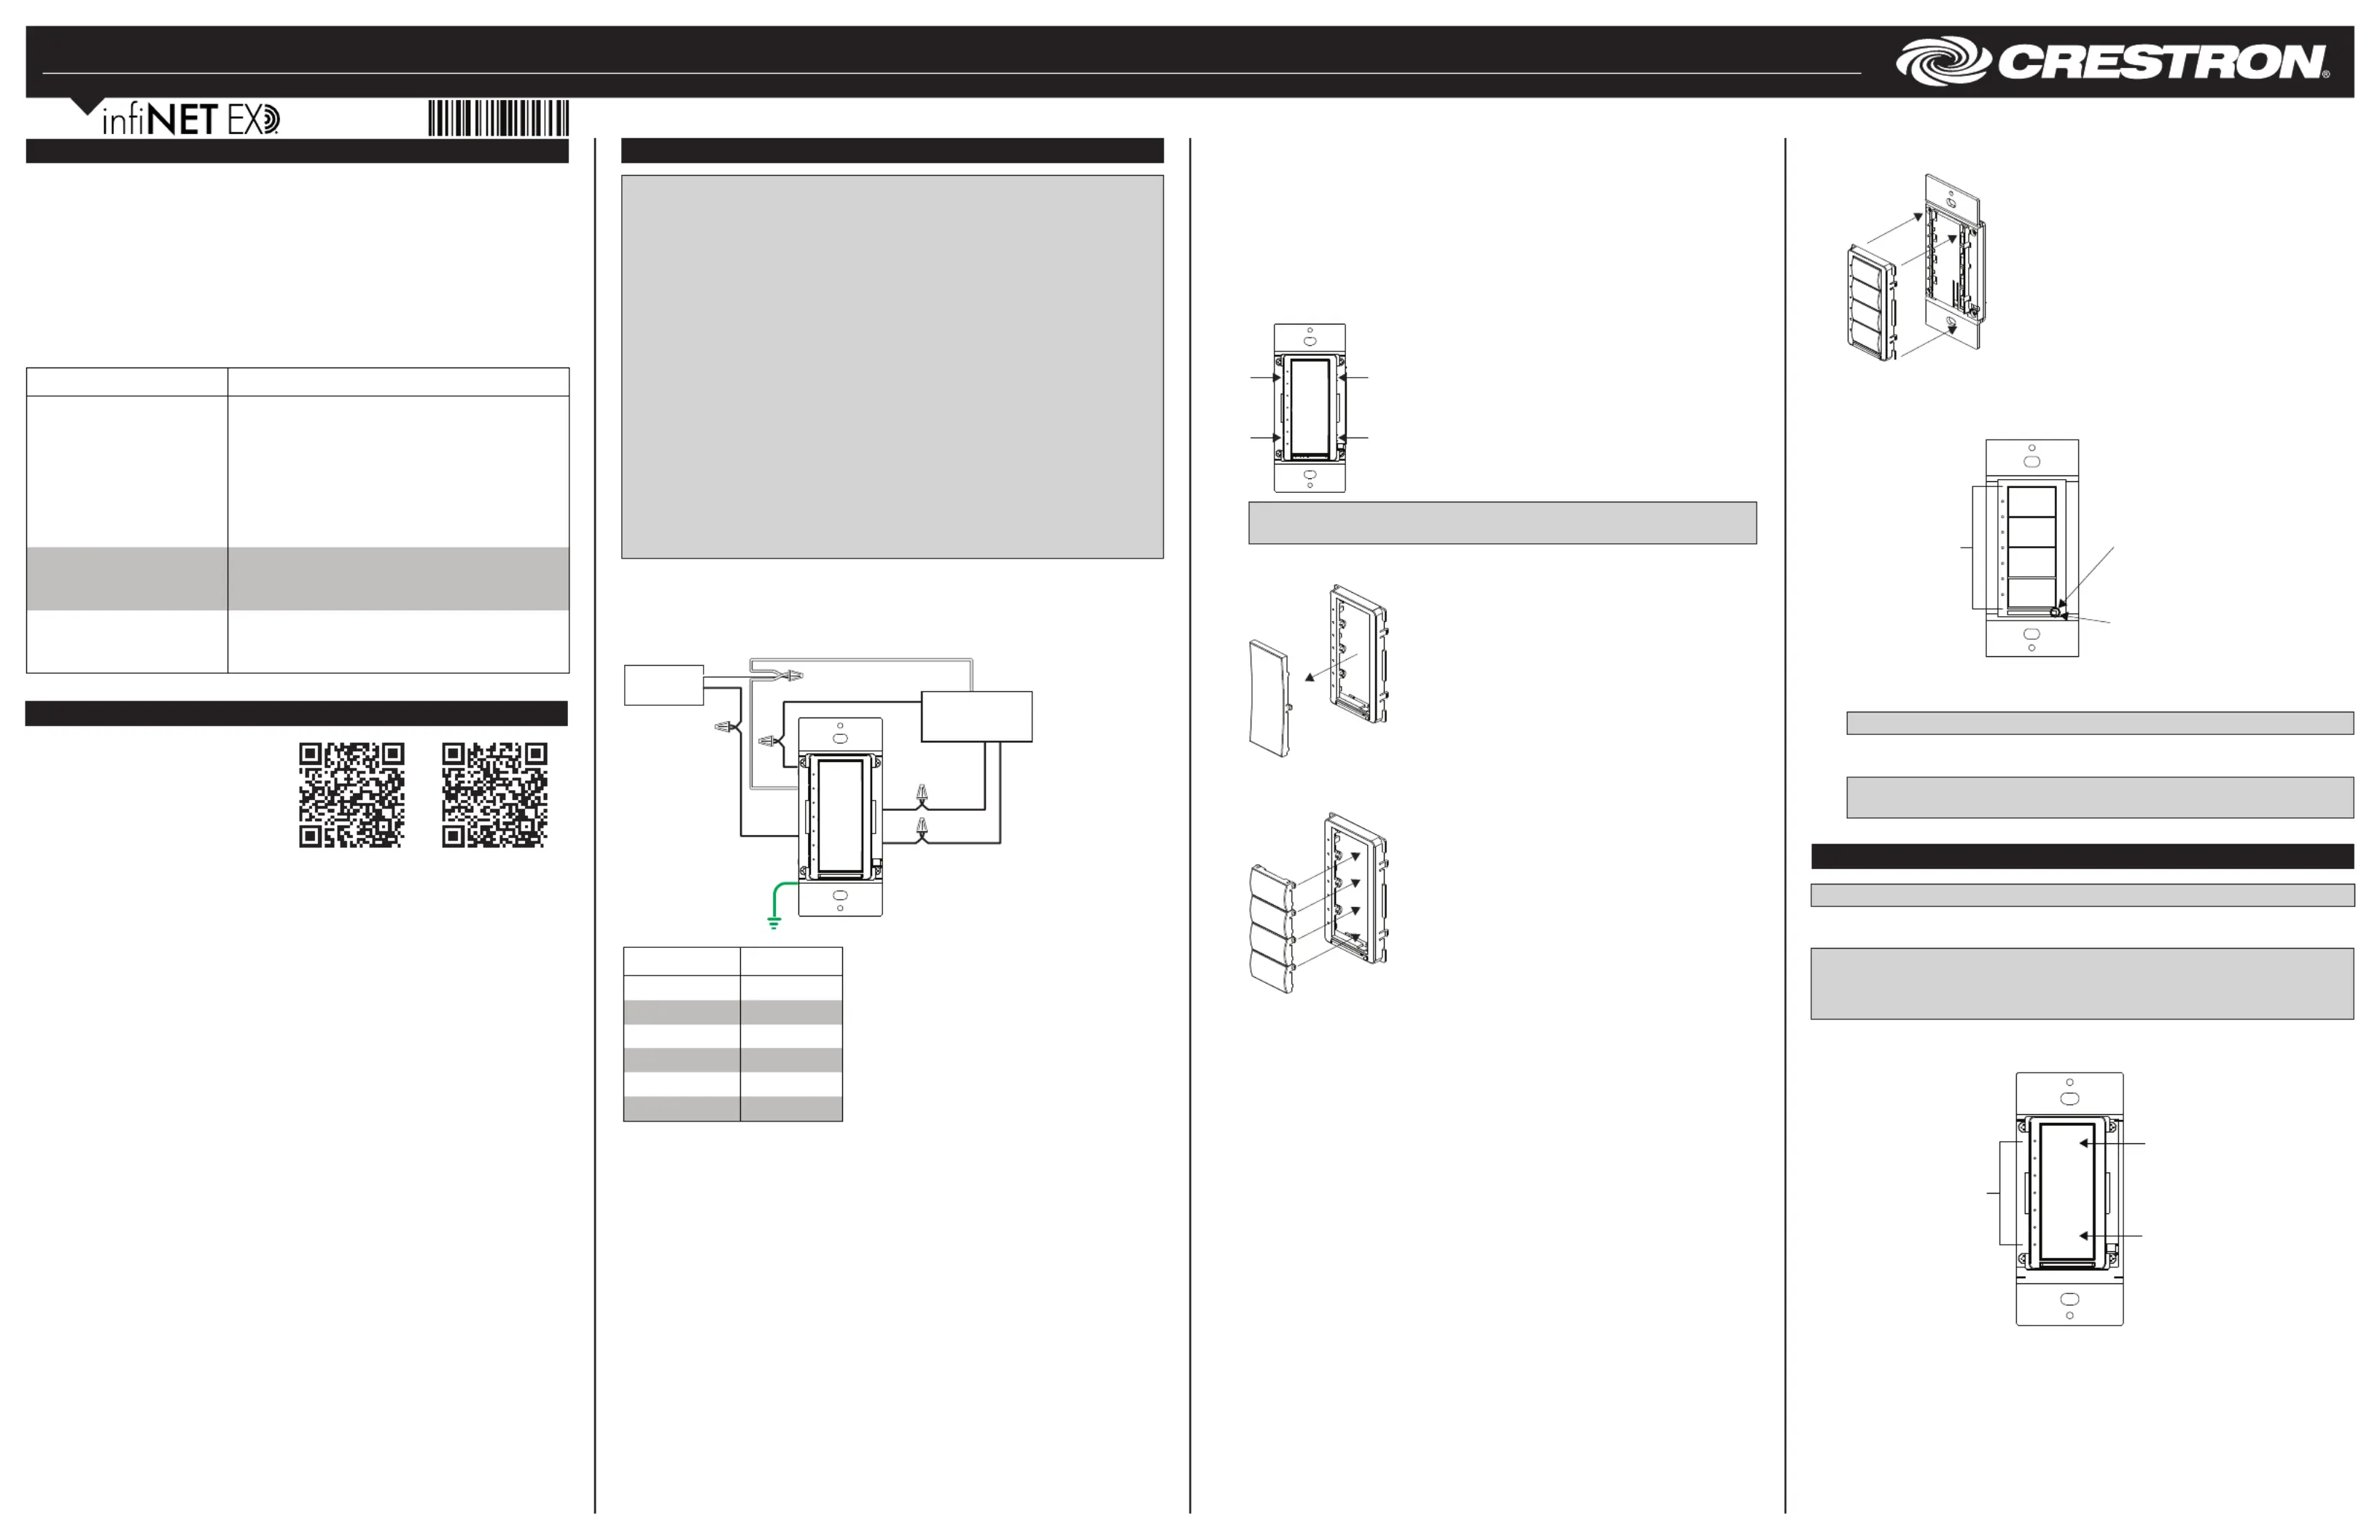
Install the CLW-DIMFLVEX-P dimmer.
1. Turn the power off at the circuit breaker.
2. Wire the device as shown in the following diagram.
Additional Resources
Visit the product page on the Crestron
website (www.crestron.com) for
additional information and the latest
rmware updates. Use a QR reader
application on your mobile device to scan
the QR image.
CLW-DIMFLVEX-PCLW-DIMFLVEX-277-P
3. Push all power wires back into the electrical box and fasten the device to the
electrical box with the provided screws.
4. Attach a decorative faceplate.
5. Ensure all buttons, including the program button, actuate without sticking.
6. Restore power at the circuit breaker.
Switched line
Line
Neutral
Ground
From
breaker
+
0–10 V Ballast
or Driver
-
Changing Button Assemblies
The button assembly can be removed and replaced with other button assemblies.
1. As shown in the following diagram, remove the button assembly by squeezing the
sides of the bezel near the bezel snaps.
Squeeze at arrow
points and pull to
remove the button
assembly.
NOTE: When the button assembly is removed, power to the unit and load is
removed automatically.
2. Remove button(s) from the front of the button assembly as shown in the following
diagram.
3. Insert new buttons through the front of the bezel and snap into place as shown in
the following diagram. Ensure that the LED strip is on the left side.
4. Attach the button assembly to the device as shown in the following diagram.
Ensure that the LED strip is on the left side.
Gently spread the
frame apart to
remove the buttons.
Gently spread the
frame apart to insert
the buttons.
5. Once power has been restored, press and hold the program button as shown in
the following diagram. After 5 seconds, some LEDs start ashing. Continue to hold
the button and proceed to step 6.
6. While holding the program button, tap all of the buttons in the new layout. The LED
next to the tapped button lights.
NOTE: If the rocker switch is installed, press the top and bottom of the rocker.
7. After all of the buttons have been tapped, release the program button to save the
settings.
NOTE: Changing the button conguration alters the device’s behavior. Refer to
"Default Button Functions" for details.
Step 5:
Press and hold
the program
button.
Step 7:
Release the
program button
to save the
settings.
Step 6:
Tap each of the
installed buttons
on the device.
Operation
NOTE: The device may be warm during operation. This is normal.
The CLW-DIMFLVEX-P is shipped with a rocker switch already installed. In this
conguration, the unit functions as shown below.
NOTE: Operation described in this guide assumes the CLW-DIMFLVEX-P is operating
in Local mode (without the use of a control system). The device can also operate in
Remote mode, in which button behavior is dictated entirely by the control system
program.
LEDs indicate the
load level. When all
loads are off, the
top LED remains
dimly lit to act as a
night light.
Tap to turn the load
on. Press and hold
to raise the light
level.
Tap to turn the load
off. Press and hold
to lower the light
level.
Wire Color
HOT or LINE Black
Neutral White
Ground Green
Switched Line Red
+ Purple
-Gray
SPECIFICATION DETAILS
Load Ratings
Switch Output 5 A
Dimmer Control Output Isolated 0–10 Vdc signal output (60 mA sink/source);
Mechanically latching relay
Dimmed Load Type 0–10 Vdc fluorescent ballast, 0–10 Vdc LED driver
Switched Load Type Incandescent, ELV, MLV, electronic fluorescent
ballast, LED Ballast, HID
Power Requirements
CLW-DIMFLVEX-P
CLW-DIMFLVEX-277-P
120 Vac 50/60 hz
277 Vac 50/60 hz
Environmental
Temperature
Humidity
32° to 104 °F (0° to 40 °C)
10% to 90% RH (noncondensing)
Tuotetiedot
| Merkki: | Crestron |
| Kategoria: | Himmennin |
| Malli: | CLW-DIMFLVEX-P |
Tarvitsetko apua?
Jos tarvitset apua merkille Crestron CLW-DIMFLVEX-P esitä kysymys alla ja muut käyttäjät vastaavat sinulle
Himmennin Crestron Käyttöohjeet

2 Huhtikuuta 2025
12 Maaliskuuta 2025
Himmennin Käyttöohjeet
Viimeisimmät Himmennin Käyttöohjeet
11 Tammikuuta 2025
11 Tammikuuta 2025
11 Tammikuuta 2025
10 Tammikuuta 2025
9 Joulukuuta 2024
9 Joulukuuta 2024
9 Joulukuuta 2024
9 Joulukuuta 2024
9 Joulukuuta 2024
9 Joulukuuta 2024