TFA 60.3541.09 Käyttöohje
Lue alta 📖 käyttöohje suomeksi merkille TFA 60.3541.09 (3 sivua) kategoriassa køleskab. Tämä opas oli hyödyllinen 35 henkilölle ja sai 4.4 tähden keskimäärin 8 käyttäjältä
Sivu 1/3
k
Bedienungsanleitung
Funkuhr
Kat. Nr. 60.3541.xx
1.Sicherheitshinweise
WARNUNG
•
Halten Sie das Gerät und die Batterie außerhalb der Reichweite von Kin-
dern.
•
Kleinteile können von Kindern (unter drei Jahren) verschluckt werden.
•
Batterien enthalten gesundheitsschädliche Säuren und können bei Ver-
schlucken lebensgefährlich sein. Wenn Sie vermuten, eine Batterie könnte
verschluckt oder anderweitig in den Körper gelangt sein, nehmen Sie
sofort medizinische Hilfe in Anspruch.
•
Batterien nicht ins Feuer werfen, kurzschließen, auseinandernehmen oder
aufladen. Explosionsgefahr!
•
Um ein Auslaufen der Batterien zu vermeiden, sollten schwache Batterien
möglichst schnell ausgetauscht werden. Achten Sie auf die richtige Polari-
tät beim Einlegen der Batterien. Entfernen Sie die Batterien, wenn Sie das
Gerät längere Zeit nicht verwenden. Beim Hantieren mit ausgelaufenen
Batterien chemikalienbeständige Schutzhandschuhe und Schutzbrille tra-
gen!
ACHTUNG
•
Das eigenmächtige Reparieren, Umbauen oder Verändern des Gerätes ist
nicht gestattet.
•
Setzen Sie das Gerät keinen extremen Temperaturen, Vibrationen und
Erschütterungen aus.
•
Reinigen Sie das Gerät mit einem weichen, leicht feuchten Tuch. Keine
Scheuer- oder Lösungsmittel verwenden!
•
Vor Feuchtigkeit schützen!
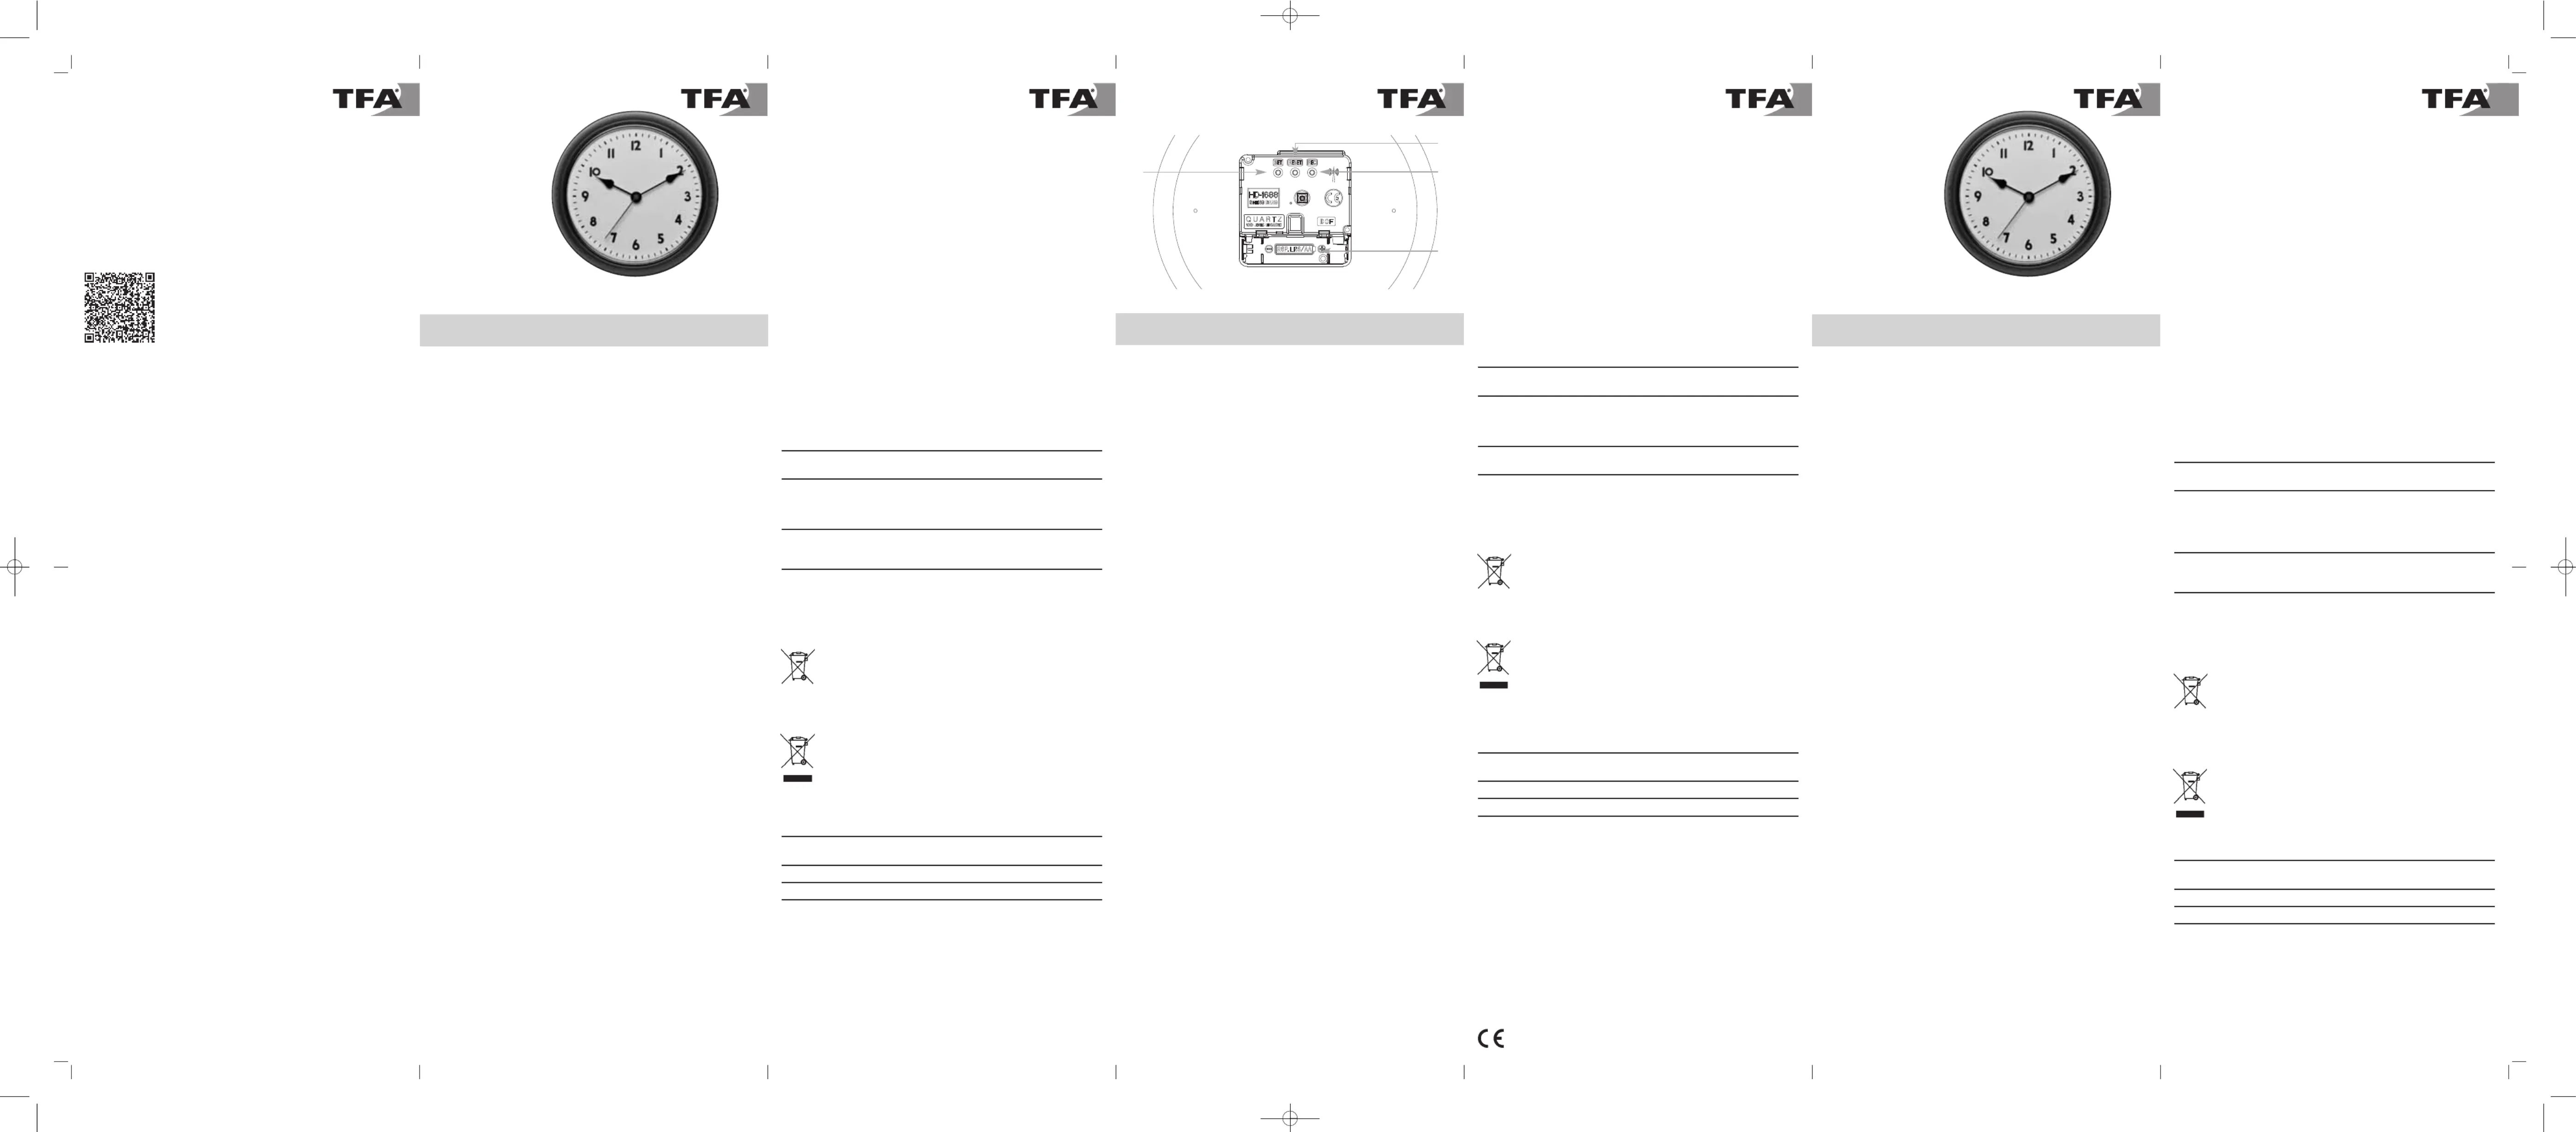
2.Bestandteile
A:Batteriefach
B:SET Taste
C:RESETTaste
D:REC Taste
3.Inbetriebnahme
•
Legen Sie eine neue Batterie 1,5 V AA polrichtig ein.
•
Das Gerät ist jetzt betriebsbereit.
Empfang der Funkzeit DCF
•
Die Zeiger stellen sich auf 12.00 Uhr.
•
Die Uhr versucht nun, das Funkuhrsignal zu empfangen.
•
Wenn der Zeitcode nach 3-12 Minuten empfangen wurde, wird die funkge-
steuerte Zeit angezeigt.
•
Der DCF-Signalempfang findet 12-mal täglich statt.
Hinweis: Empfang der Funkzeit
•
Die Zeitübertragung erfolgt von einer Atomuhr in der Nähe von Frankfurt
am Main durch ein DCF-77 (77.5 kHz) Frequenzsignal mit einer Reichweite
von ca. 1.500 km. Ihre Funkuhr empfängt das Signal, wandelt es um und
zeigt immer die exakte Zeit an. Auch die Umstellung von Sommer- und Win-
terzeit erfolgt automatisch.
•
Vermeiden Sie die Nähe von Störquellen wie Computerbildschirmen, Fern-
sehgeräten oder massiven Metallgegenständen. In Stahlbetonbauten (Kel-
lern, Aufbauten) ist das empfangene Signal natürlicherweise schwächer. In
Extremfällen wird empfohlen, das Gerät in Fensternähe zu platzieren.
•
Nachts sind die atmosphärischen Störungen meist geringer. Ein einziger
Empfang pro Tag genügt, um die Genauigkeit (±1 Sekunde) zu gewährlei-
sten.
k
Vielen Dank, dass Sie sich für dieses Gerät aus dem Hause TFA entschieden
haben.
Bevor Sie mit dem Gerät arbeiten
•
Lesen Sie sich bitte die Bedienungsanleitung genau durch.
Die Bedienungsanleitung liegt dem Gerät bei oder zum Download unter
www.tfa-dostmann.de/service/downloads/anleitungen
•
Verwenden Sie das Gerät nicht anders, als in der Anleitung dargestellt wird.
•
Durch die Beachtung der Bedienungsanleitung vermeiden Sie auch
Beschädigungen des Gerätes und die Gefährdung Ihrer gesetzlichen Män-
gelrechte durch Fehlgebrauch.
•
Beachten Sie besonders die Sicherheitshinweise!
•
Bewahren Sie die Bedienungsanleitung gut auf!
t
Thank you for choosing this instrument from TFA.
Before you use this product
•
Please make sure you read the instruction manual carefully.
•
The operating instructions are enclosed with the device or can be downloa-
ded at
www.tfa-dostmann.de/en/service/downloads/instruction-manuals
•
This product should only be used as described within these instructions.
•
Following and respecting the instructions in your manual will prevent dama-
ge to your instrument and loss of your statutory rights arising from defects
due to incorrect use.
•
Please take particular note of the safety advice!
•
Please keep this instruction manual safe for future reference.
p
Nous vous remercions d'avoir choisi l'appareil de la société TFA.
Avant d'utiliser votre appareil
•
Veuillez lire attentivement le mode d'emploi.
•
Le mode d'emploi est joint à l'appareil ou peut être téléchargé à l'adresse
suivante
www.tfa-dostmann.de/en/service/downloads/instruction-manuals
•
N'utilisez jamais l’appareil à d'autres fins que celles décrites dans le pré-
sent mode d'emploi.
•
En respectant ce mode d'emploi, vous éviterez d'endommager votre appa-
reil et de perdre vos droits légaux en cas de défaut si celui-ci résulte d’une
utilisation non-conforme.
•
Suivez bien toutes les consignes de sécurité !
•
Conservez soigneusement le mode d'emploi !
C
Vi ringraziamo per aver scelto l'apparecchio della TFA.
Prima di utilizzare l'apparecchio
•
Leggete attentamente le istruzioni per l'uso.
•
Le istruzioni per l'uso sono allegate all'apparecchio o possono essere sca-
ricate da
www.tfa-dostmann.de/en/service/downloads/instruction-manuals
•
Non utilizzate il prodotto in maniera diversa da quanto descritto in queste
istruzioni.
•
Seguendo le istruzioni per l'uso, eviterete anche di danneggiare il prodotto
e di pregiudicare, a causa di un utilizzo scorretto, i diritti del consumatore
che vi spettano per legge.
•
Prestate particolare attenzione alle misure di sicurezza!
•
Conservate con cura le istruzioni per l'uso.
4.Bedienung
4.1 SET Taste - Manuelle Einstellung der Uhrzeit
•
Falls die Funkuhr kein DCF-Signal empfangen kann (z.B. wegen Störun-
gen, Übertragungsdistanz, etc.), kann die Zeit manuell eingestellt werden.
•
Halten Sie die Taste für drei Sekunden gedrückt SET
•
Halten Sie nun die Taste gedrückt, bis die aktuelle Uhrzeit angezeigtSET
wird.
•
Drücken Sie die Taste nur kurz, rückt der Zeiger eine Minute vor.SET
•
Drücken Sie die Taste oder warten Sie 8 Sekunden, das Gerät über-REC
nimmt dann automatisch die Einstellung.
•
Bei erfolgreichem Empfang des DCF-Signals wird die manuell eingestellte
Zeit überschrieben.
4.2 REC Taste
•
Sie können die Initialisierung auch manuell starten.
•
Drücken Sie für drei Sekunden die REC Taste.
•
Die Zeiger stellen sich auf 12.00 Uhr.
•
Die Funkuhr versucht nun, die Funkzeit erneut zu empfangen.
4.3 RESET Taste
•
Drücken Sie die Taste mit einem spitzen Gegenstand, wenn dieRESET
Funkuhr nicht einwandfrei funktioniert.
5.Fehlerbeseitigung
ProblemLösung
Keine Zeigerbewegung➜ Batterie polrichtig einlegen
➜ Batterie wechseln
Kein DCF EmpfangInitialisierung manuell starten➜
➜ Empfangsversuch in der Nacht abwarten
➜ Anderen Aufstellort für das Gerät wählen
➜ Uhrzeit manuell einstellen
Unkorrekte AnzeigeTaste mit einem spitzen Gegenstand➜ RESET
drücken
➜ Batterie wechseln
Wenn Ihr Gerät trotz dieser Maßnahmen immer noch nicht funktioniert, wen-
den Sie sich an den Händler, bei dem Sie das Produkt gekauft haben.
6. Entsorgung
Dieses Produkt wurde unter Verwendung hochwertiger Materialien und
Bestandteile hergestellt, die recycelt und wiederverwendet werden können.
Batterien und Akkus dürfen keinesfalls in den Hausmüll!
Als Verbraucher sind Sie gesetzlich verpflichtet, gebrauchte Bat-
terien und Akkus zur umweltgerechten Entsorgung beim Handel
oder entsprechenden Sammelstellen gemäß nationalen oder
lokalen Bestimmungen abzugeben.
Die Bezeichnungen für enthaltene Schwermetalle sind:
Cd=Cadmium, Hg=Quecksilber, Pb=Blei
Dieses Gerät ist entsprechend der EU-Richtlinie über die Entsor-
gung von Elektro- und Elektronik-Altgeräten (WEEE) gekenn-
zeichnet.
Dieses Produkt darf nicht mit dem Hausmüll entsorgt werden.
Der Nutzer ist verpflichtet, das Altgerät zur umweltgerechten
Entsorgung bei einer ausgewiesenen Annahmestelle für die Ent-
sorgung von Elektro- und Elektronikgeräten abzugeben.
7. Technische Daten
SpannungsversorgungBatterie 1 x 1,5 V AA (nicht inklusive)
Verwenden Sie Alkaline Batterien.
GehäusemaßeØ 240 x 68 mm
Gewicht551 g (nur das Gerät)
Diese Anleitung oder Auszüge daraus dürfen nur mit Zustimmung von TFA Dostmann veröffentlicht wer-
den. Die technischen Daten entsprechen dem Stand bei Drucklegung und können ohne vorherige
Benachrichtigung geändert werden. Die neuesten technischen Daten und Informationen zu Ihrem Produkt
finden Sie auf unserer Homepage unter Eingabe der Artikel-Nummer in das Suchfeld.
EU-Konformitätserklärung
Hiermit erklärt TFA Dostmann, dass der Funkanlagentyp 60.3541 der Richtlinie 2014/53/EU entspricht.
Der vollständige Text der EU-Konformitätserklärung ist unter der folgenden Internetadresse verfügbar:
www.tfa-dostmann.de/service/downloads/ce
www.tfa-dostmann.de
E-Mail: info@tfa-dostmann.de
TFA Dostmann GmbH & Co.KG, Zum Ottersberg 12, D-97877 Wertheim, Deutschland11/20
k
Bedienungsanleitung
Funkuhr
Kat. Nr. 60.3541.xx
Kat. Nr. 60.3541.xx
k
Bedienungsanleitung
t
Instruction manual
p
Mode d’emploi
C
Istruzioni per l'uso
N
Gebruiksaanwijzing
m
Instrucciones de uso
j
Návod k použití
U
Bruksanvisning
P
Instrukcja obsługi
p
Mode d'emploi
Horloge radio-pilotée
Réf. 60.3541.xx
1.Consignes de sécurité
AVERTISSEMENT
•
Opérez votre appareil et la pile hors de la portée des enfants.
•
Les petites pièces peuvent être avalées par les enfants (moins de trois
ans).
•
Les piles contiennent des acides nocifs pour la santé et peuvent être mor-
telles dans le cas d’une ingestion. Si vous craignez qu’une pile ait pu être
avalée ou ingérée d’une autre manière, quelle qu’elle soit, contactez
immédiatement un médecin d’urgence.
•
Ne jetez jamais de piles dans le feu, ne les court-circuitez pas, ne les
démontez pas et ne les rechargez pas. Risque d'explosion !
•
Une pile faible doit être remplacée le plus rapidement possible afin d'éviter
toute fuite. Veillez à la bonne polarité des piles. Retirez les piles si vous
n'utilisez pas votre appareil pendant une durée prolongée. Pour manipuler
des piles qui ont coulé, utilisez des gants de protection chimique spéciale-
ment adaptés et portez des lunettes de protection !
ATTENTION
•
Vous ne devez en aucun cas réparer, démonter ou modifier l'appareil par
vous-même.
•
Évitez d’exposer l’appareil à des températures extrêmes, à des vibrations
ou à des chocs.
•
Pour le nettoyage de votre appareil, utilisez un chiffon doux et humide.
N’utilisez pas de solvants ou d'agents abrasifs !
•
Protégez-la contre l'humidité !
2.Composants
A:Compartiment à pile
B:Touche SET
C:Touche RESET
D:Touche REC
3.Mise en service
•
Insérez une nouvelle pile de type 1,5 V AA, en respectant la polarité +/- .
•
Votre appareil est maintenant prêt à fonctionner.
Réception de l'heure radio
•
Les aiguilles se déplacent à 12.00 heures.
•
L’horloge cherche le signal radio.
•
Dès la réception du code horaire après 3-12 minutes, l’heure radio s’affi-
che.
•
La réception du signal DCF a lieu 12 fois par jour.
Consignes pour la réception de l'heure radio
•
La transmission de l’heure radio s’effectue via une horloge atomique près
de Francfort-sur-le-Main, avec un signal DCF-77 (77,5 kHz) d'une portée
d’environ 1 500 km. Votre horloge radio-pilotée reçoit le signal, le convertit
et affiche l'heure précise. Le passage de l'heure d'hiver à l'heure d'été et
vice-versa s'effectue également automatiquement.
•
Évitez la proximité de sources d'interférence telles que les écrans d'ordina-
teur, les téléviseurs ou les objets métalliques solides. Dans les bâtiments
en béton armé (caves, greniers aménagés), le signal reçu est affaibli. Dans
les cas extrêmes, nous vous conseillons de placer l’appareil près d’une
fenêtre.
•
La nuit, les perturbations s’affaiblissent en règle générale. Une seule
réception par jour suffit pour maintenir d’éventuels écarts en dessous
d'1 seconde.
4.Utilisation
4.1 Touche SET - Réglage manuel de l'heure
•
Si votre horloge radio-pilotée ne peut pas recevoir le signal DCF (par
exemple en cas de perturbations, d'une distance de transmission excessi-
ve etc.), vous pouvez régler l'horaire manuellement.
•
Appuyez sur la touche pendant trois secondes.SET
•
Maintenez la touche SET appuyée jusqu'à ce que l'heure correcte soit affi-
chée.
•
Appuyez sur la touche brièvement et l’aiguille avancera d’une minute.SET
•
Appuyez sur la touche ou attendez 8 secondes pour confirmer l'en-REC
trée.
•
Lorsque la réception du signal DCF a abouti, l'heure ajustée manuellement
sera remplacée par l’heure radio.
4.2 Touche REC
•
Vous pouvez également activer manuellement la réception.
•
Appuyez sur la touche pendant trois secondes. REC
•
Les aiguilles se déplacent à 12.00 heures.
•
L’horloge cherche à nouveau le signal radio.
4.3 Touche RESET
•
Appuyez sur la touche RESET avec un objet pointu si l’horloge ne fonction-
ne pas correctement.
5.Dépannage
ProblèmeSolution
Aucun mouvement Contrôlez la bonne polarité de la pile➜
des aiguillesChangez la pile➜
Pas de réception DCFActivez manuellement la réception➜
➜ Attendez la réception du signal de nuit
➜ Choisissez une autre position pour votre
appareil
➜ Réglez l'heure manuellement
Affichage incorrectAppuyez sur la touche à l'aide d'un ➜ RESET
objet pointu
➜ Changez la pile
Si votre appareil ne fonctionne toujours pas malgré ces mesures, adressez-
vous au vendeur chez qui vous l'avez acheté.
6. Traitement des déchets
Ce produit a été fabriqué avec des matériaux de haute qualité qui peuvent
être recyclés et réutilisés.
Les piles usagées ne doivent pas être jetées dans les détritus
ménagers.
En tant qu'utilisateur, vous avez l'obligation légale de rapporter
les piles et piles rechargeables usagées à votre revendeur ou de
les déposer dans une déchetterie proche de votre domicile
conformément à la réglementation nationale et locale.
Les métaux lourds sont désignés comme suit :
Cd = cadmium, Hg= mercure, Pb = plomb.
Cet appareil est conforme aux normes de l'UE relatives au traite-
ment des déchets électriques et électroniques (WEEE).
L'appareil usagé ne doit pas être jeté dans les ordures ménagè-
res. L’utilisateur s’engage, pour le respect de l’environnement, à
déposer l’appareil usagé dans un centre de traitement agréé
pour les déchets électriques et électroniques.
7. Caractéristiques techniques
AlimentationPile 1 x 1,5 V AA (non incluse)
Utilisez des piles alcalines.
Dimensions du boîtierØ 240 x 68 mm
Poids 551 g (appareil seulement)
La reproduction, même partielle, du présent mode d'emploi est strictement interdite sans l'accord explici-
te de TFA Dostmann. Les caractéristiques techniques de ce produit ont été actualisées au moment de
l'impression et peuvent être modifiées sans avis préalable. Les dernières données techniques et les infor-
mations concernant votre produit peuvent être consultées en entrant le numéro de l'article sur notre site
Internet.
Déclaration de conformité UE
Le soussigné, TFA Dostmann, déclare que l'équipement radioélectrique du type 60.3541 est conforme
à la directive 2014/53/UE. Le texte complet de la déclaration UE de conformité est disponible à l'adres-
se Internet suivante : www.tfa-dostmann.de/service/downloads/ce
www.tfa-dostmann.de
E-Mail: info@tfa-dostmann.de
TFA Dostmann GmbH & Co.KG, Zum Ottersberg 12, D-97877 Wertheim, Allemagne11/20
p
Mode d'emploi
Horloge radio-pilotée
Réf. 60.3541.xx
t
Instruction manual
Radio-controlled clock
Cat. No. 60.3541.xx
1.Safety notices
WARNING
•
Keep this device and the battery out of reach of children.
•
Small parts can be swallowed by children (under three years old).
•
Batteries contain harmful acids and may be hazardous if swallowed. If you
suspect a battery could have been swallowed or otherwise caught in the
body, seek medical help immediately.
•
Batteries must not be thrown into a fire, short-circuited, taken apart or
recharged. Risk of explosion!
•
Low batteries should be changed as soon as possible to prevent damage
caused by leaking. Make sure the polarities are correct. Remove the bat-
teries if the device will not be used for an extended period of time. Wear
chemical-resistant protective gloves and safety glasses when handling
leaking batteries.
CAUTION
•
Unauthorized repairs, alterations or changes to the product are prohibited.
•
Do not expose the device to extreme temperatures, vibrations or shocks.
•
Clean the instrument with a soft damp cloth. Do not use solvents or scour-
ing agents.
•
Protect it from moisture!
2.Elements
A:Battery compartment
B:SET button
C:RESETbutton
D:REC button
3.Getting started
•
Insert a new battery (1,5 V AA), polarity as indicated.
•
The device is ready for use.
Radio-controlled time reception
•
The clock'shands move to 12.00 o'clock.
•
The clock will now scan the DCF frequency signal.
•
When the time code is received after 3-12 minutes, the radio-controlled
time will be shown.
•
The DCF reception always takes place 12 times a day.
Note on radio-controlled time
•
The time is transmitted from an atomic clock near Frankfurt am Main by a
DCF-77 (77.5 kHz) frequency signal with a range of about 1,500 km. Your
radio-controlled clock receives the signal, converts it and always shows the
exact time. The adjustment of Daylight Saving Time and Standard Time is
also automatic.
•
Make sure to avoid the vicinity of any source of interference such as com-
puter screens, TV sets or solid metal objects. Within concrete walls (rein-
forced with steel) such as basements, the received signal is naturally weak-
ened. In extreme cases, please place the unit close to a window to improve
reception.
•
During night-time, the atmospheric interference is usually less severe.
A single daily reception is adequate to keep the accuracy deviation under
1 second.
4.Operation
4.1 SET button - Manual setting of the clock
•
If the clock cannot detect the DCF-signal (e.g. due to interference, trans-
mitting distance, etc.), the time can be set manually.
•
Press and hold the button for three seconds.SET
•
Press and hold the button until the desired time is indicated.SET
•
Press the button briefly. The clock’s hands move forward minute bySET
minute.
•
Press the button to confirm the setting or wait 8 seconds, the unit willREC
save the setting automatically.
•
The manually set time is overwritten once the DCF time signal is success-
fully received.
4.2 REC button
•
You can also start the initialization manually.
•
Press and hold the button for three seconds. REC
•
The clock’s hands move to 12.00 o'clock.
•
The clock will scan the DCF frequency signal.
4.3 RESET button
•
If the device does not work properly press the button using a pin.RESET
5.Troubleshooting
ProblemSolution
Clock's hands do not move Ensure that the battery polarity is correct➜
➜ Change the battery
No DCF reception➜ Start the initialization manually
➜ Wait for an attempt reception during the night
➜ Choose another place for your device
➜ Set the clock manually
Incorrect indication➜ Press the button using a pinRESET
➜ Change the battery
If your device fails to work despite these measures, contact the retailer where
you purchased the product.
6. Waste disposal
This product has been manufactured using high-grade materials and compo-
nents which can be recycled and reused.
Never dispose of empty batteries and rechargeable batteries
with ordinary household waste.
As a consumer, you are required by law to take them to your retail
store or to an appropriate collection site depending on national
or local regulations in order to protect the environment.
The symbols for the contained heavy metals are:
Cd=cadmium, Hg=mercury, Pb=lead
This product is labelled in accordance with the EU Waste Electri-
cal and Electronic Equipment Directive (WEEE).
Please do not dispose of this product in ordinary household
waste. As a consumer, you are required to take end-of-life
devices to a designated collection point for the disposal of elec-
trical and electronic equipment, in order to ensure environmen-
tally-compatible disposal.
7. Specifications
Power consumptionBattery 1 x AA 1,5 V (not included)
Use alkaline batteries
Housing dimensionØ 240 x 68 mm
Weight551 g (device only)
No part of this manual may be reproduced without written consent of TFA Dostmann. The technical data
are correct at the time of going to print and may change without prior notice. The latest technical data and
information about this product can be found in our homepage by simply entering the product number in
the search box.
EU Declaration of conformity
Hereby, TFA Dostmann declares that the radio equipment type 60.3541 is in compliance with Directive
2014/53/EU. The full text of the EU declaration of conformity is available at the following internet
address: www.tfa-dostmann.de/service/downloads/ce
www.tfa-dostmann.de
E-Mail: info@tfa-dostmann.de
TFA Dostmann GmbH & Co.KG, Zum Ottersberg 12, D-97877 Wertheim, Germany11/20
t
Instruction manual
Radio-controlled clock
Cat. No. 60.3541.xx
B
C
D
A
TFA_No. 60.3541_Anleit_11_20_ 10.11.2020 11:11 Uhr Seite 1
Tuotetiedot
| Merkki: | TFA |
| Kategoria: | køleskab |
| Malli: | 60.3541.09 |
Tarvitsetko apua?
Jos tarvitset apua merkille TFA 60.3541.09 esitä kysymys alla ja muut käyttäjät vastaavat sinulle
køleskab TFA Käyttöohjeet

25 Joulukuuta 2024
14 Joulukuuta 2024
8 Joulukuuta 2024
8 Joulukuuta 2024
8 Joulukuuta 2024
8 Joulukuuta 2024
8 Joulukuuta 2024
8 Joulukuuta 2024
8 Joulukuuta 2024
8 Joulukuuta 2024
køleskab Käyttöohjeet
Viimeisimmät køleskab Käyttöohjeet
9 Huhtikuuta 2025
9 Huhtikuuta 2025
3 Huhtikuuta 2025
2 Huhtikuuta 2025
13 Maaliskuuta 2025
5 Maaliskuuta 2025
5 Maaliskuuta 2025
19 Helmikuuta 2025
28 Tammikuuta 2025
25 Tammikuuta 2025