TFA 60.3044.02 Käyttöohje
Lue alta 📖 käyttöohje suomeksi merkille TFA 60.3044.02 (2 sivua) kategoriassa Kello. Tämä opas oli hyödyllinen 30 henkilölle ja sai 5.0 tähden keskimäärin 7 käyttäjältä
Sivu 1/2
Bedienungsanleitung
Kat. Nr. 60.3044.02
Wanduhr mit Anzeige des Wochentags
Vielen Dank, dass Sie sich für dieses Gerät aus dem Hause TFA ent-
schieden haben.
1. Bevor Sie mit dem Gerät arbeiten
•
Lesen Sie sich bitte die Bedienungsanleitung genau durch.
So werden Sie mit Ihrem neuen Gerät vertraut, lernen alle
Funktionen und Bestandteile kennen, erfahren wichtige Details
für die Inbetriebnahme und den Umgang mit dem Gerät und
erhalten Tipps für den Störungsfall.
•
Durch die Beachtung der Bedienungsanleitung vermeiden Sie
auch Beschädigungen des Gerätes und die Gefährdung Ihrer
gesetzlichen Mängelrechte durch Fehlgebrauch.
•
Für Schäden, die aus Nichtbeachtung dieser Bedienungsanlei-
tung verursacht werden, übernehmen wir keine Haftung.
•
Beachten Sie besonders die Sicherheitshinweise!
•
Bewahren Sie diese Bedienungsanleitung gut auf!
2.Lieferumfang
•
Wanduhr
•
Bedienungsanleitung
3.Einsatzbereich und alle Vorteile Ihres neuen Gerätes auf
einen Blick
•
Anzeige des Wochentags
•
Rahmen aus gebürstetem Aluminium
•
Abdeckung aus Glas
•
Ideal für zuhause, das Büro, das Wartezimmer, den Eingangs-
oder Empfangsbereich und als Geschenk
4.Zu Ihrer Sicherheit
•
Das Produkt ist ausschließlich für den oben beschriebenen Ein-
satzbereich geeignet. Verwenden Sie das Produkt nicht anders,
als in dieser Anleitung dargestellt wird.
•
Das eigenmächtige Reparieren, Umbauen oder Verändern des
Gerätes ist nicht gestattet.
Vorsicht!
Verletzungsgefahr:
•
Bewahren Sie die Batterie und das Gerät außerhalb der Reich-
weite von Kindern auf.
•
Batterien nicht ins Feuer werfen, kurzschließen, auseinander
nehmen oder aufladen. Explosionsgefahr!
•
Batterien enthalten gesundheitsschädliche Säuren. Um ein Aus-
laufen der Batterien zu vermeiden, sollten schwache Batterien
möglichst schnell ausgetauscht werden.
•
Beim Hantieren mit ausgelaufenen Batterien chemikalienbe-
ständige Schutzhandschuhe und Schutzbrille tragen!
Wichtige Hinweise zur Produktsicherheit!
•
Setzen Sie das Gerät keinen extremen Temperaturen, Vibratio-
nen und Erschütterungen aus.
•
Vor Feuchtigkeit schützen.
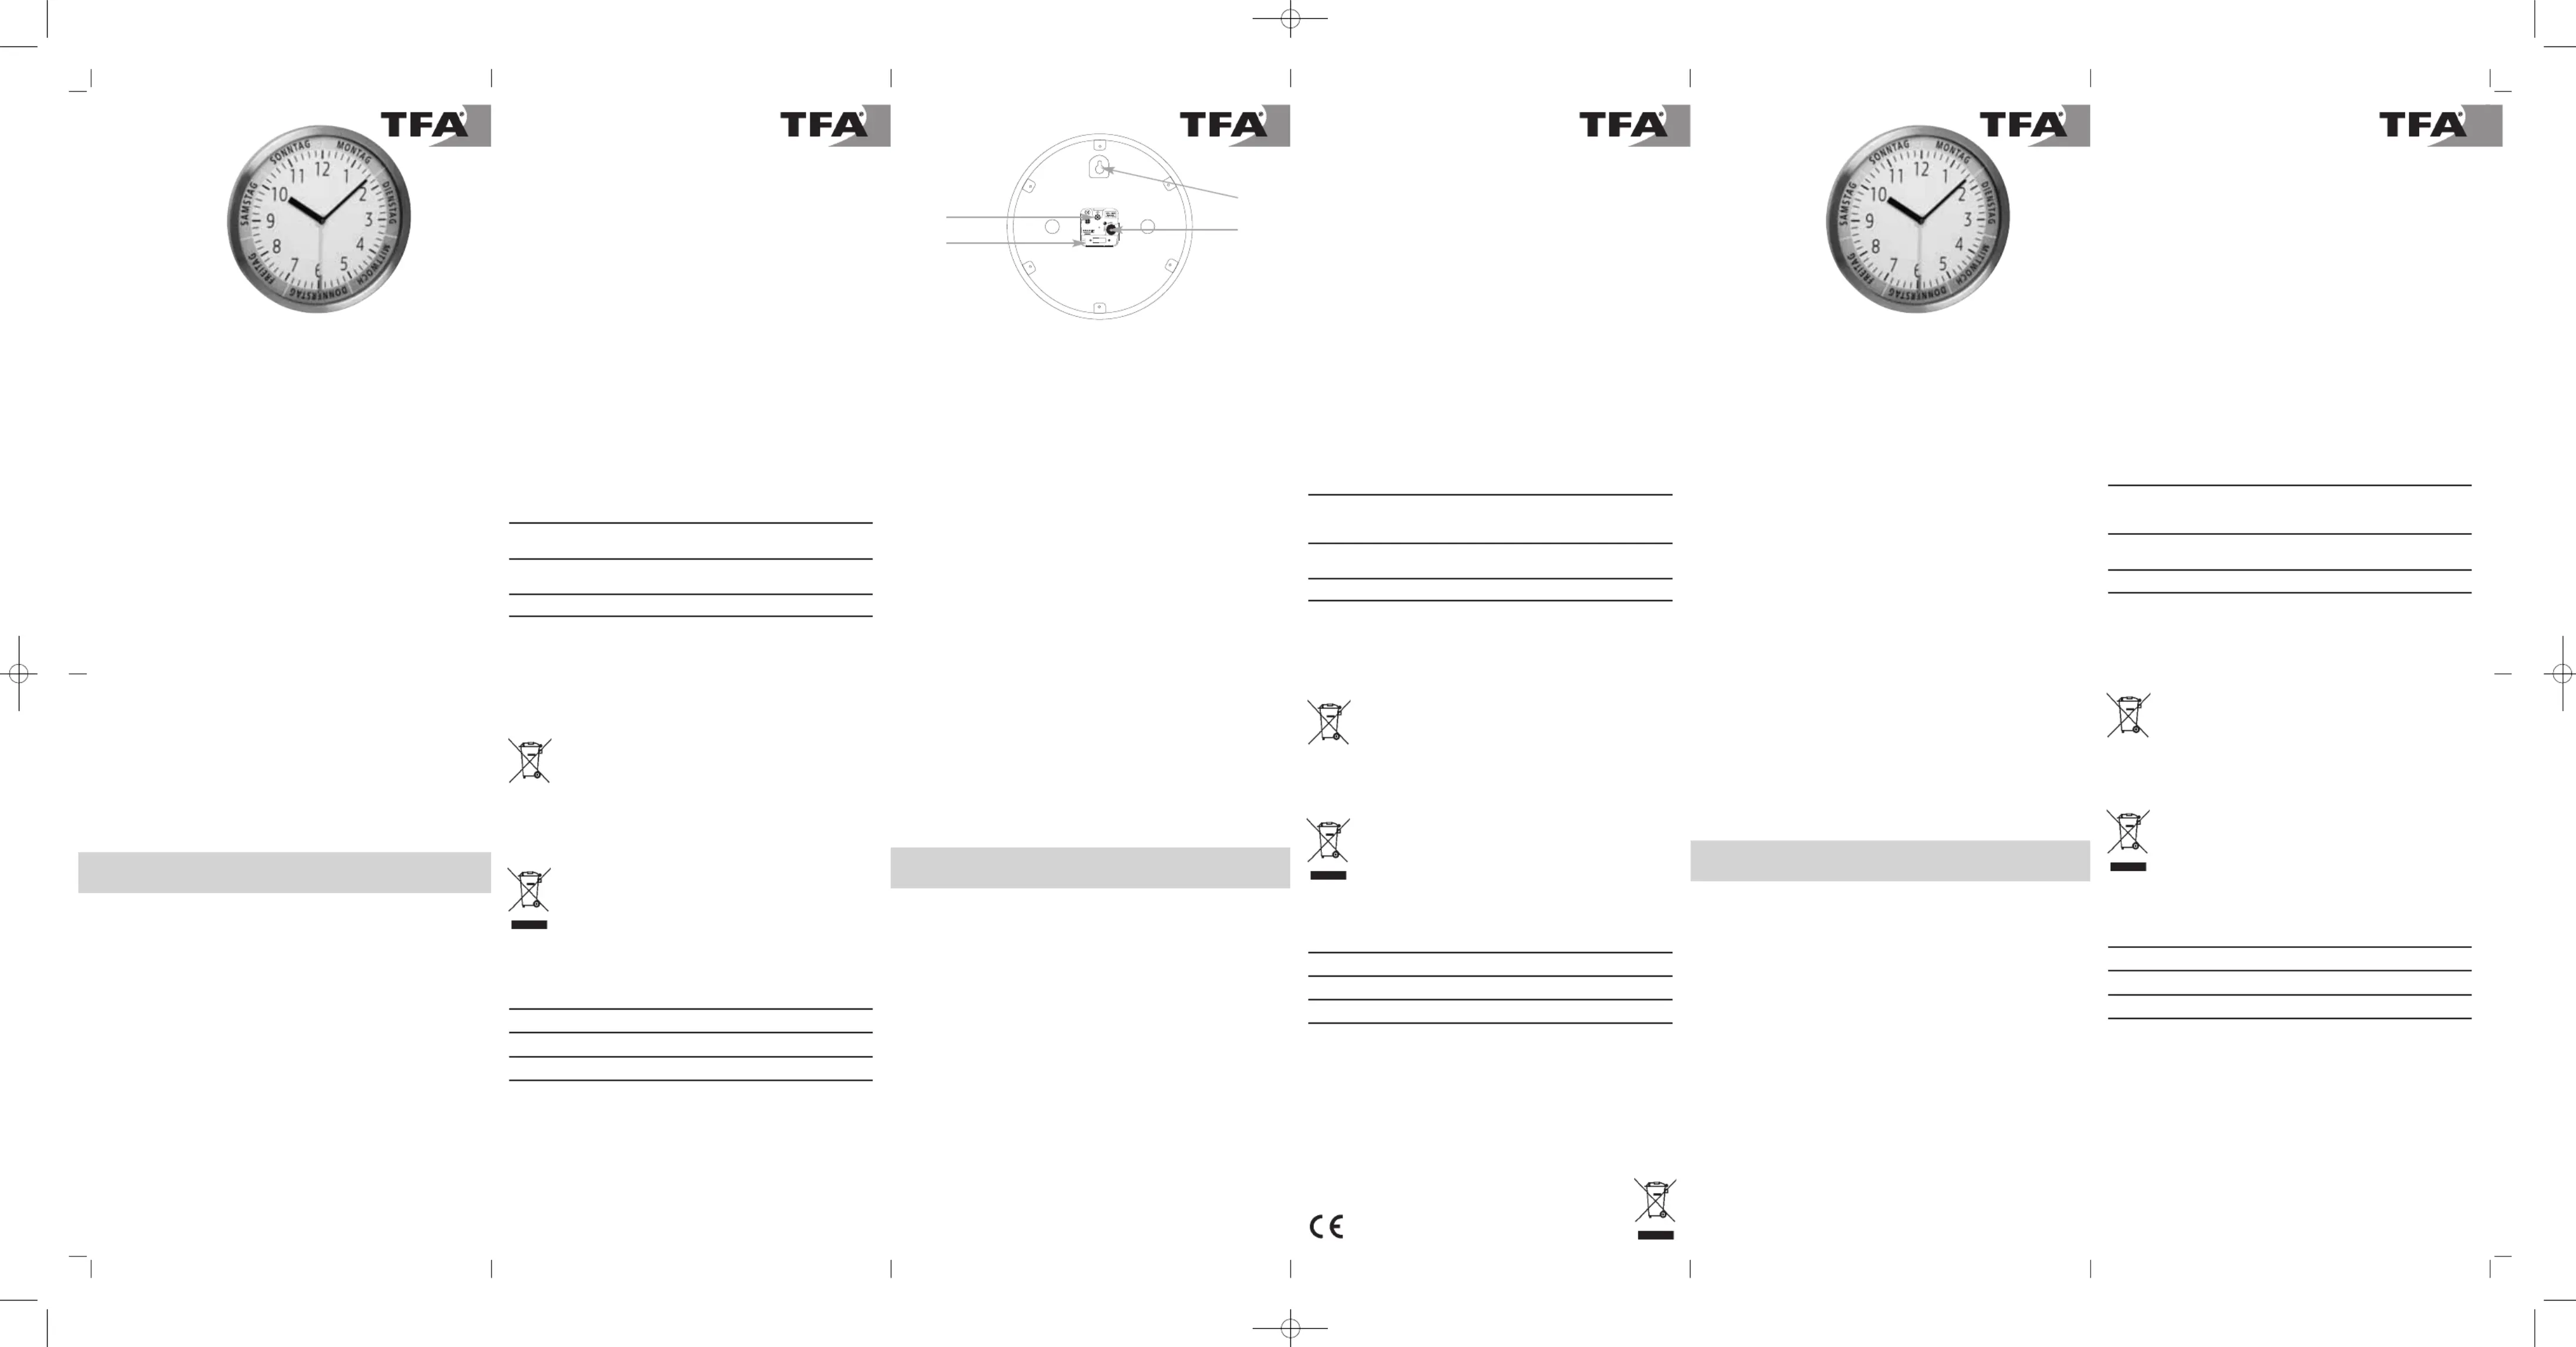
5.Bestandteile
A:
Einstellrad Uhrzeit
B:
Einstellrad Wochentag
C:
Batteriefach
D:
Wandaufhängung
6.Bedienung
•
Legen Sie eine neue Batterie 1,5 V AA ein, +/- Pol wie abgebil-
det.
•
Das Gerät ist jetzt betriebsbereit.
6.1 Einstellen der Uhrzeit
•
Stellen Sie mit dem Einstellrad die aktuelle Zeit ein.
6.2 Einstellen des Wochentags
•
Ziehen Sie den Einstellknopf heraus und stellen Sie den aktuel-
len Wochentag ein.
•
Sobald Sie den Wochentag eingestellt haben, drücken Sie den
Einstellknopf wieder zurück.
•
Hinweis: Der Zeiger läuft kontinuierlich mit der Uhrzeit über
das Wochentagfeld. Um 12 Uhr nachts sollte sich der Zeiger
genau am Anfang des kommenden Wochentags und um 12 Uhr
mittags in der Mitte des entsprechenden Feldes befinden. Ach-
ten Sie beim Einstellen darauf, den Zeiger entsprechend der
aktuellen Uhrzeit zu positionieren und gegebenenfalls nachzu-
stellen.
7.Pflege und Wartung
•
Reinigen Sie das Gerät mit einem weichen, leicht feuchten
Tuch. Keine Scheuer- oder Lösungsmittel verwenden!
•
Entfernen Sie die Batterie, wenn Sie das Gerät längere Zeit
nicht verwenden.
•
Bewahren Sie Ihr Gerät an einem trockenen Platz auf.
8.Fehlerbeseitigung
ProblemLösung
Keine Zeigerbewegung➜ Batterie polrichtig einlegen
➜ Batterie wechseln
UnkorrekteSiehe „Einstellen des Wochentags”➜
Wochentaganzeige
Unkorrekte AnzeigeBatterie wechseln➜
Wenn Ihr Gerät trotz dieser Maßnahmen immer noch nicht funktio-
niert, wenden Sie sich an den Händler, bei dem Sie das Produkt
gekauft haben.
9. Entsorgung
Dieses Produkt wurde unter Verwendung hochwertiger Materia-
lien und Bestandteile hergestellt, die recycelt und wiederverwen-
det werden können.
Batterien und Akkus dürfen keinesfalls in den Haus-
müll!
Als Verbraucher sind Sie gesetzlich verpflichtet, ge-
brauchte Batterien und Akkus zur umweltgerechten
Entsorgung beim Handel oder entsprechenden Sam-
melstellen gemäß nationaler oder lokaler Bestimmun-
gen abzugeben.
Die Bezeichnungen für enthaltene Schwermetalle
sind: Cd=Cadmium, Hg=Quecksilber, Pb=Blei
Dieses Gerät ist entsprechend der EU-Richtlinie über
die Entsorgung von Elektro- und Elektronik-Altgerä-
ten (WEEE) gekennzeichnet.
Dieses Produkt darf nicht mit dem Hausmüll entsorgt
werden. Der Nutzer ist verpflichtet, das Altgerät zur
umweltgerechten Entsorgung bei einer ausgewiese-
nen Annahmestelle für die Entsorgung von Elektro-
und Elektronikgeräten abzugeben.
10. Technische Daten
Spannungsversorgung:1 x 1,5V AA Batterie (nicht inklusive)
Gehäusemaße:Ø 303 x 43 mm
Gewicht:680 g (nur das Gerät)
Diese Anleitung oder Auszüge daraus dürfen nur mit Zustimmung von TFA
Dostmann veröffentlicht werden. Die technischen Daten entsprechen dem
Stand bei Drucklegung und können ohne vorherige Benachrichtigung geän-
dert werden.
Die neuesten technischen Daten und Informationen zu Ihrem Produkt finden
Sie unter Eingabe der Artikel-Nummer auf unserer Homepage.
www.tfa-dostmann.de
TFA Dostmann GmbH & Co.KG, Zum Ottersberg 12, D-97877 Wertheim,
Deutschland
03/17
Bedienungsanleitung
Kat. Nr. 60.3044.02
Mode d’emploi
Réf. 60.3044.02
Horloge murale avec jour de la semaine
Nous vous remercions d'avoir choisi l'appareil de la Société TFA.
1. Avant d'utiliser votre appareil
•
Veuillez lire attentivement le mode d'emploi. Pour vous fami-
liariser avec votre nouvel appareil, découvrez les fonctions et
les composants, notez les détails importants relatifs à la mise en
service et lisez quelques conseils en cas de disfonctionnement.
•
En respectant ce mode d'emploi, vous éviterez d'endommager
votre appareil et de perdre vos droits légaux en cas de défaut
si celui-ci résulte d’une utilisation non-conforme.
•
Nous n'assumons aucune responsabilité pour des dommages
qui auraient été causés par le non-respect du présent mode
d'emploi.
•
Suivez bien toutes les consignes de sécurité !
•
Conservez soigneusement le mode d'emploi!
2.Contenu de la livraison
•
Horloge murale
•
Mode d'emploi
3.Aperçu du domaine d'utilisation et de tous les avantages
de votre nouvel appareil
•
Affichage du jour de la semaine
•
Cadre en aluminium brossé
•
Couvercle en verre
•
Idéal pour la maison, le bureau, le hall d’entrée, la salle d’at-
tente ou la réception ou bien encore comme cadeau
4.Pour votre sécurité
•
L'appareil est destiné uniquement à l'utilisation décrite ci-des-
sus. Ne l'utilisez jamais à d'autres fins que celles décrites dans le
présent mode d'emploi.
•
Vous ne devez en aucun cas réparer, démonter ou modifier l'ap-
pareil par vous-même.
Attention!
Danger de blessure:
•
Gardez l'appareil et la pile hors de la portée des enfants.
•
Ne jetez jamais les piles dans le feu, ne les court-circuitez pas, ne
les démontez pas et ne les rechargez pas. Risques d'explosion!
•
Les piles contiennent des acides nocifs pour la santé. Une pile
faible doit être remplacée le plus rapidement possible, afin
d'éviter une fuite.
•
Pour manipuler des piles qui ont coulé, utilisez des gants de
protection chimique spécialement adaptés et portez des lunet-
tes de protection !
Conseils importants de sécurité du produit!
•
Évitez d’exposer l’appareil à des températures extrêmes, à des
vibrations ou à des chocs.
•
Protégez-le contre l'humidité.
5.Composants
A:
Molette de réglage de l’heure
B :
Molette de réglage de jour
C :
Compartimente à pile
D:
Suspension murale
6.Utilisation
•
Insérez une nouvelle pile 1,5 V AA, polarité +/- comme illustrée
•
Votre instrument est maintenant prêt à fonctionner.
6.1 Réglage de l’heure
•
Régler l’heure actuelle avec la molette de réglage.
6.2 Réglage du jour de la semaine
•
Sortez la molette et réglez le jour de la semaine actuel.
•
Une fois le jour réglé, remettez la molette en place.
•
Indication:L’aiguille court en continu avec le temps sur le
champ du jour de la semaine. À minuit, l’aiguille devrait se
trouver exactement au début du jour suivant et à 12 h (midi) au
milieu du champ correspondant. Veillez lors du réglage à posi-
tionner l’aiguille selon l’heure actuelle et à l’ajuster au besoin.
7.Entretien et maintenance
•
Pour le nettoyage de l'appareil, utilisez un chiffon doux et
humide. N’utilisez aucun agent solvant abrasif! Protégez-le
contre l'humidité.
•
Enlevez la pile, si vous n’utilisez pas votre horloge pendant une
durée prolongée.
•
Conservez-la dans un endroit sec.
8.Dépannage
ProblèmeSolution
Aucun mouvementContrôlez la bonne polarité de la ➜
des aiguillespile
➜ Changez la pile
Indication incorrecte de ➜ Voir
jour de la semaine«Réglage du jour de la semaine»
Affichage incorrecte➜ Changez la pile
Si votre appareil ne fonctionne toujours pas malgré ces mesures,
adressez-vous à votre vendeur.
9. Traitement des déchets
Ce produit a été fabriqué avec des matériaux de haute qualité qui
peuvent être recyclés et réutilisés.
Les piles usagées ne doivent pas être jetées dans les
détritus ménagers. En tant qu'utilisateur, vous avez
l'obligation légale de rapporter les piles et piles rechar-
geables usagées à votre revendeur ou de les déposer
dans une déchetterie proche de votre domicile confor-
mément à la réglementation nationale et locale.
Les métaux lourds sont désignés comme suit:
Cd=cadmium, Hg=mercure, Pb=plomb
Cet appareil est conforme aux normes de l'UE relati-
ves au traitement des déchets électriques et électroni-
ques (WEEE).
L'appareil usagé ne doit pas être jeté dans les ordures
ménagères. L’utilisateur s’engage, pour le respect de
l’environnement, à déposer l’appareil usagé dans un
centre de traitement agréé pour les déchets électri-
ques et électroniques.
10. Caractéristiques techniques
Alimentation:Pile 1 x 1,5 V AA (non incluse)
Mesure de boîtier:Ø 303 x 43 mm
Poids:680 g (appareil seulement)
La reproduction, même partielle du présent mode d'emploi est strictement
interdite sans l'accord explicite de TFA Dostmann. Les spécifications techni-
ques de ce produit ont été actualisées au moment de l'impression et peuvent
être modifiées, sans avis préalable.
Les dernières données techniques et des informations concernant votre pro-
duit peuvent être trouvées en entrant le numéro de l'article sur notre site.
www.tfa-dostmann.de
TFA Dostmann GmbH & Co.KG, Zum Ottersberg 12, D-97877 Wertheim,
Allemagne
03/17
Mode d’emploi
Réf. 60.3044.02
Instruction Manual
Cat.-No.60.3044.02
Wall clock with indication of the weekday
Thank you for choosing this instrument from TFA.
1. Before you start using it
•
Please make sure to read the instruction manual carefully.
This information will help you to familiarise yourself with your
new device, to learn all of its functions and parts, to find out
important details about its first use, how to operate it, and get
advice in the event of faults.
•
Following and respecting the instructions in your manual will
prevent damage to your instrument and loss of your statutory
rights arising from defects due to incorrect use.
•
We shall not be liable for any damage occurring as a result of
non following of these instructions.
•
Please take particular note of the safety advice!
•
Please keep this instruction manual for future reference.
2.Delivery contents
•
Wall clock
•
Instruction manual
3.Field of operation and the benefits of your new instru-
ment at a glance
•
Indication of the weekday
•
Frame made of brushed aluminum
•
Cover made of glass
•
Ideal for home, office, waiting room, lobby or entrance hall or
as a gift
4.For your safety
•
This product is exclusively intended for the field of application
described above. It should only be used as described in your
instruction manual.
•
Unauthorised repairs, modifications or changes to the product
are prohibited.
Caution!
Risk of injury:
•
Keep this instrument and its battery out of the reach of child-
ren.
•
Batteries must not be thrown into a fire, short-circuited, taken
apart or recharged. Risk of explosion!
•
Batteries contain harmful acids. Low batteries should be
changed as soon as possible to prevent damage caused by leak-
ing.
•
Wear chemical-resistant protective gloves and glasses when
handling leaking batteries.
Important information on product safety!
•
Do not place the instrument near extreme temperatures, vibra-
tion or shock.
•
Protect it from moisture.
5.Elements
A:
Setting knob time
B:
Setting knob weekday
C:
Battery compartment
D:
Wall mounting hole
6.Operation
•
Insert one new battery AA size 1.5 V with the polarity as indi-
cated.
•
Your clock is now ready to use.
6.1 Clock setting
•
Set the actual time by turning the setting knob at the backside.
6.2 Weekday setting
•
Pull out the setting knob and set the current day of the week.
•
Once you have set the day push back the setting knob.
•
Note: The weekday hand runs continuously for 24 hours over
the current day of the week field. At 12 midnight, the weekday
hand should be found on the day which is about to start and at
12 noon it should be found exactly in the middle of the corre-
sponding weekday field. When setting the weekday, make sure
to position the weekday hand according to the current time
and, if necessary, adjust it.
7.Care and maintenance
•
Clean your instrument with a soft damp cloth. Do not use sol-
vents or scouring agents.
•
Remove the battery if you do not use the product for a long
period of time.
•
Keep your clock in a dry place.
8.Troubleshooting
ProblemsSolution
No hands movement ➜ Ensure that the battery polarity is
correct
➜ Change the battery
Incorrect See “weekday setting”➜
weekday indication
Incorrect displayChange the battery➜
If your device fails to work despite these measures contact the
supplier from whom you purchased it.
7. Waste disposal
This product has been manufactured using high-grade materials
and components which can be recycled and reused.
Never dispose of empty batteries and rechargeable
batteries in household waste.
As a consumer, you are legally required to take them
to your retail store or to an appropriate collection site
depending on national or local regulations in order to
protect the environment.
The symbols for the heavy metals contained are:
Cd=cadmium, Hg=mercury, Pb=lead
This instrument is labelled in accordance with the EU
Waste Electrical and Electronic Equipment Directive
(WEEE).
Please do not dispose of this instrument in household
waste. The user is obligated to take end-of-life
devices to a designated collection point for the dis-
posal of electrical and electronic equipment, in order
to ensure environmentally-compatible disposal.
8. Specifications
Power consumption:1 x 1,5V AA battery (not included)
Housing dimension:Ø 303 x 43 mm
Weight:680 g (instrument only)
No part of this manual may be reproduced without written consent of TFA
Dostmann. The technical data are correct at the time of going to print and
may change without prior notice.
The latest technical data and information about your product can be found
by entering your product number on our homepage.
www.tfa-dostmann.de
TFA Dostmann GmbH & Co.KG, Zum Ottersberg 12, D-97877 Wertheim,
Germany03/17
Instruction Manual
Cat.-No.60.3044.02
RoHS
C
B
D
A
TFA_No. 60.3044_Anleitung 29.03.2017 10:43 Uhr Seite 1
Tuotetiedot
| Merkki: | TFA |
| Kategoria: | Kello |
| Malli: | 60.3044.02 |
Tarvitsetko apua?
Jos tarvitset apua merkille TFA 60.3044.02 esitä kysymys alla ja muut käyttäjät vastaavat sinulle
Kello TFA Käyttöohjeet

25 Joulukuuta 2024
14 Joulukuuta 2024
8 Joulukuuta 2024
8 Joulukuuta 2024
8 Joulukuuta 2024
8 Joulukuuta 2024
8 Joulukuuta 2024
8 Joulukuuta 2024
8 Joulukuuta 2024
8 Joulukuuta 2024
Kello Käyttöohjeet
Viimeisimmät Kello Käyttöohjeet
9 Huhtikuuta 2025
9 Huhtikuuta 2025
3 Huhtikuuta 2025
2 Huhtikuuta 2025
13 Maaliskuuta 2025
5 Maaliskuuta 2025
5 Maaliskuuta 2025
19 Helmikuuta 2025
28 Tammikuuta 2025
25 Tammikuuta 2025