Roberts Rambler Max Käyttöohje
Lue alta 📖 käyttöohje suomeksi merkille Roberts Rambler Max (4 sivua) kategoriassa Radio. Tämä opas oli hyödyllinen 56 henkilölle ja sai 4.2 tähden keskimäärin 4 käyttäjältä
Sivu 1/4
Before you can use your smart radio you must have the following:
• A broadband internet connection (not required for DAB, FM or music player functions).
• A router (or wireless access point)providing a WiFi signal, connected to your broadband
internet service provider.
• A Smartphone or tablet which uses the Android operating system (version 4.2.4 or later) or
Apple iOS (version 13.0 or later).
• If your wireless network requires a security password, then you will need to have this available
during setup. The radios WiFi system is compatible with 802.11b, g, n or a networks and can
use 2.4GHz or 5 GHz WiFi frequency bands.
IMPORTANT: Before you continue, make sure your router is powered up and working with
your broadband internet service provider.
To listen to internet radio or to stream music, your radio must rst be connected to your network.
1 Choose ‘YES’to keep the radio connected to the network when
in Standby. This will allow remote control software to switch on
your radio when needed.
2 A list of the available WiFi networks will then be displayed.
If no networks are found then your radio may be too far from
your router.
3 Rotate the Tuningcontrol to navigate the list of available
networks and highlight your own Network Name. If your
Network Name is not found, then you may have to get your
wireless router working or your radio may be too far from the
router.
4 If your Network Name (sometimes called SSID) is displayed
with “[WPS]” (WiFi Protected Setup), then press the Tuning
control and a WPS menu will be displayed, otherwise press
the Tuning control and proceed to step 6.
5 Choose one of the WPS menu options as required for your
router (WPS may be via push button, or using an identication
number):
‘Push Button’- the display prompts you to press the WPS
button on your router and then the Tuningcontrol on the radio.
The two devices should then connect automatically. Proceed
to step 9.
‘PIN’- the display shows an identication number which you
must enter into your router using a web browser (refer to your
router’s user documentation). You should then press the Tuning
control on the radio. Proceed to step 9.
‘Skip WPS’– if you wish to enter your password or if your
password was previously entered.
6 If you are prompted to enter a password (or key), enter each
character by rotating the Tuningcontrol to highlight it, then
pressing the Tuningcontrol. If you are not prompted for a
password then proceed to step 9.
7 The three controls on the right-hand side of the password key
screen have special functions. You can quickly access these by
pressing the Infobutton and then using the Tuning control as
needed.
Select ‘OK’ - When the complete password has been entered.
Select ‘BKSP’- Select to erase a character (long press to clear).
Select ‘CANCEL’ - To cancel and re-run the Network Wizard.
8 After the nal character of the password has been entered,
highlight the ‘OK’ symbol and press the Tuning control.
9 The screen will show and then ‘Setup wizard ‘Connecting..’
completed’. Press theTuningcontrol to exit the setup wizard.
The radio should now be able to connect to the network. Your
radio will display the main mode menu.
10 For details on navigation and operation of your smart radio, please see overleaf.
Smart radio, mains adaptor, quick start guide, safety/warranty and PSTI Statement of Compliance.
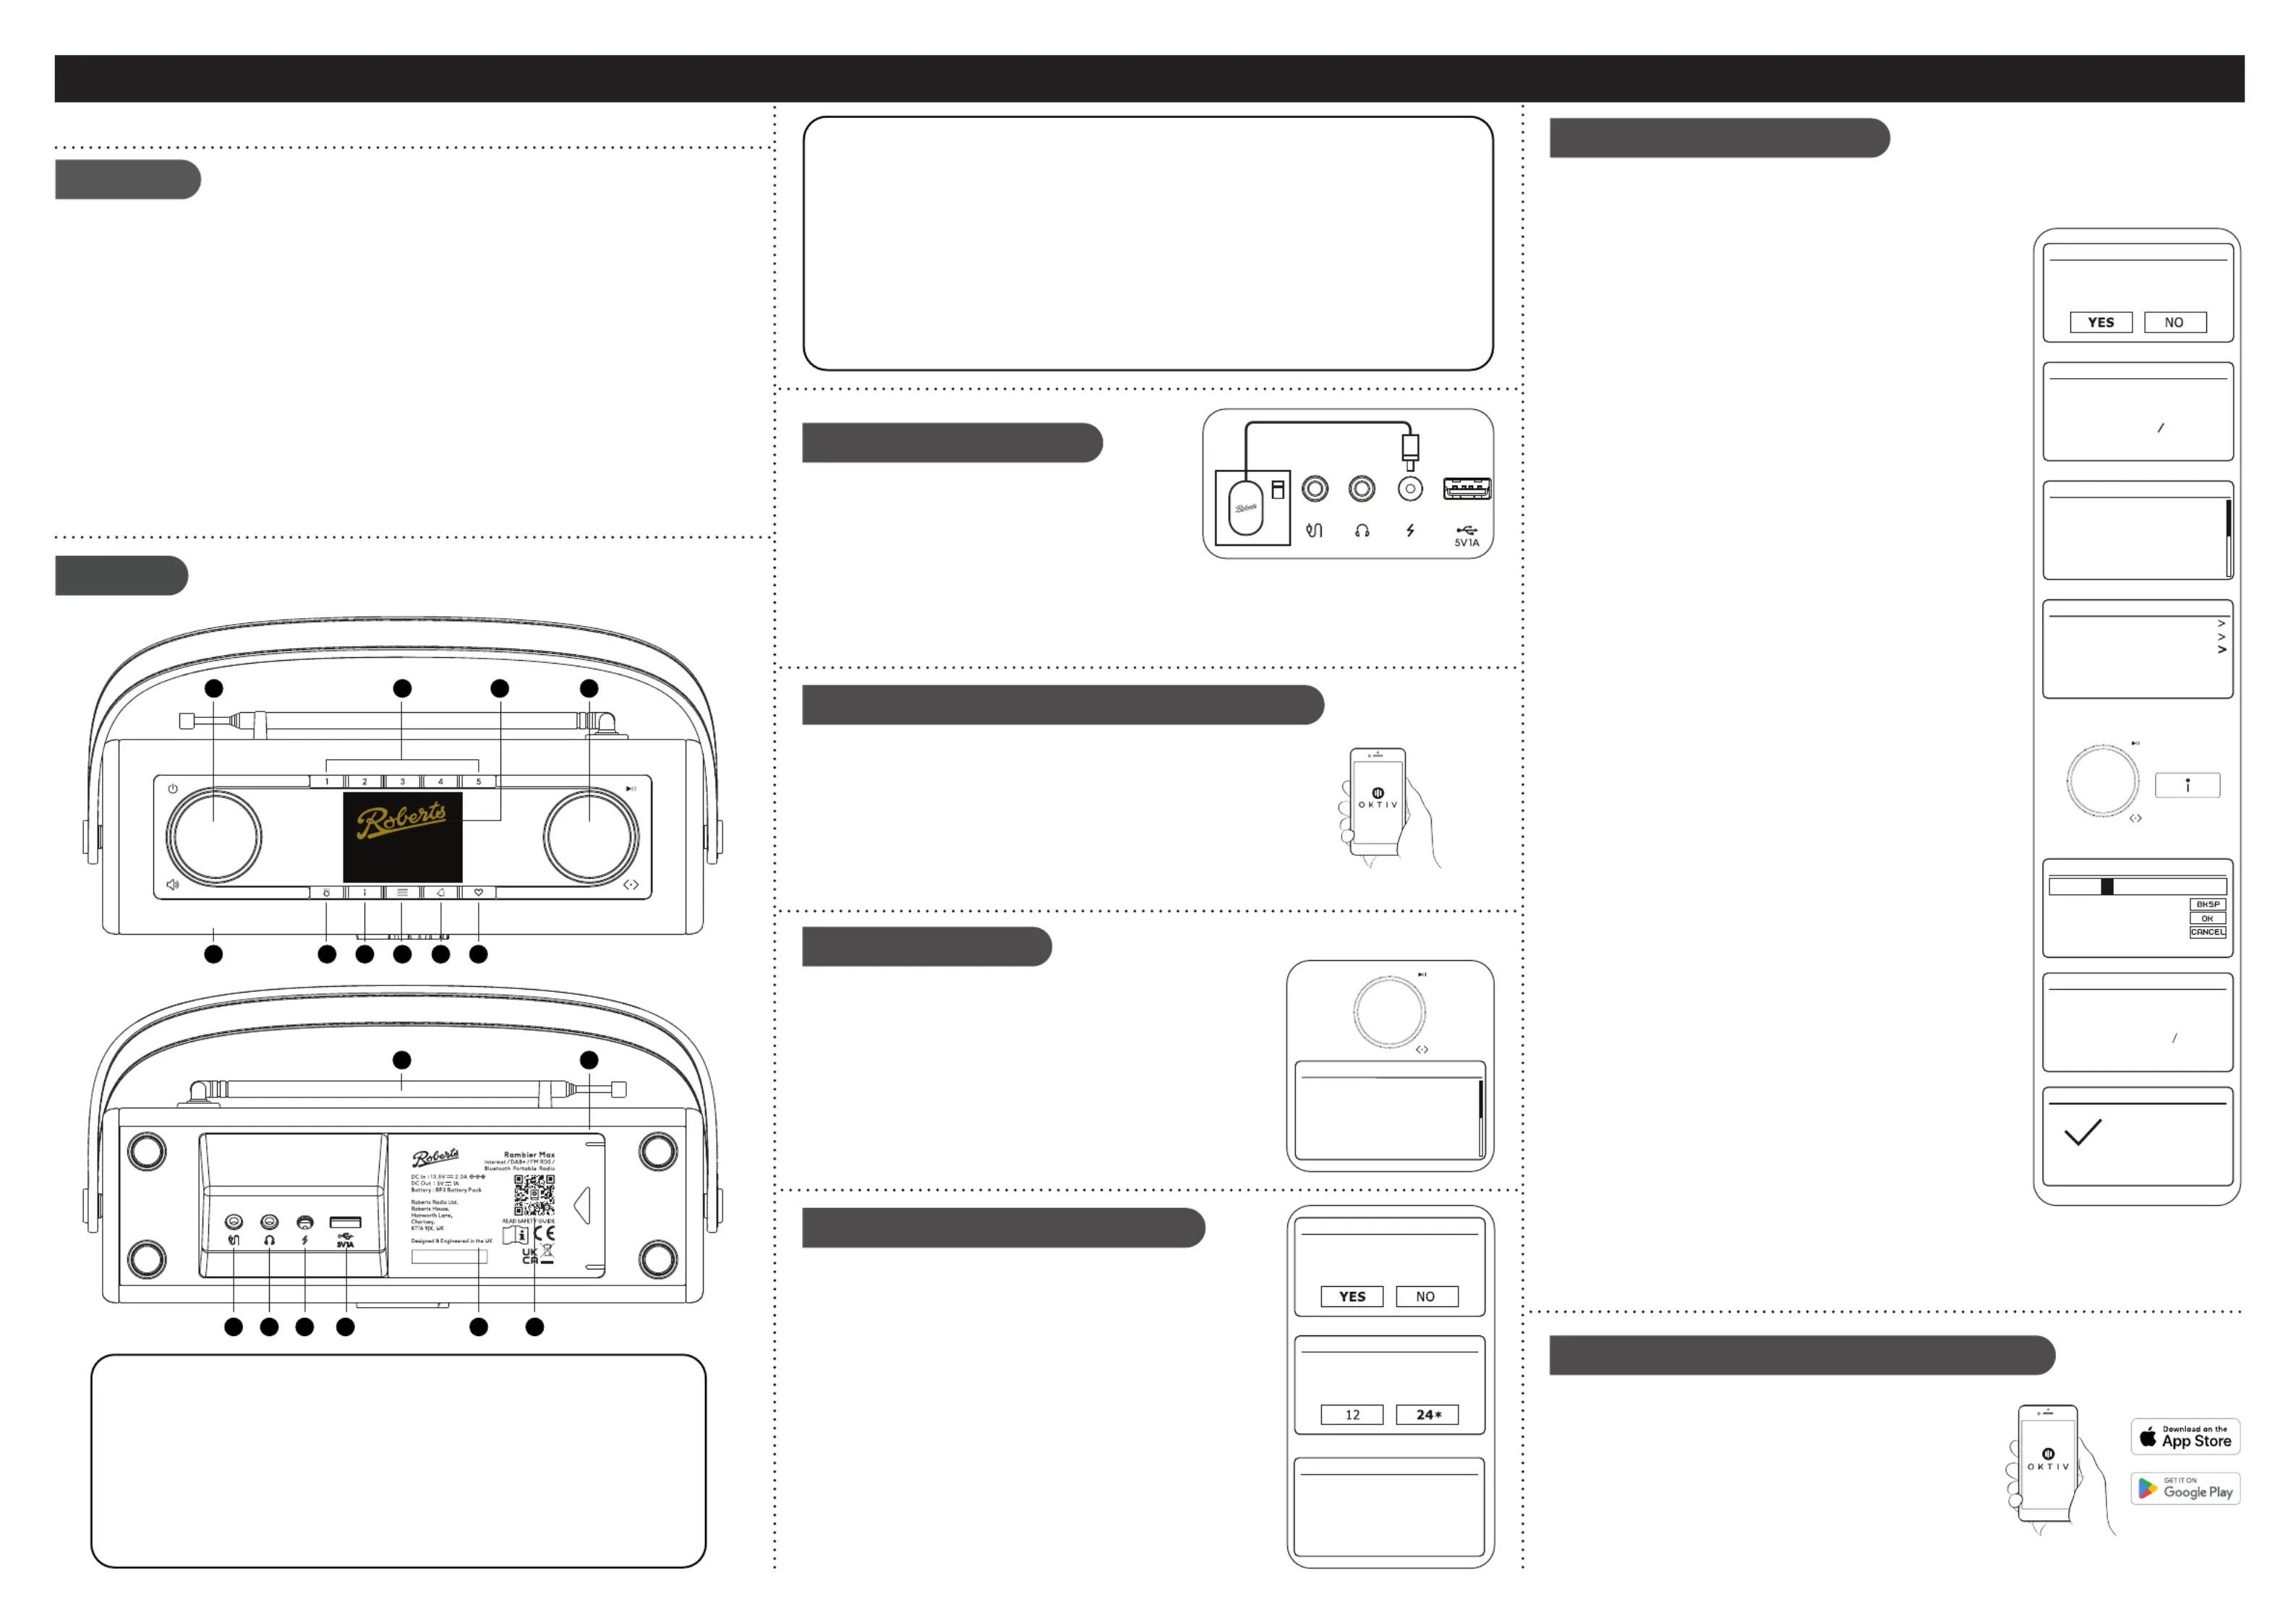
Features
Controls
continued overleaf...
STEP 1 - Connect to the mains & setup your smart radioWhat is in the Box?
E - Connect to your network
F - Use the Oktiv app to setup your radio
• DAB / DAB+ / FM and WiFi internet radio with colour display and built-in battery charging
• Stream using Spotify Connect and Deezer
(Third-party streaming services may require a subscription)
• Bluetooth audio streaming from iPhone or Smartphone
• MP3 playback via USB
• Full control via the Oktiv smartphone app (for Apple iOS and Android)
• 60 presets (20 x Internet Radio/Podcast, 20 x DAB, 20 x FM)
• Wireless connection (Dual-band WiFi, 802.11b/g/n/a)
• 6 equaliser proles and separate bass and treble
• 2 alarm timers (DAB/FM/Internet or buzzer)
• USB charging of smartphone, tablet or similar devices
• AC adaptor included / Roberts Lithium Ion BP3 not included
• Stereo auxiliary input and headphone sockets
A - Connect to the mains
Please read the safety leaflet provided before
connecting your radio to the mains.
1 Place your radio on a at surface.
2 Plug the cable from the mains adaptor into the DC input socket.
3 Plug the mains adaptor into a wall socket and switch on the socket.
4 The display on the radio will show a start up screen for a few seconds. If this is the rst time
that you use your radio (or after a Factory Reset) the display will show the language menu.
ON
1 If you wish to setup your radio using the Oktiv app download
and install the Oktiv app on to your Android or iOS device.
2 Follow the on-screen instructions or see the full user guide
on-line.
• If you already have the Oktiv app installed on your device
ensure that you have the latest version.
1 Power/ Volume/Sleep
2 Preset Buttons 1-5
LCD display3
4 Tuning, Select & Navigation
Loudspeaker5
Mode button6
Info button 7
Menu button8
Alarm button9
10 Favourites button
11 Telescopic aerial
WiFi antenna (internal)12
13 Auxiliary input socket
14 Headphone socket
15 DC input socket
16 USB playback / Charge socket
17 Battery compartment
18 QR code for online instructions
D - Select clock and time settings
1 The radio will show a setup wizard. With highlighted press ‘YES’
the Tuning/Select control to begin setting up your radio.
• Note: If you wish to go back within a menu or if you make an
error at any time, please use the button.Menu
2 Choose either the 1’2’ ‘24 hour’or clock display.
3 A menu allowing you to specify the auto-update option for the
clock will be shown. ‘ will be the best for Update from network’
most users.
4 Choose the timezone for your region.
5 Choose a daylight saving option. This is also known as Summer/
Winter time (or BST/GMT in the UK).
C - Select language
By default your radio will display all menus and messages in English.
1 Rotate the Tuning/Select control to highlight the desired
language.
2 Press the Tuning/Select control to enter the selection.
• Your radio will display a privacy policy. Please read the privacy
policy and then press theTuning/Select control to accept the
policy.
Jones family
[WPS] Paul’s network
Smith
Brown
[Rescan]
[Manual config]
SSID
*
Network settings
Keep network connected?
Network settings
Network wizard
Scanning...
Push Button
PIN
Skip WPS
WPS Menu
Key:
0 1 2 3 4 5 6
7 8 9 . _ - @
,
a b c d e
f g h i j k l
m n o p
q r s
123-jones
Setup wizard
Setup wizard
completed
Press ‘SELECT’ to exit
Network settings
Please wait
Connecting...
English
Dansk
Nederlands
Français
Deutsch
Italiano
Language
*
Your radio may be congured using either the display and buttons on
the radio or using the Oktiv app. First-time users are recommended
to use the radio’s controls.
1 If you wish to use Oktiv to setup your radio, skip to step F now.
2 If you would like to setup your radio using the radio’s controls
follow the setup procedure below and choose the desired
language.
B - Setup using the radio or the Oktiv app
Setup wizard
Start now?
Date/Time
12/24 hour format
Auto update
Update from DAB
Update from FM
Update from Network
No update
*
Rambler Max
1
10
11
12
131415161718
2
3
4
56789
Tuotetiedot
| Merkki: | Roberts |
| Kategoria: | Radio |
| Malli: | Rambler Max |
Tarvitsetko apua?
Jos tarvitset apua merkille Roberts Rambler Max esitä kysymys alla ja muut käyttäjät vastaavat sinulle
Radio Roberts Käyttöohjeet

24 Helmikuuta 2025
18 Tammikuuta 2025
28 Joulukuuta 2024
18 Joulukuuta 2024
24 Lokakuuta 2024
Radio Käyttöohjeet
Viimeisimmät Radio Käyttöohjeet
1 Huhtikuuta 2025
1 Huhtikuuta 2025
29 Maaliskuuta 2025
26 Maaliskuuta 2025
24 Maaliskuuta 2025
14 Maaliskuuta 2025
11 Maaliskuuta 2025
5 Maaliskuuta 2025
5 Maaliskuuta 2025
5 Maaliskuuta 2025