Claber Video-6 Plus 8054 Käyttöohje
Claber Kastelun ohjaus Video-6 Plus 8054
Lue alta 📖 käyttöohje suomeksi merkille Claber Video-6 Plus 8054 (14 sivua) kategoriassa Kastelun ohjaus. Tämä opas oli hyödyllinen 31 henkilölle ja sai 4.1 tähden keskimäärin 5 käyttäjältä
Sivu 1/14
AQUAUNO VIDEO-6 PLUS
1
Guida all’utilizzo
User manual
Guide d’utilisation
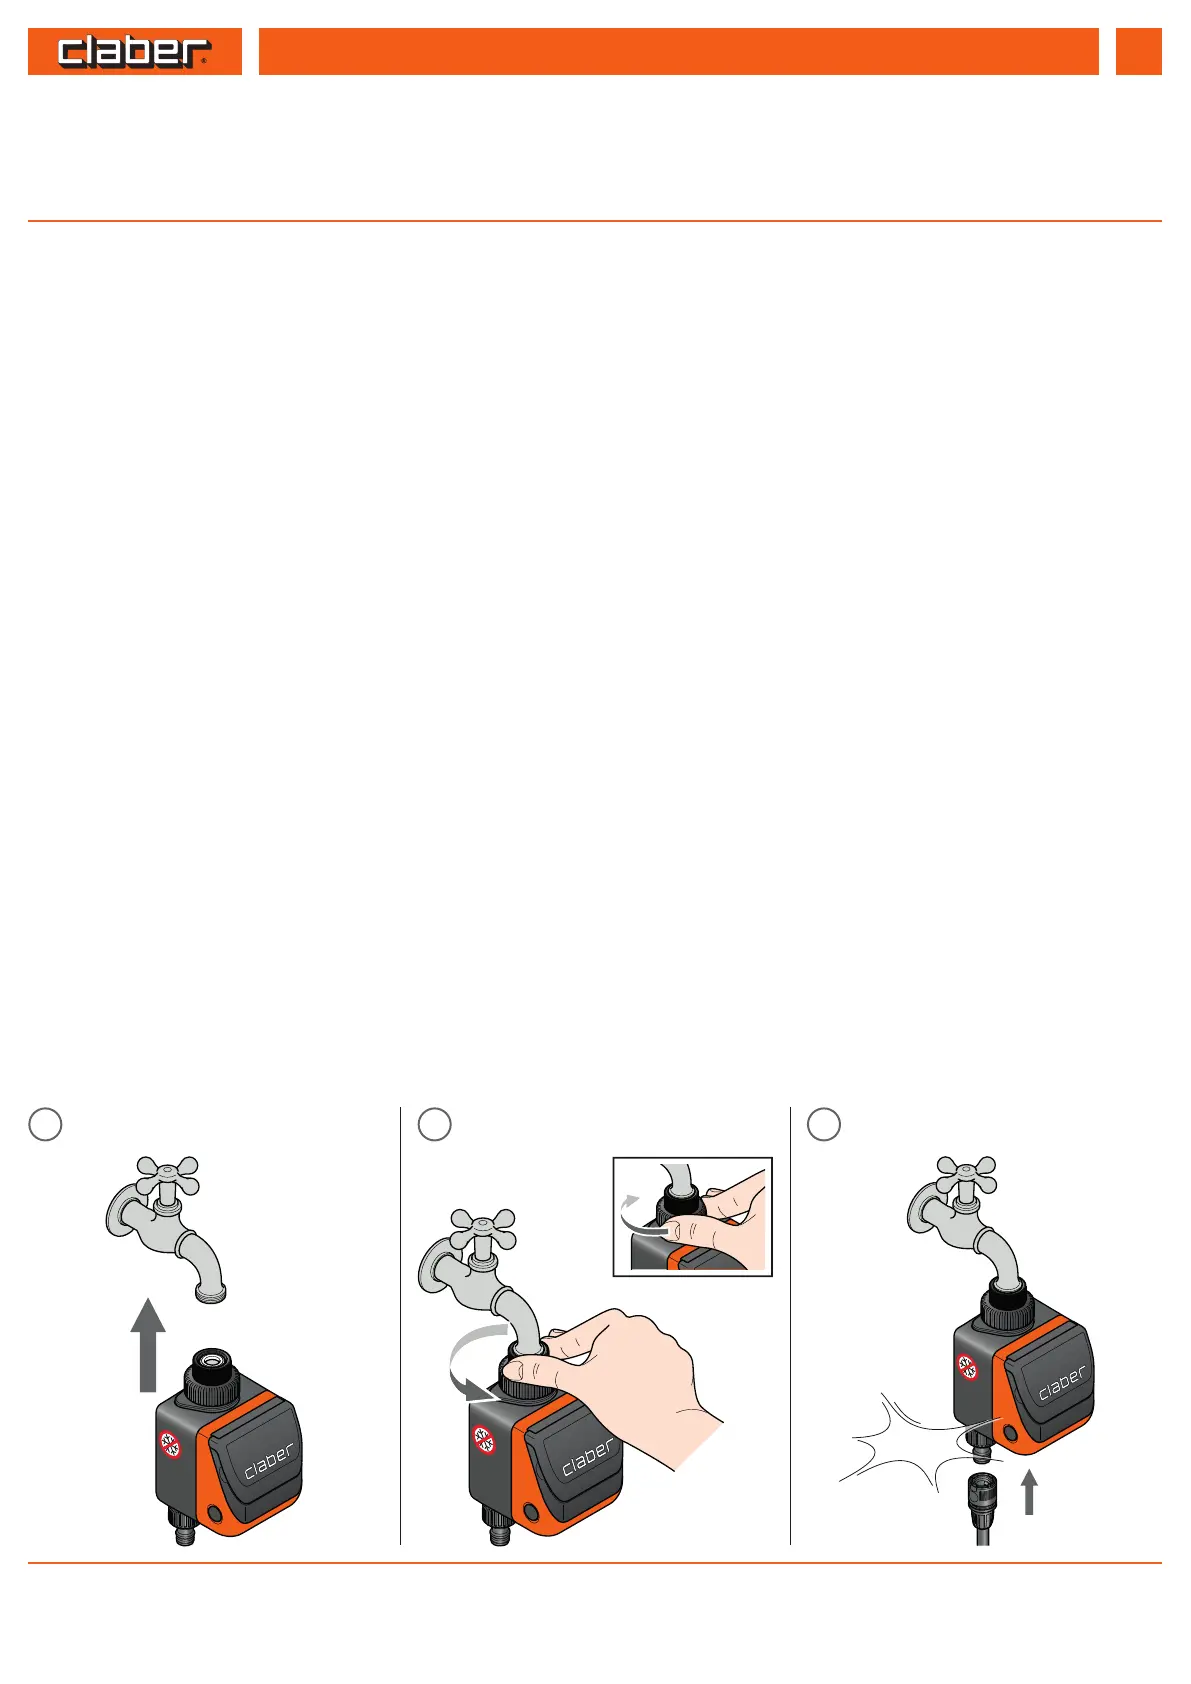
INSTALLAZIONE. Collegare il programmatore al rubinetto e raccordarlo all’impianto. Non installare il programmatore all’interno di pozzetti, sotto il livello
del terreno o all’interno di edici. Non usare il programmatore con sostanze chimiche o liquidi diversi dall’acqua. Non impiegare il programmatore con
pressioni di esercizio inferiori a 0,5 bar (7,3 psi) o superiori a 10 bar (145 psi).
INSTALLATION. Connect the timer to a tap and connect it to the system. Do not install the water timer inside valve boxes, below ground level or indoors.
Do not use the water timer with chemicals or liquids other than water. Do not use the water timer with operating pressures lower than 0.5 bar (7.3 psi) or
higher than 10 bar (145 psi).
INSTALLATION. Raccordez le programmateur au robinet et raccordez-le à l'installation. N'installez pas le programmateur à l'intérieur de regards, sous le
niveau du terrain ou dans des bâtiments. N'utilisez pas le programmateur avec des substances chimiques ou liquides autres que l'eau. N'utilisez pas le
programmateur avec des pressions d'exercice inférieures à 0,5 bar (7,3 psi) ou supérieures à 10 bar (145 psi).
INSTALLATION. Schließen Sie den Bewässerungscomputer an den Wasserhahn an und verbinden Sie ihn mit der Anlage. Installieren Sie den
Bewässerungscomputer nicht in Ventilbox underirdisch oder in Gebäuden. Verwenden Sie das Bewässerungscomputer nicht mit chemischen Substanzen
oder anderen Flüssigkeiten als Wasser. Verweden Sie des Bewässerungscomputer nicht mit einem Betriebsdruck von unter 0,5 bar (7,3 psi) oder über 10
bar (145 psi).
INSTALACIÓN. Conecte el programador al grifo y al sistema. No instale el programador dentro de arquetas, bajo el nivel del terreno o en el interior de
edicios. No utilice el programador con sustancias químicas/líquidos distintos del agua. No emplee el programador con presiones de trabajo inferiores a
0,5 bar (7,3 psi) o superiores a 10 bar (145 psi).
8413
Per Aquauno Video-6 Plus (codice): - For Aquauno Video-6 Plus (code): - Pour Aquauno Video-6 Plus (code): - Für Aquauno Video-6 Plus (Art.): - Para Aquauno Video-6 Plus
(código):
IT
UK
FR
DE
ES
IT
UK
FR
Benuttzzerrhandbucch
Guía de uso
DE
ES
1
2
click!
123
Tuotetiedot
| Merkki: | Claber |
| Kategoria: | Kastelun ohjaus |
| Malli: | Video-6 Plus 8054 |
Tarvitsetko apua?
Jos tarvitset apua merkille Claber Video-6 Plus 8054 esitä kysymys alla ja muut käyttäjät vastaavat sinulle
Kastelun ohjaus Claber Käyttöohjeet

18 Tammikuuta 2025
18 Tammikuuta 2025
18 Tammikuuta 2025
18 Tammikuuta 2025
17 Tammikuuta 2025
17 Tammikuuta 2025
17 Tammikuuta 2025
17 Tammikuuta 2025
17 Tammikuuta 2025
17 Tammikuuta 2025
Kastelun ohjaus Käyttöohjeet
Viimeisimmät Kastelun ohjaus Käyttöohjeet
10 Tammikuuta 2025
31 Joulukuuta 2025
29 Joulukuuta 2024
28 Joulukuuta 2024
4 Joulukuuta 2024
15 Lokakuuta 2024
15 Lokakuuta 2024