Busch-Jaeger 83222 U-611 Käyttöohje
Busch-Jaeger Intercomssteem 83222 U-611
Lue alta 📖 käyttöohje suomeksi merkille Busch-Jaeger 83222 U-611 (9 sivua) kategoriassa Intercomssteem. Tämä opas oli hyödyllinen 48 henkilölle ja sai 4.1 tähden keskimäärin 9 käyttäjältä
Sivu 1/9
Deutsch
Innenstation Video
WARNUNG
Bei direktem oder indirektem Kontakt mit spannungsfüh-
renden Teilen kommt es zu einer gefährlichen Körper-
durchströmung. Elektrischer Schock, Verbrennungen oder
Tod können die Folge sein.
Vor Montage, Demontage Netzspannung freischalten!
Arbeiten am 230 V-Netz nur von Fachpersonal ausfüh-
ren lassen.
Montageanleitung sorgfältig lesen und aufbewahren.
Weitere Benutzerinformationen unter www.busch-jaeger.com
oder durch Scannen des QR-Codes.
Weitere Informationen zur Planung des Welcome Systems finden
Sie im Anwenderhandbuch (Download unter www.busch-
jaeger.com).
Bestimmungsgemäße Verwendung
Die Innenstation Video ist Teil des Busch Welcome
®
/ABB-Welcome
Türkommunikationssystems und arbeitet ausschließlich mit Kompo-
nenten aus diesem System zusammen. Das Gerät darf nur in trocke-
nen Innenräumen installiert werden.
Produktbeschreibung
Die Innenstation Video dient als Endgerät für die Kommunikation mit
den Busch-Welcome
®
/ ABB Welcome Außenstationen.
Technische Daten
Betriebstemperatur -5 °C – +40 °C
Schutzart IP 30
Klemmen eindrähtig 2 x 0,6 mm² / 2 x 1 mm²
Klemmen feindrähtig 2 x 0,6 mm² / 2 x 0,75 mm²
Busspannung 28 V- ±2 V
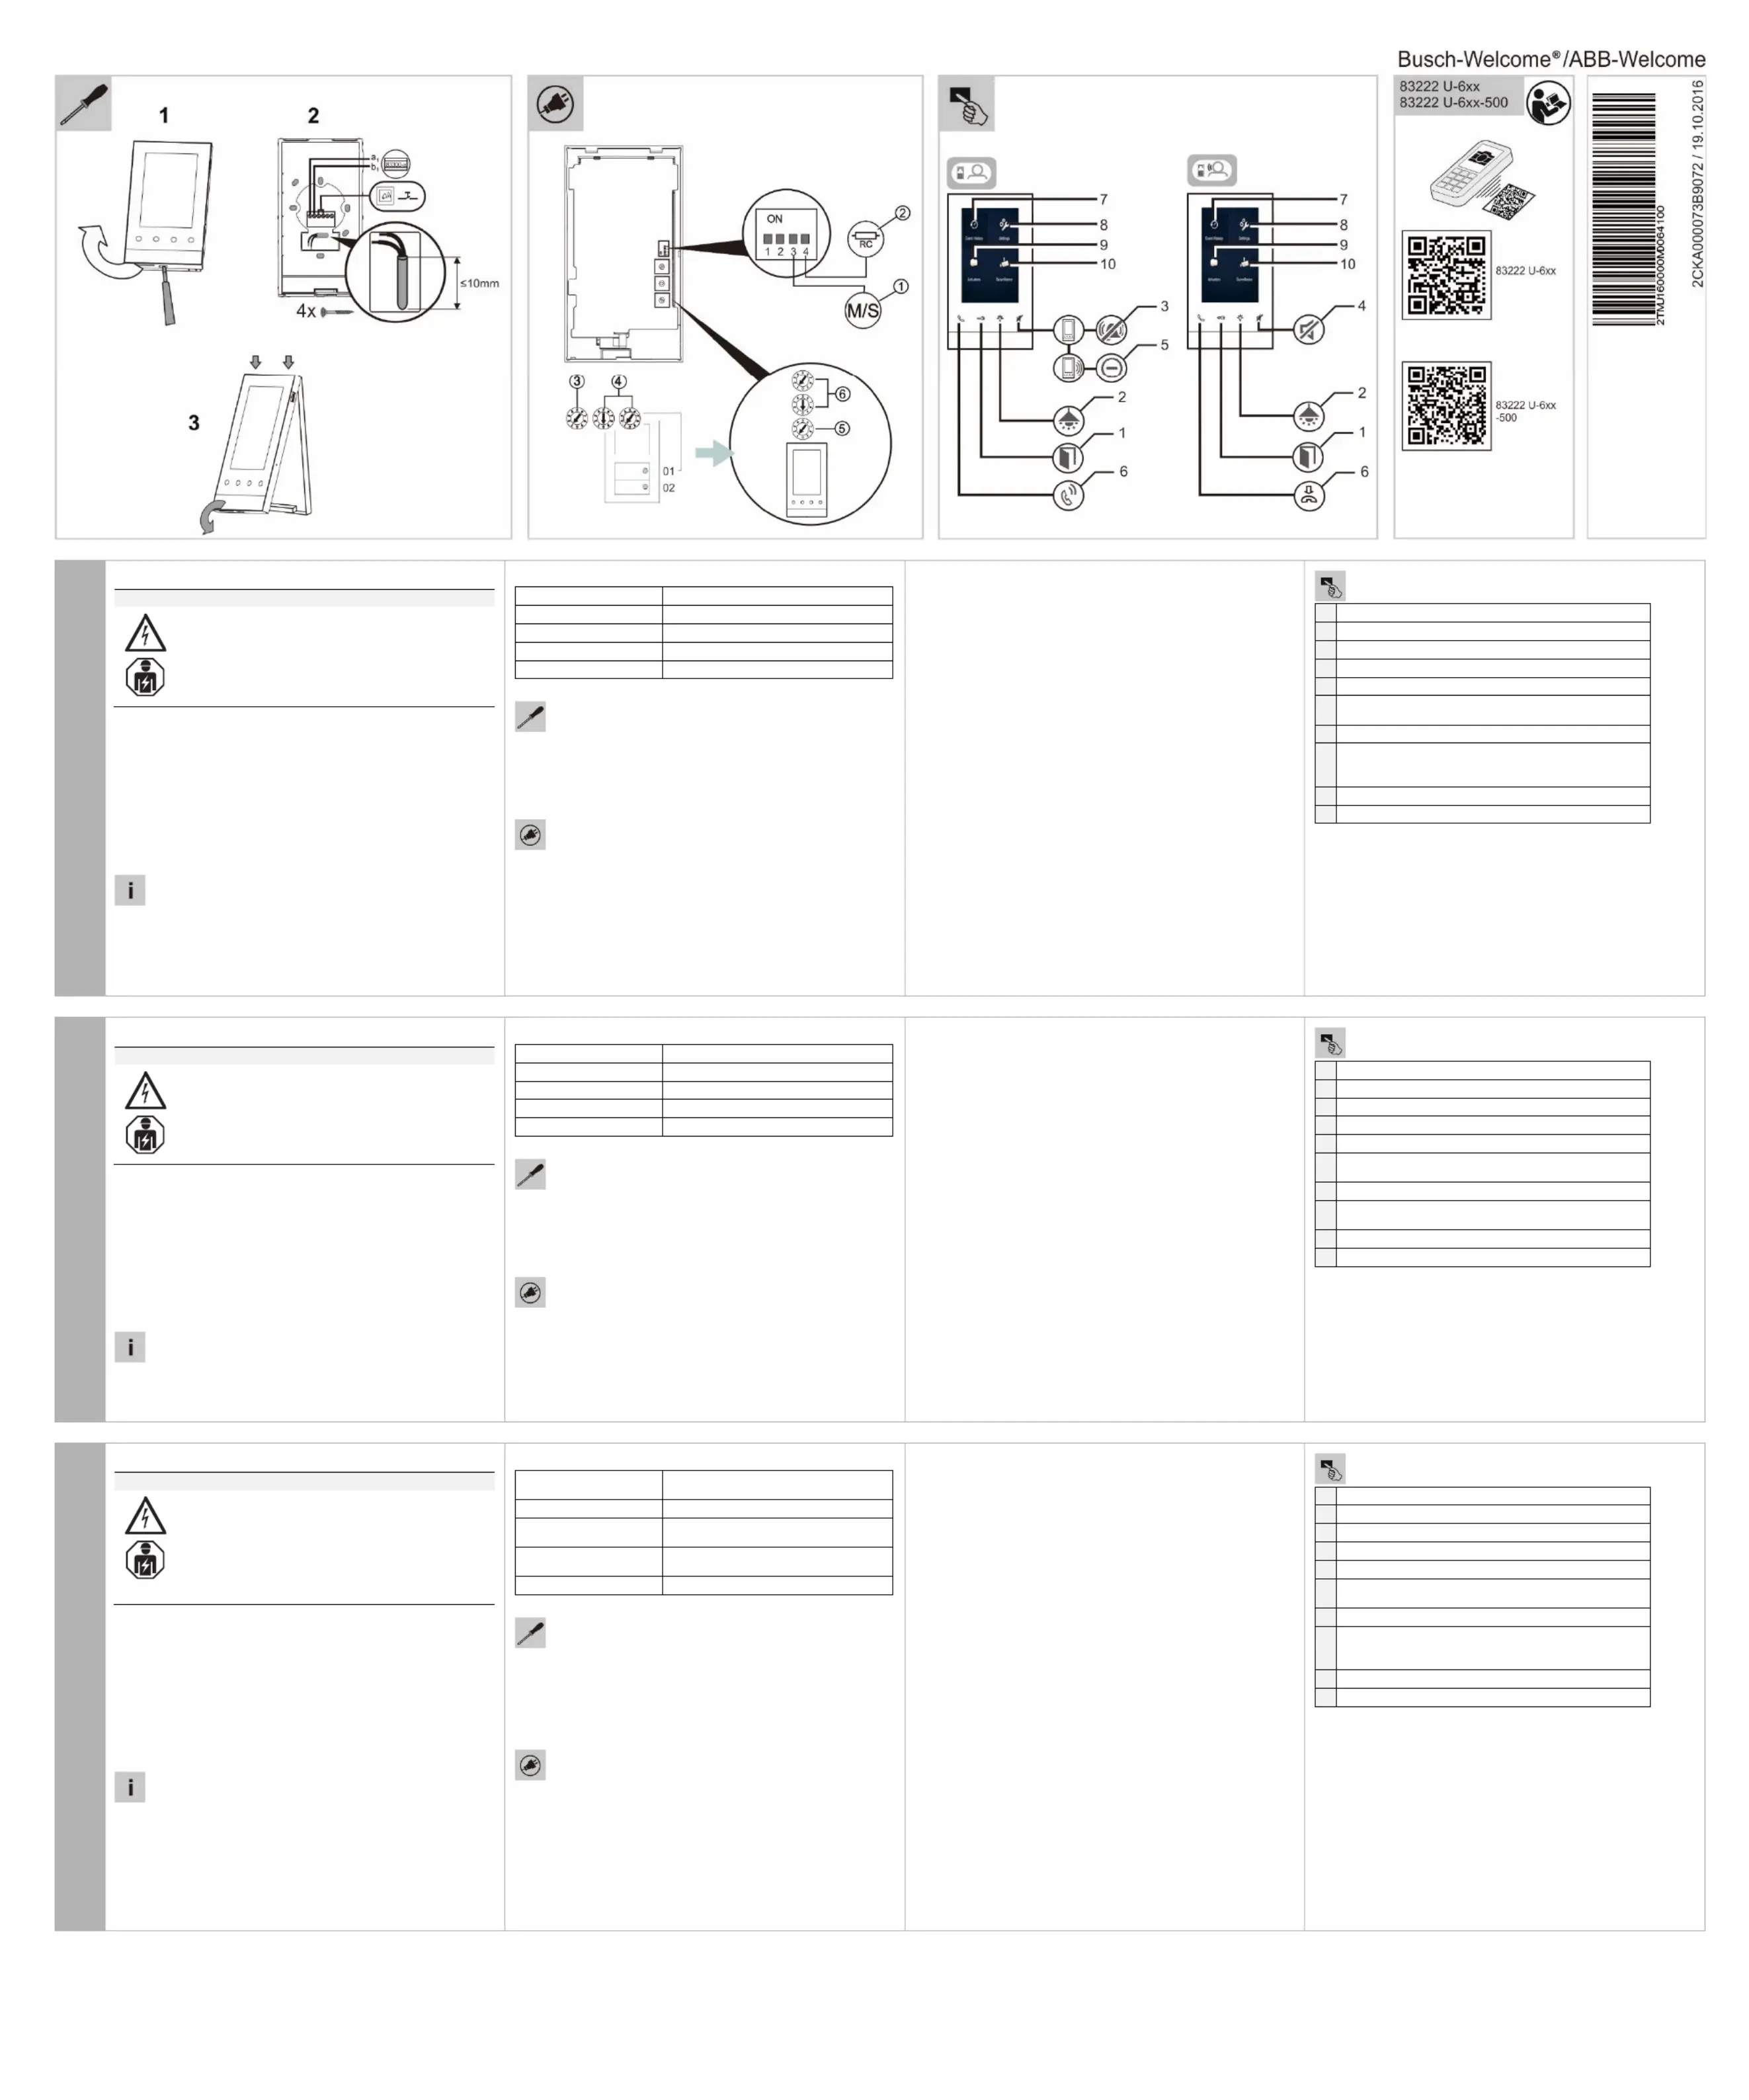
Montage
1. Gerät von der Montageplatte abheben
2. Trägerplatte montieren
Leitungen anschließen
Gerät adressieren (siehe Kapitel "Anschluss")
3. Gerät an die Montageplatte anbringen
Anschluss
In jeder Wohnung muss eine Station als „Master“ eingestellt sein
(Schalter ① auf „ON“). Alle weiteren Innenstationen in derselben
Wohnung müssen auf „Slave“ eingestellt sein (Schalter ① auf
„OFF“).
In Videoinstallationen oder gemischten Audio- und Videoinstalla-
tionen muss der Abschlusswiderstand bei dem letzten Gerät ei-
nes Zweiges eingeschaltet werden (Schalter ② auf „ON“).
Adressierung für Außenstationen:
Stellen Sie mit dem linken Wahlschalter die Adresse der
Außenstation ein (1 bis 9).
Stellen Sie dann mit den beiden anderen Wahlschaltern ④ die
Adresse (Zehner- und Einerstelle z.B. 01) des ersten Klingeltas-
ters der Außenstation ein. Die darunter liegenden Klingeltaster
werden fortlaufend nummeriert.
Adressierung für Innenstationen:
Stellen Sie mit dem linken Wahlschalter die Adresse der
Standard-Außenstation ein (1 bis 9).
Stellen Sie dann mit den beiden anderen Wahlschaltern ⑥ die
Adresse (Zehner- und Einerstelle z.B. 01) der Innenstation ein.
Bedienung
1 Tür öffnen
2
Beleuchtung schalten
3 Türklingel abstellen
4 Im Gespräch: Stummschaltung
5 Ankommender Ruf: Ruf ablehnen
6
Sprechverbindung
aufbauen / beenden
7 Gesprächshistorie anzeigen
8
Einstellungen (Änderung der Einstellungen über den
Touchscreen, z. B. Kameraliste, Klingelton, Lautstärke,
Datum und Uhrzeit)
9 Schaltaktoren steuern
10 Außenstation überwachen
Service
Busch-Jaeger Elektro GmbH – ein Unternehmen der ABB-Gruppe,
Freisenbergstraße 2, D-58513 Lüdenscheid,
www.BUSCH-JAEGER.com, Tel.: +49 2351 956-1600
English
Indoor Video Station
WARNING
Dangerous currents flow through the body when coming
into direct or indirect contact with live components. This
can result in electric shock, burns or even death.
Disconnect the mains power supply prior to installation
and/or disassembly!
Permit work on the 230 V supply system to be per-
formed only by specialist staff.
Please read the mounting instructions carefully and keep them
for future use.
Additional user information is available at www.busch-jaeger.com
or by scanning the QR code.
Further information on planning Welcome see user manual
(Download at www.busch-jaeger.com).
Intended use
The indoor video station is an integral part of the Busch Welcome
®
/ABB-Welcome door communication system and operates exclusively
with components from this system. The device must only be installed
in dry indoor rooms.
Product description
The indoor video station serves as end device for communication
with the Busch Welcome
®
/ABB-Welcome outdoor stations.
Technical data
Operating temperature -5 °C – +40 °C
Protection IP 30
Single-wire clamps 2 x 0,6 mm² – 2 x 1 mm²
Fine-wire clamps 2 x 0,6 mm² – 2 x 0,75 mm²
Bus voltage 28 V- ±2 V
Mounting
1. Lift the device off the mounting plate
2. Install the carrier plate
Connect the cables
Address the device (see chapter “Connection”)
3. Attach the device to the mounting plate
Connection
One station in each apartment must be set as "Master" (Switch ①
on “ON”). All additional indoor stations in the same apartment
must be set on "Slave" (Switch ① on “OFF”).
In video installations or mixed audio and video installations the
terminal resistor must be activated on the last device of an arm
(Switch ② on “ON”)'.
Addressing for outdoor stations:
With the left selector switch ③ set the address of the outdoor
station (1 to 9).
Then use the other two selector switches ④ to set the address
(tens and single digits e.g. 01) of the first door bell button of the
outdoor station. The next door bell buttons below are numbered
consecutively.
Addressing for indoor stations:
With the left selector switch ⑤ set the address of the default
outdoor station (1 to 9).
Then use the other two selector switches ⑥ to set the address
(tens and single digits e.g. 01) of the indoor station.
Operation
1 Open door
2
Switching the lighting
3 Deactivating the door bell
4 During a call: mute function
5 Incoming call: reject call
6
Setting up / ending a voice
connection
7 Display the talking history
8
Settings (change of settings via touch screen, e.g.
camera list, ringtone, volume, date and time)
9 Control switch actuators
10 Make a surveillance to outdoor station
Service
Busch-Jaeger Elektro GmbH - an ABB company,
Freisenbergstraße 2, D-58513 Lüdenscheid,
www.BUSCH-JAEGER.com, Tel: +49 2351 956-1600
Français
Interphone intérieur vidéo
AVERTISSEMENT
Un contact direct ou indirect avec des pièces sous tension
entraîne un passage de courant dangereux dans le corps.
Celui-ci risque d’entraîner un choc électrique, des brûlures
ou la mort.
Déconnecter la tension secteur avant tout montage et
démontage !
Confier toute intervention sur l'alimentation électrique
en 230 V uniquement au personnel spécialisé !
Lire attentivement et conserver les instructions de montage.
Des informations utilisateurs supplémentaires sont disponibles
sur le site www.busch-jaeger.com ou en scannant le code QR.
Des informations supplémentaires sur la planification du système
Welcome sont disponibles dans le manuel utilisateur (télé-
chargement à l'adresse www.busch-jaeger.com).
Utilisation conforme
L'interphone intérieur vidéo fait partie du système d'interphonie
Busch Welcome
®
/ABB-Welcome et fonctionne exclusivement avec
les composants de ce système. L'appareil ne doit être installé que
dans des pièces intérieures à l'abri de l'humidité.
Description du produit
L'interphone intérieur vidéo sert de terminal pour la communication
avec les interphones extérieurs Busch-Welcome
®
/ ABB Welcome.
Caractéristiques techniques
Température de
fonctionnement
-5 °C – +40 °C
Degré de protection IP 30
Bornes à un conduc-
teur
2 x 0,6 mm² / 2 x 1 mm²
Bornes à fils de faible
section
2 x 0,6 mm² / 2 x 0,75 mm²
Tension du bus 28 V- ±2 V
Montage
1. Soulever l'appareil de la plaque de montage
2. Monter la plaque support
Brancher les câbles
Procéder à l'adressage de l'appareil (voir chapitre « Rac-
cordement »)
3. Monter l'appareil sur la plaque de montage
Raccordement
Dans chaque logement, un interphone doit être configuré en tant
que « Maître » (commutateur ① sur « ON »). Tous les inter-
phones intérieurs du même logement doivent être des
« Esclaves » (commutateur ① sur « OFF »).
Sur les installations vidéo ou les installations mixtes audio et
vidéo, la résistance de raccordement doit être activée (commu-
tateur ② sur « ON ») sur le dernier appareil d'une branche.
Adressage pour les interphones extérieurs :
A l'aide du sélecteur ③ de gauche, réglez l'adresse de l'inter-
phone extérieur (1 à 9).
A l'aide des deux autres sélecteurs ④, réglez l'adresse (la
dizaine et l'unité par ex. 01) du premier bouton de sonnette de
l'interphone extérieur. Les boutons de sonnette sous-jacents sont
numérotés en continu.
Adressage pour les interphones intérieurs :
A l'aide du sélecteur ⑤
de gauche, réglez l'adresse de l'inter-
phone extérieur standard (1 à 9).
Réglez ensuite l'adresse (dizaine et unité, par exemple 01) de
l'interphone intérieur, à l'aide des deux autres sélecteurs ⑥.
Utilisation
1 Ouvrir une porte
2
Allumer l'éclairage
3 Désactiver le carillon de porte
4 Lors d'une conversation : mode silence
5 Appel entrant : refuser l'appel
6
Etablir / couper
une communication
7 Afficher l'historique de communication
8
Réglages (modification des réglages à l'aide de l'écran
tactile, par ex. liste des caméras, sonnerie, volume,
date et heure)
9 Commander des actionneurs de commutation
10 Surveiller un interphone extérieur
Service
Busch-Jaeger Elektro GmbH – une entreprise du groupe ABB,
Freisenbergstraße 2, D-58513 Lüdenscheid
www.BUSCH-JAEGER.com, Tél. : +49 2351 956-1600
www.busch-jaege
r
-
catalogue.com/8300-0-
0482,artikel.html
www.busch-jaege
r
-
katalog.de/8300-0-
0480,artikel.html
Tuotetiedot
| Merkki: | Busch-Jaeger |
| Kategoria: | Intercomssteem |
| Malli: | 83222 U-611 |
Tarvitsetko apua?
Jos tarvitset apua merkille Busch-Jaeger 83222 U-611 esitä kysymys alla ja muut käyttäjät vastaavat sinulle
Intercomssteem Busch-Jaeger Käyttöohjeet

24 Tammikuuta 2025
4 Joulukuuta 2024
Intercomssteem Käyttöohjeet
Viimeisimmät Intercomssteem Käyttöohjeet
28 Maaliskuuta 2025
27 Maaliskuuta 2025
27 Maaliskuuta 2025
27 Maaliskuuta 2025
27 Maaliskuuta 2025
20 Helmikuuta 2025
6 Helmikuuta 2025
30 Tammikuuta 2025
25 Tammikuuta 2025
25 Tammikuuta 2025