X Rocker CXR3 LED Käyttöohje
Lue alta 📖 käyttöohje suomeksi merkille X Rocker CXR3 LED (16 sivua) kategoriassa Gamestoel. Tämä opas oli hyödyllinen 65 henkilölle ja sai 4.2 tähden keskimäärin 7 käyttäjältä
Sivu 1/16
CONSOLE CONNECTION: CONTROLLER CONNECTION METHOD (PS4™/PS5™, XBOX™ ONE/SERIES, SWITCH™)
PS4
TM
DUALSHOCK 4
TM
CONNECTION GUIDE*
1. Connect the B1 cable to the bottom of the PS4
TM
controller via the headset socket.
2. Connect the other end of the B1 cable to the chair via the green input port.
3. With the PS4
TM
turned on, go to the main menu (or locate the main menu screen). Press and
hold the PS button on the PS4
TM
controller until the quick menu appears on screen.
4. In this menu select [Adjust sound and devices].
5. Then select [Output to Headphones].
6. Change the setting from [Chat Only] to [All Audio].
7. Make sure the volume in the previous menu is set to the maximum.
1. Connect the B1 cable to the bottom of the PS5
TM
Dual sense controller via the headset socket.
2. Connect the other end of the B1 cable to the chair via the green input port.
3. Press the PlayStation
TM
button on the controller once to bring up the control center.
4. Select [Sound] > [Output Device] > [Headset (controller)].
5. Ensure that [Output to Headphones] is correctly set to [All Audio].
6. You can check this by going to [Settings] > [Sound] > [Audio Output] > [Output to headphones]
> [All Audio].
PS5
TM
DUALSENSE
TM
CONNECTION GUIDE*
1. Connect the B1 cable to the bottom of the Xbox
TM
controller via the headset socket.**
2. Connect the other end of the B1 cable to the chair via the green input port.
3. The Xbox
TM
will automatically recognize the connection and pass through to the chair.
4. To increase volume, press the guide button, navigate to the speaker icon and increase the
headset volume setting.
XBOX ONE
TM
TM
1. Connect the B1 cable to the bottom of the Switch
TM
via the headphone socket.***
2. Connect the other end of the B1 cable to the chair via the green input port.
SWITCH
TM
CONNECTION GUIDE
CTIA compliant headset. If you use an OMTP compliant headset, then you may experience issues with chat and audio functionality.
** You may need an Xbox One
TM
headset adapter if a headset socket is not available on your controller. These are available separately through any gaming retailer.
*** Voice-Chat compatibility for Switch
TM
may rely on a third-party mobile phone app rather than direct console connection for certain games, please check the game developer’s information if you encounter any
compatibility issues.
B1
B2
B4
B5
VIEW LATEST INSTRUCTIONS ONLINE:
XROCKERUK.COM
XROCKERGAMING.COM
Missing parts?
USER MANUAL ICONS
USER MANUAL ICONS
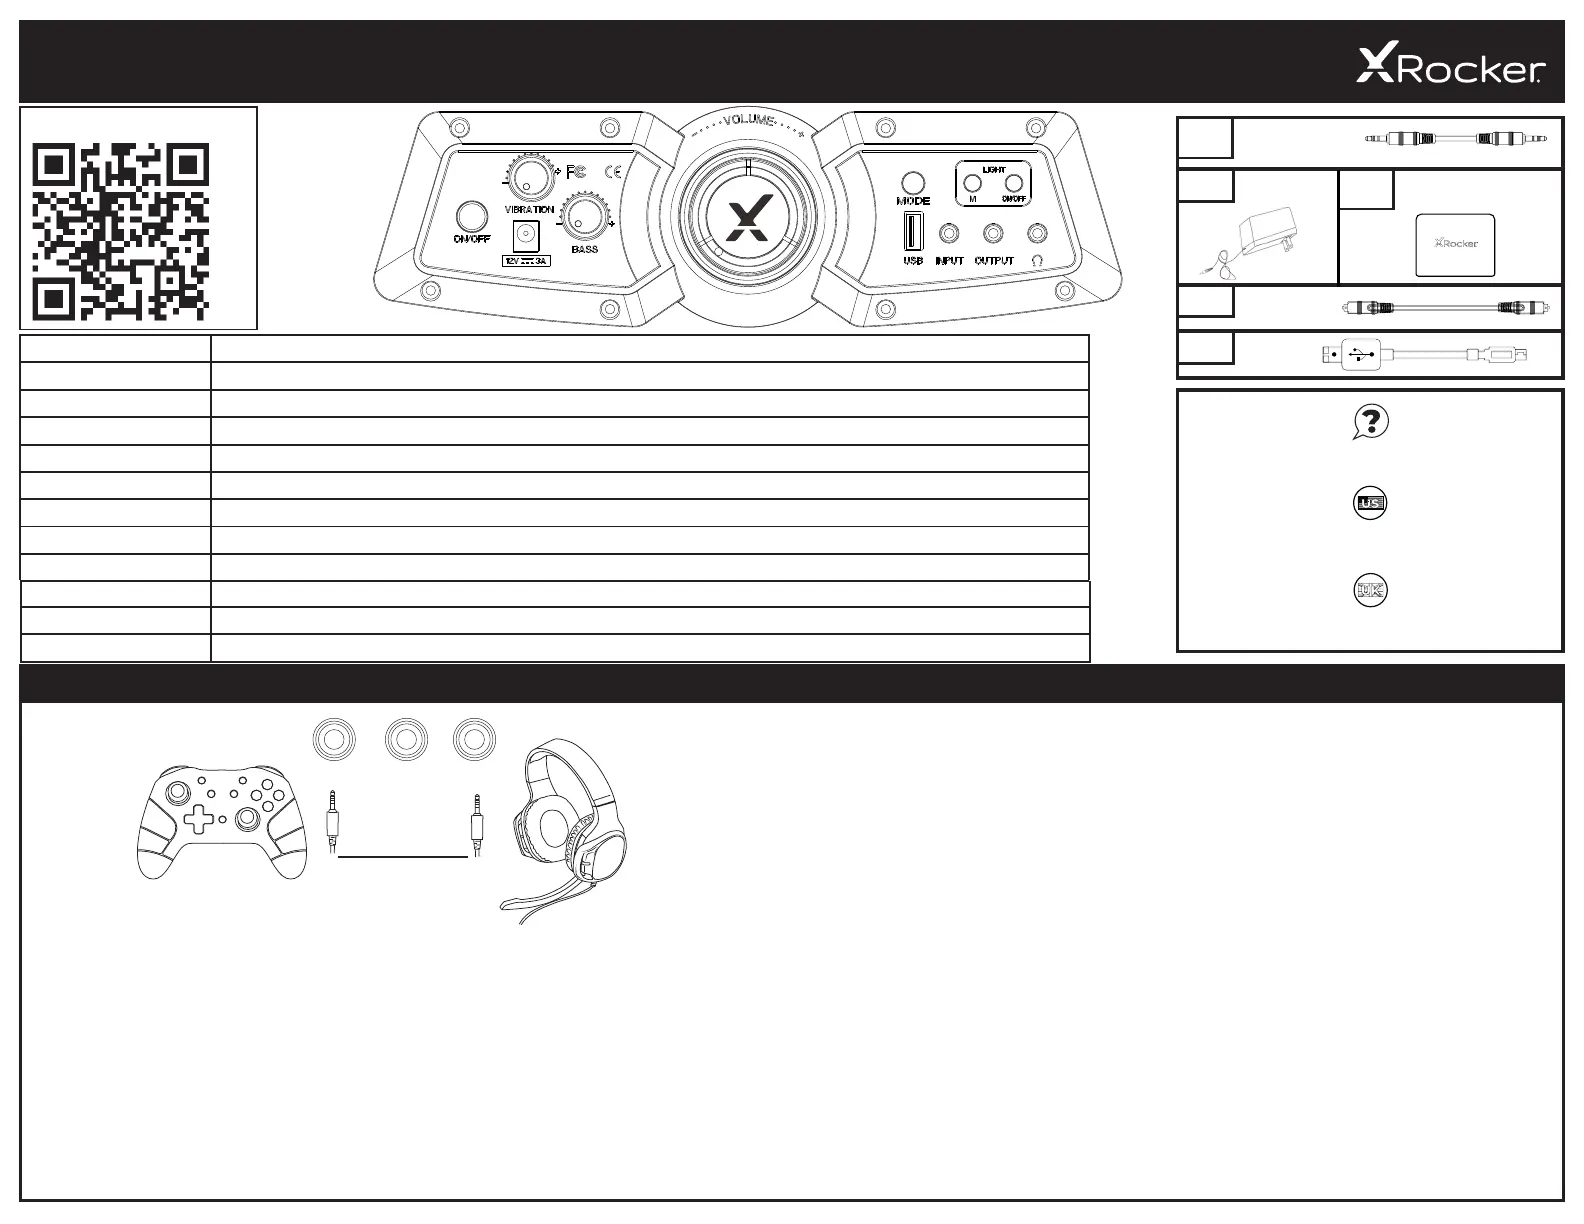
2. Power InputPlug your power supply into this socket
3. Vibration
4. Bass
5. Volume
6. USB Used to charge devices such as mobile phones. (5V/1A Output)
7. InputPlug the 3.5mm cable into here for audio from your TV or your controller
8. OutputAllows you to connect multiple chairs for audio
9. Headphone SocketPlug your headphones or gaming headset in here to play quietly. Perfect for night-time play.
3M 3.5MM
AUDIO CABLE
1M OPTICAL
TOSLINK AUDIO
CABLE
MICRO USB
CABLE
POWER
SUPPLY
WIRELESS DAC
TRANSMITTER
B3
TER
DAC TRANSMIT
OUTPUTHEADPHONEINPUT
XROCKERGAMING.COM
XROCKERGAMING.COM/PAGES/SUPPORT
USER MANUAL ICONS
1
1
2
4
5
6
8
10. Mode Button
11. Light mode Button
12. Light On/Off
Press to toggle LED on/off
Use this to switch between wired,Bluetooth or wireless audio
Press this button to toggle between 10+ different color modes
2.1 DUAL
WITH LED
WITH
VIBRATION
- ENGLISH
3
12
11
9
10
7
Tuotetiedot
| Merkki: | X Rocker |
| Kategoria: | Gamestoel |
| Malli: | CXR3 LED |
Tarvitsetko apua?
Jos tarvitset apua merkille X Rocker CXR3 LED esitä kysymys alla ja muut käyttäjät vastaavat sinulle
Gamestoel X Rocker Käyttöohjeet

26 Joulukuuta 2024
16 Lokakuuta 2024
15 Lokakuuta 2024
15 Lokakuuta 2024
Gamestoel Käyttöohjeet
Viimeisimmät Gamestoel Käyttöohjeet
3 Huhtikuuta 2025
3 Huhtikuuta 2025
3 Huhtikuuta 2025
30 Maaliskuuta 2025
28 Maaliskuuta 2025
27 Maaliskuuta 2025
27 Maaliskuuta 2025
27 Maaliskuuta 2025
27 Maaliskuuta 2025
27 Maaliskuuta 2025