Westinghouse Hernando 6125200 Käyttöohje
Westinghouse Helpotus Hernando 6125200
Lue alta 📖 käyttöohje suomeksi merkille Westinghouse Hernando 6125200 (2 sivua) kategoriassa Helpotus. Tämä opas oli hyödyllinen 44 henkilölle ja sai 4.9 tähden keskimäärin 8 käyttäjältä
Sivu 1/2
MOUNTING AND WIRING INSTRUCTIONS
NOTE: Underwriters Laboratories (UL) does not require all fixtures to have ground wires. These fixtures
meet all UL specifications.
1. Turn off power at fuse box to avoid possible electric shock.
2. Thread mounting screw (A) into the matching hole of mounting bar (B).
3. Secure the mounting bar (B) to outlet box (C) with outlet box screws (D) (if applicable).
4. Identify color coding of fixture wires (see figure 2).
5. Connect the black wire from the fixture with the black wire (live wire) from the outlet box (C) by wire
connector (E), and wrap the wire connector (E) with electrical tape for a more secure connection.
6. Connect the white wire from the fixture with the white wire (neutral wire) from the outlet box (C)
by
wire connector (E), and wrap the wire connector (E) with electrical tape for a more secure connection.
7. Partially thread green grounding screw (J) into side hole (K) on cross bar (B) (see figure 1).
8. Wrap grounding wire from fixture around green grounding screw (J) leaving enough excess wire,
then connect the excess grounding wire from the fixture with the grounding wire from outlet box (C)
by wire connector (E) (if applicable), then wrap the wire connector (E) with electrical tape for a more
secure connection.
9. Tighten grounding screw (J). Do not over tighten.
10. Tuck wires inside outlet box (C) (see figure 1).
FIXTURE ASSEMBLY INSTRUCTIONS
Warning: This fixture is for indoor use only.
1.
Thread the decorative tube (F) onto the stud (G).
2. After wires are connected, tuck them carefully inside outlet box (C). Raise canopy (H) allowing the
mounting screw (A) to protrude through the hole in the canopy (H), and secure with cap nuts (L).
3. Install lamp(s). Do not exceed recommended wattage.
WARNING
Turn off electricity to the mounting site before beginning installation.
Mounting instructions must be followed exactly as shown for the fixture to be safely supported.
CLEANING AND CARE
To clean, wipe fixture with soft cloth. Clean glass with mild soap. Spray from chemical cleaners can
discolor the finish of fixture. Do not use scouring pads, powders, steel wool or abrasive paper to
clean this fixture.
ORDERING PARTS
Keep this manual for future reference, and in case replacement parts are needed. Available parts can
be ordered from place of purchase. Use exact wording from diagrams when ordering parts.
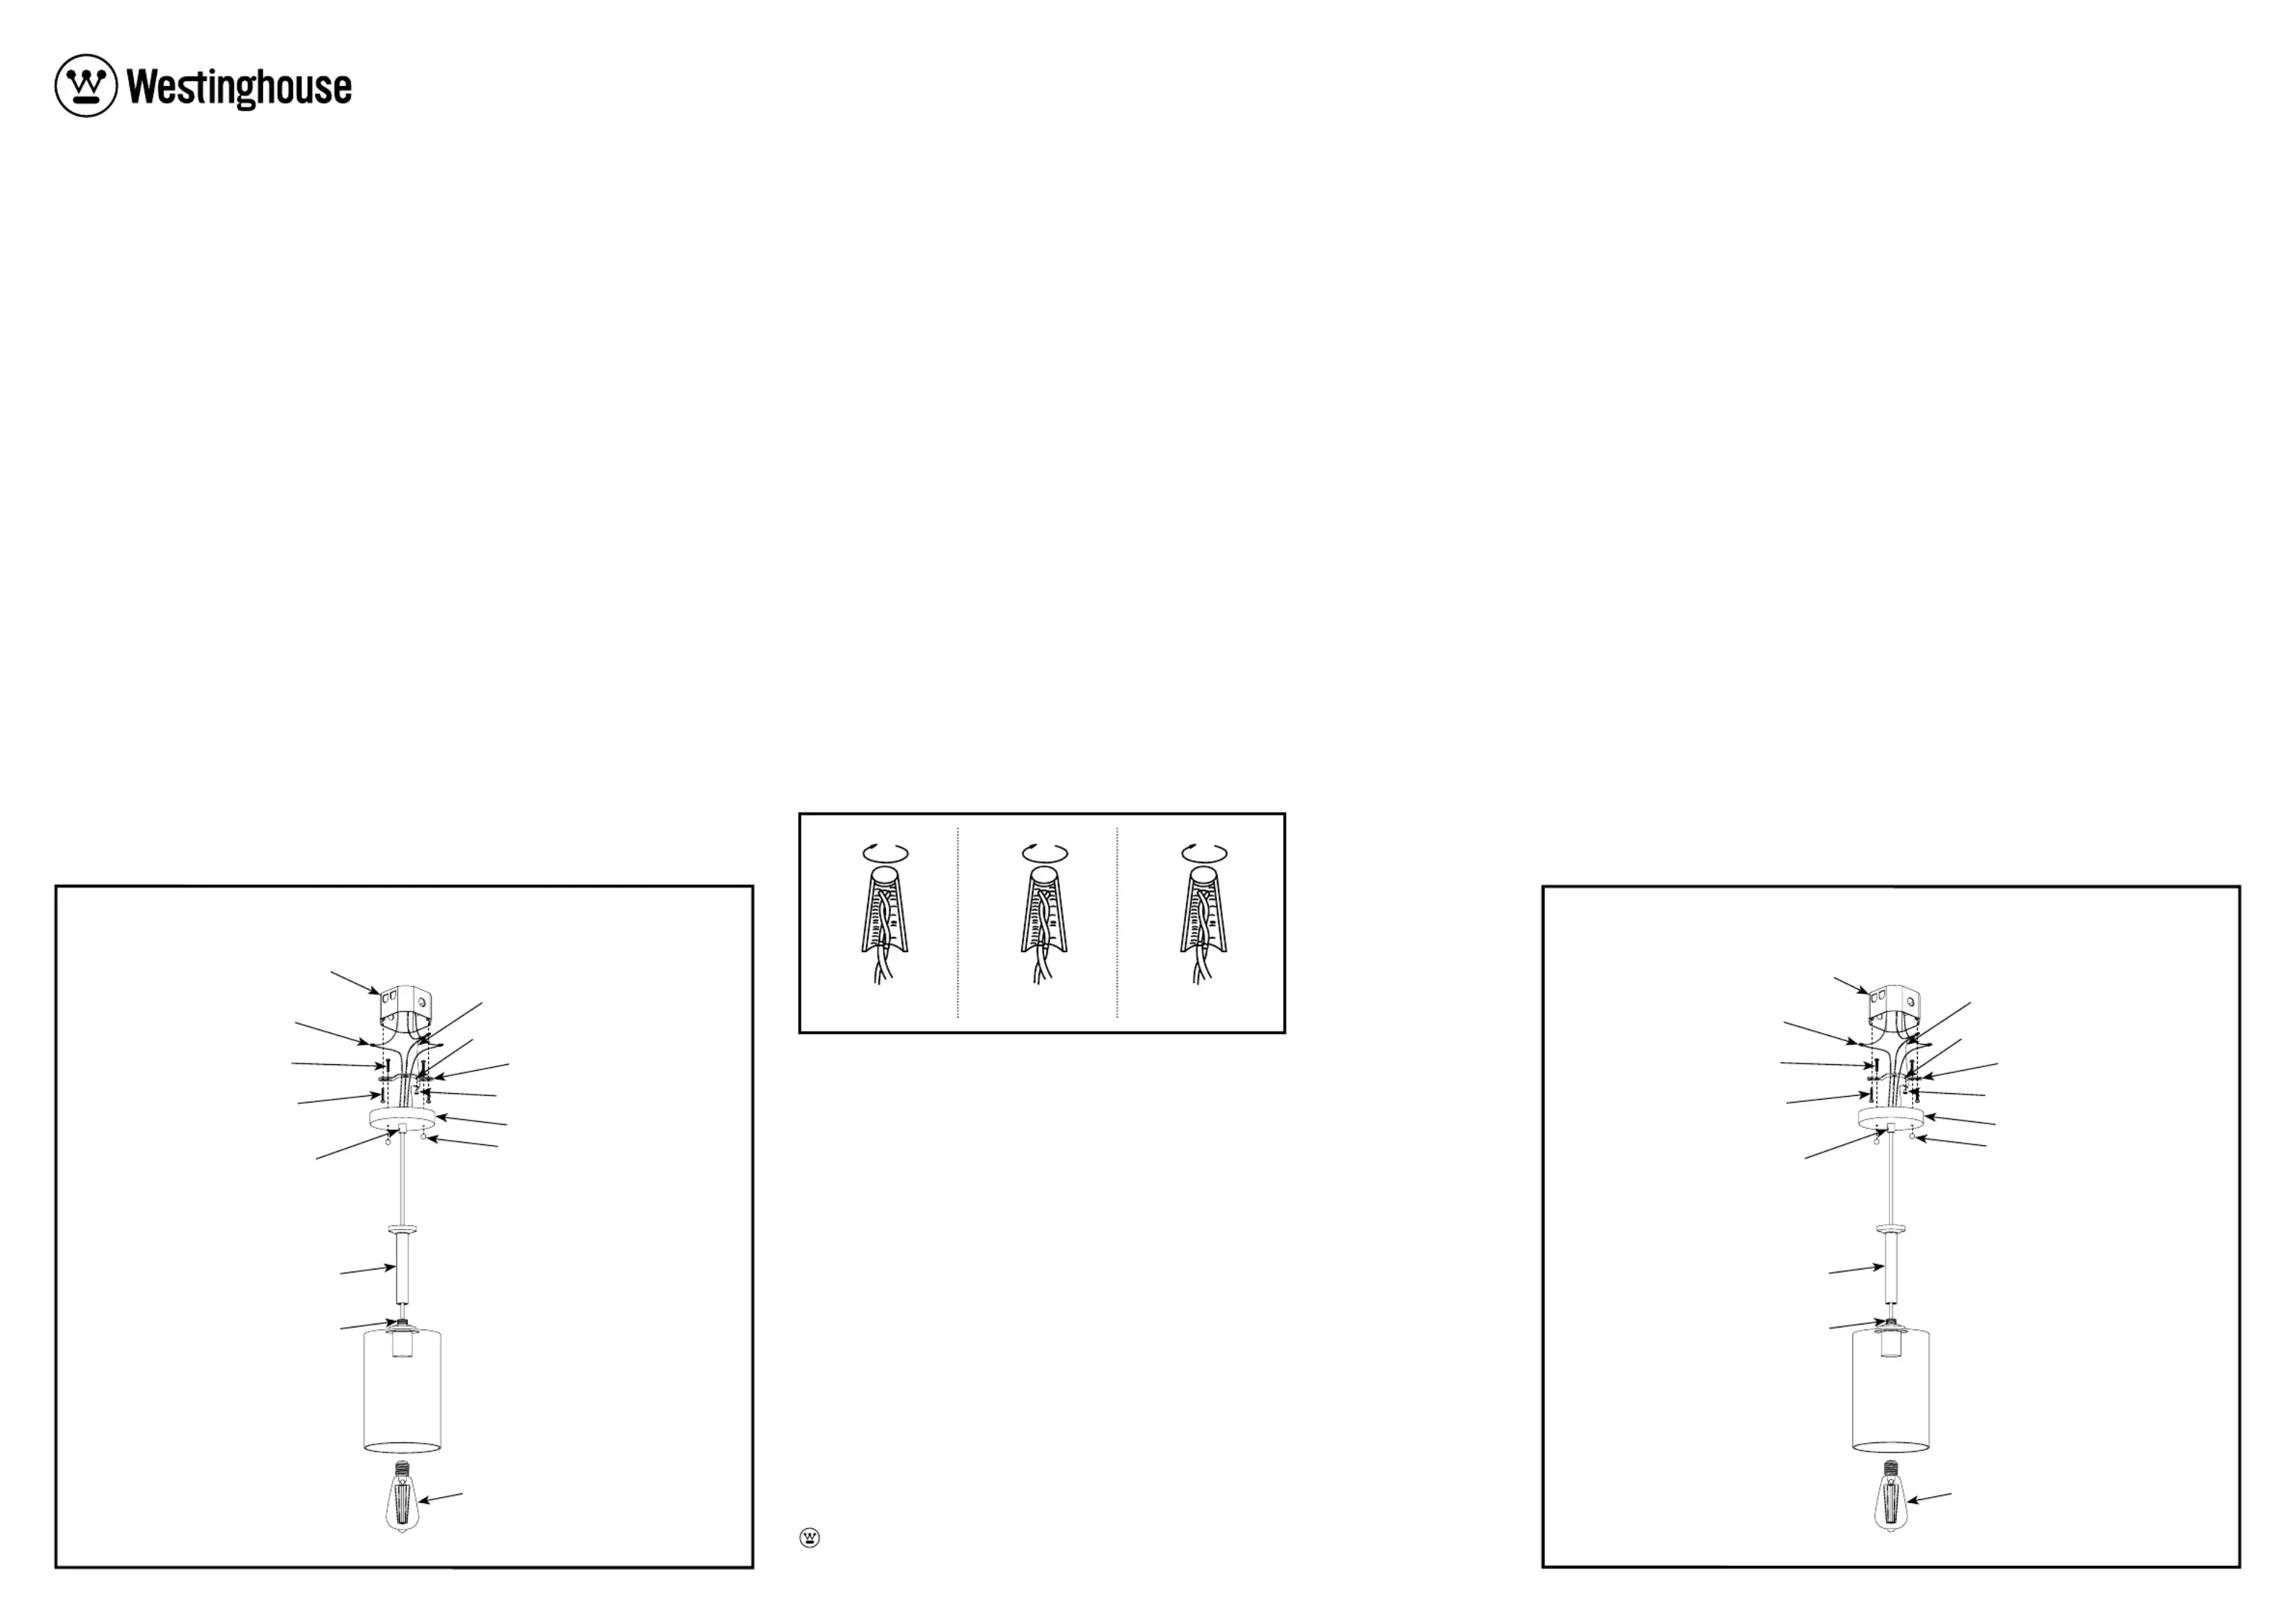
FIGURE 2.
FIXTURE
WIRES:
Black
HOUSE
WIRES:
Black
(Hot)
HOUSE
WIRES:
White
(Neutral)
HOUSE
WIRES:
Bare
Copper
(Ground)
FIXTURE
WIRES:
Bare
Copper
(Ground)
FIXTURE
WIRES:
White
ADJUSTING LENGTH OF CORD (if needed)
These steps should only be performed by someone familiar with working with electrical wiring. Care
must be taken when adjusting the length of the cord to ensure insulation on internal wires is not
damaged. If you are not familiar with these steps, seek the aid of a qualified electrician.
1.
Loosen the screw in strain relief (Q) until cord slides easily, being careful not to completely remove
screw.
Slide canopy down cord until the fixture is the desired distance below the canopy. Tighten
the screw in the strain relief (Q) until cord does not slide.
2. Cut excess cord approximately six to seven inches (6”-7”) above canopy.
3. Leaving at least one inch (1”) of outer insulation above the canopy, carefully cut through outer
insulation of cord, being careful not to damage inner insulation. Remove outer insulation. Strip
inner insulation from end of both wires, leaving approximately 1/2 inch of wire exposed.
4. For cords without differently colored inner insulation, identify the tracer lines on the new ends of
the inner wires to match the labels on the original ends and connect to house wiring as described
in the appropriate step listed below in the Mounting and Wiring Instructions section.
W-753
042822
ASSEMBLY INSTRUCTIONS FOR INDOOR LIGHTING FIXTURE
Congratulations on your Westinghouse purchase. This fixture has been designed to give you many
years of beauty and service. For questions and comments, please visit www.westinghouselighting.
com/contact-us.
NOTE:Carefully unpack fixture and parts. Make sure all parts are included before discarding any pack-
ing materials (see figure 1).
Owner’s Manual
Indoor Lighting Fixture
Installation Instructions
FIXTURE WARRANTY
This Westinghouse lighting fixture is warranted against defects in material and workmanship for a period
of five years from purchase date. This warranty is in lieu of all other warranties expressed or implied.
This warranty does not cover acts of nature such as lightening damage, or corrosion and discoloration
of components, nor does it cover damages caused through abuse, improver installation, surges in
electric current, or acts of third parties.
This warranty does not cover the costs of removing and re-installing the lighting fixture.
If this product fails for any reason covered by this warranty, please contact us at www.westinghouse-
lighting.com/contact-us.
WARNING:
ELECTRICAL SHOCK CAN RESULT IN SERIOUS INJURY.
Read and follow instructions exactly as shown. If instructions are unclear, do not proceed.
Contact a qualified electrician. Read all instructions before beginning. Proper wiring is essen-
tial for safe operation of this fixture. When cutting or drilling into walls or ceilings, do not dam-
age electrical wiring, gas lines, or water lines. If any of the fixture or wiring components are
damaged, do not install fixture. Return to place of purchase.
For fixtures provided with 75° C or 90° C supply wire warning only. (These warnings are provid-
ed on the U.L. label and on the fixture carton.) Risk of fire. Most dwellings built before 1985
have supply wires rated 60° C. Consult a qualified electrician before installing.
Guide d’utilisation
Instructions d’installation
Appareil d’éclairage pour utilisation intérieure
LES INSTRUCTIONS D’ASSEMBLAGE DE L’APPAREIL D’ÉCLAIRAGE POUR UTILISATION INTÉRIEURE
Félicitations ! Vous avez acheté un produit de Westinghouse Lighting. Cet appareil d’éclairage a été
conçu pour durer de nombreuses années. Si vous avez des questions ou des commentaires à
nous communiquer, veuillez visiter www.westinghouselighting.com/contact-us.
NOTA : Déballez soigneusement l’appareil d’éclairage et les pièces. Assurez-vous que toutes les pièces
y sont avant de mettre l’emballage au rebut (voir fig. 1).
GARANTIE LIMITÉE DE CINQ ANS
Ce luminaire Westinghouse est garanti pièces et main-d’oeuvre pour une période de Cinq ans à compter
de la date d’achat. Cette garantie remplace toute autre garantie, explicite ou implicite.
Cette garantie ne couvre pas les phénomènes naturels comme les dommages de la foudre, ni la corro-
sion ou la décoloration des composants, pas plus qu’elle ne couvre les dommages causés par les abus,
une installation inappropriée, les surtensions électriques ou les actes de tiers.
Cette garantie ne couvre pas les coûts de dépose et de pose du luminaire.
En cas de défaillance du produit, pour une raison quelconque, couverte par cette garantie, veuillez
nous contacter via www.westinghouselighting.com/contact-us.
MISE EN GARDE: L’ÉLECTROCUTION POURRAIT CAUSER DE GRAVES BLESSURES PERSONNELLES.
Lisez ces instructions et suivez-les exactement comme illustré. En cas de doute, ne commencez
pas l’installation. Consultez un électricien qualifié. Lisez toutes les instructions avant de com-
mencer l’installation. Un câblage approprié est essentiel au bon fonctionnement de cet appareil
d’éclairage. Lorsque vous faites une entaille ou que vous percez un trou dans un mur ou un
plafond, n’endommagez pas les câbles électriques, les canalisations de gaz ou d’eau. Si l’un des
composants de raccordement ou de l’appareil d’éclairage est endommagé, n’installez pas cet
appareil d’éclairage. Retournez-le à l’endroit où vous l’avez acheté.
Convient uniquement aux appareils comportant un avertissement indiquant que l’appareil
d’éclairage est doté d’un fil supportant une chaleur de 75°C ou 90°C. (Ces avertissements se
trouvent sur l’étiquette U.L. et sur l’emballage de l’appareil d’éclairage.)
*NOT SUPPLIED
FIGURE 1.
*GROUND
WIRE
MOUNTING
SCREWS (A)
CROSS BAR (B)
*OUTLET BOX
SCREWS (D)
STRAIN RELIEF (Q)
*OUTLET
BOX (C)
WIRE
CONNECTORS (E)
SIDE HOLE (K)
GREEN GROUNDING
SCREW (J)
CAP NUTS (L)
CANOPY (H)
DECORATIVE
TUBE (F)
STUD (G)
Line art shown may not exactly match the fixture enclosed.
However, the installation instructions do apply to this fixture.
Il est possible que le dessin illustré ici ne soit pas la reproduction exacte de l’appareil
d’éclairage contenu dans la boîte.
Les instructions d’installation demeurent cependant valables.
DÉCORATIF
TUBE (F)
MONTANT (G)
*NON FOURNI
FIGURE 1.
*FIL DE MISE
A LA TERRE
VIS DE
FIXATION (A)
BARRE TRANSVERSALE (B)
*VIS DE LA BOITE DE
SORTIE DE COURANT (D)
*BOITE DE SORTIE
DE COURANT (C)
CONNECTEURS
DE FIL (E)
TROU LATERAL (K)
VIS DE MISE A LA
TERRE (VERTE) (J)
ECROUS
CAPUCHONS (L)
CHAPEAU (H)
VERROU DU
CORDON (Q)
Westinghouse Lighting, Philadelphia, PA 19154-1029, U.S.A. www.westinghouselighting.com
and Westinghouse are trademarks of Westinghouse Electric Corporation.
Used under license by Westinghouse Lighting. All Rights Reserved. Made in China
*LAMP
*AMPOULE
Tuotetiedot
| Merkki: | Westinghouse |
| Kategoria: | Helpotus |
| Malli: | Hernando 6125200 |
Tarvitsetko apua?
Jos tarvitset apua merkille Westinghouse Hernando 6125200 esitä kysymys alla ja muut käyttäjät vastaavat sinulle
Helpotus Westinghouse Käyttöohjeet

25 Helmikuuta 2025
25 Helmikuuta 2025
25 Helmikuuta 2025
25 Helmikuuta 2025
25 Helmikuuta 2025
25 Helmikuuta 2025
25 Helmikuuta 2025
25 Helmikuuta 2025
25 Helmikuuta 2025
25 Helmikuuta 2025
Helpotus Käyttöohjeet
Viimeisimmät Helpotus Käyttöohjeet
9 Huhtikuuta 2025
8 Huhtikuuta 2025
8 Huhtikuuta 2025
8 Huhtikuuta 2025
8 Huhtikuuta 2025
7 Huhtikuuta 2025
5 Huhtikuuta 2025
5 Huhtikuuta 2025
5 Huhtikuuta 2025
5 Huhtikuuta 2025