Stamony ST-KS-100N Käyttöohje
Lue alta 📖 käyttöohje suomeksi merkille Stamony ST-KS-100N (6 sivua) kategoriassa Holvi. Tämä opas oli hyödyllinen 24 henkilölle ja sai 4.3 tähden keskimäärin 8 käyttäjältä
Sivu 1/6
Produktname
Product name
Nazwa produktu
Název výrobku
Nom du produit
Nome del prodotto
Nombre del producto
Precíziós mérleg
Schlüsselsafe
Key Safe
Skrzynka szyfrowa
Trezor na klíče
Coret à clés
Lucchetto portachiavi key safe
Caja fuerte para llaves
Kulcsdoboz
Modell
Model
Model produktu
Model
Modèle
Modello
Modelo
Modell
ST-KS-
100N
ST-KS-
200N
ST-KS
-300N
Außenmaße des
Schrankes [mm]
External dimensions
of the cabinet [mm]
Wymiary zewnętrzne
szafki [mm]
Vnější rozměry
skřínky [mm]
Dimensions
extérieures
du coret [mm]
Dimensioni esterne
[mm]
Medidas externas
de la caja [mm]
A szekrény külső
méretei [mm]
121x87x40125x85x42184x85x42,5
Gewicht [kg]
Weight [kg]
Waga [kg]
Hmotnost [kg]
Poids [kg]
Peso [kg]
Peso [kg]
Súly [kg]
0,5 0,450,56
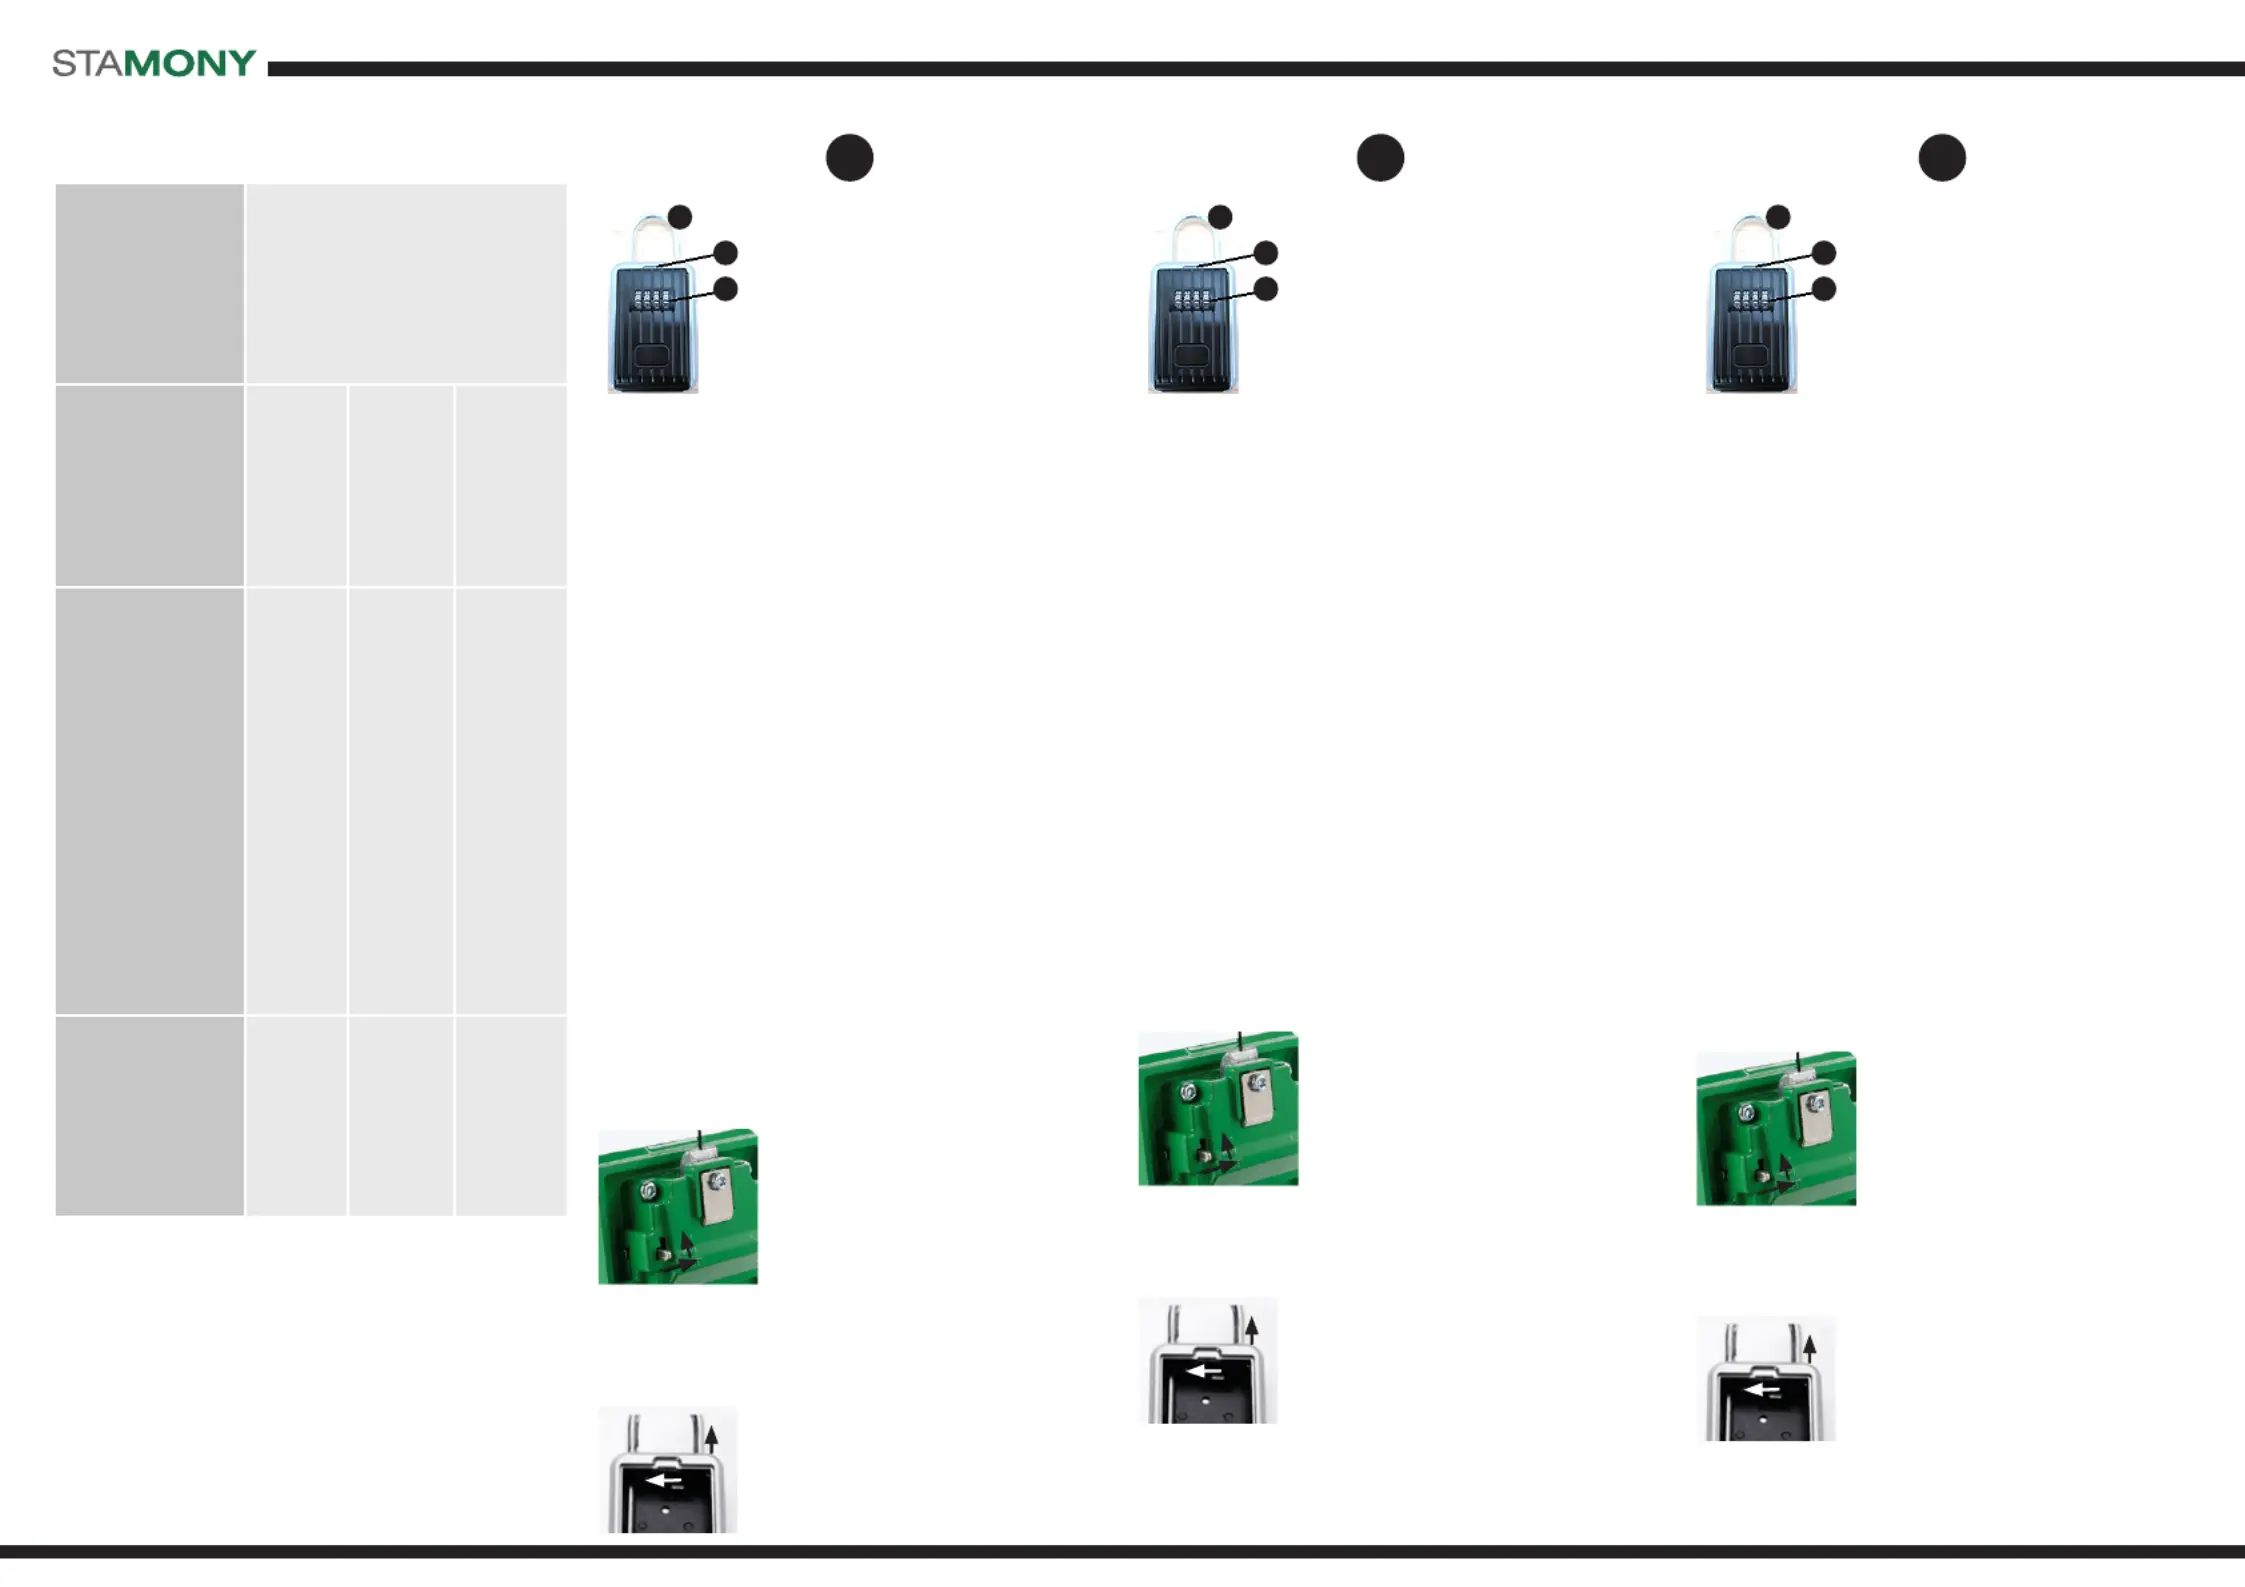
I. Gerätebeschreibung
1. Klemme
(nur für Modell ST-KS-300N)
2. Türönungstaste
3. Chire
II. Modell ST-KS-100N/ST-KS-200N
Önen der Boxtür:
1. Schieben Sie die Blende des Chire nach unten (nur
Modell ST-KS-100N).
2. Drehen Sie die Zierntasten, um den entsprechenden Code
einzustellen (Standard ist der werkseitige Einstellcode bei
0-0-0-0).
3. Drücken Sie die Türönungstaste und önen Sie die Tür.
4. Schlüssel einsetzen / herausziehen.
5. Schließen Sie die Tür (stellen Sie beim Schließen sicher,
dass der Code richtig eingestellt ist).
6. Drehen Sie die Nummernrädchen, um den Code
auszublenden.
7. Bewegen Sie die Ziernabdeckung nach oben (nur für ST-
KS-100N).
III. Codeänderung für das Modell ST-KS-100N:
1. Önen Sie die Tür gemäß den obigen Anweisungen.
2. Bewegen Sie den RESET-Hebel auf der Rückseite des
Geräts nach rechts oben.
3. Stellen Sie die Wählscheiben auf den ausgewählten Code
ein.
4. Bewegen Sie den RESET-Hebel in die Startposition (nach
unten und nach links).
5. Schließen Sie die Tür und drehen Sie die Wählscheiben,
um den Code abzudecken.
IV. Codeänderung für die Modelle ST-KS-200N / ST-KS-300N:
1. Önen Sie die Tür gemäß den obigen Anweisungen.
2. Bewegen Sie den RESET-Hebel auf der Rückseite des
Geräts nach rechts oben.
3. Stellen Sie die Wählscheiben auf den ausgewählten Code
ein.
4. Bewegen Sie den RESET-Hebel in die Startposition (nach
unten und nach links).
V. Modell ST-KS-300N:
Montage der Chire-Box mit dem Bügel:
1. Die Tür önen.
2. Bewegen Sie die RELEASE-Verriegelung nach links, um den
Bügel zu ziehen.
3. Das Schnappschloss RELEASE
freilassen.
4. Platzieren Sie den Schäkel um
das Objekt, auf dem Sie die Box
platzieren möchten.
5. Schäkel einrasten lassen.
5. Drücken Sie auf die Verriegelung,
um sicherzustellen, dass sich diese
ohne Beeinträchtigungen bewegt.
Wenn die Verriegelung sich
ungehindert bewegt, wurde das
Passwort korrekt geändert.
6. Schließen Sie die Tür und drehen
Sie die Wählscheiben, um den
Code abzudecken.
3
2
1
DE
I. Device description
1. Buckle
(only for the model ST-KS-300N)
2. Door opening button
3. Cipher
II. For ST-KS-100N / ST-KS-200N models:
In order to open the door it is necessary to:
1 Move the cap of the cipher down (only for the ST-KS-100N
model).
2. Rotate the numeric discs to set the appropriate code (by
default, the factory setting code is at 0-0-0-0).
3. Press the door open button and open it.
4. Insert / remove keys.
5. Close the door (when closing, make sure that the code is
correctly set).
6. Rotate the numeric discs to hide the code.
7. Move the cipher cap up (only for the model ST-KS-100N).
III. Change of code for the ST-KS-100N model:
1. Open the door in accordance with the instructions above.
2. Move the RESET lever to the right and up on the back of
the device,
3. Set the discs to the selected code.
4. Move the RESET lever to the starting position (down and
to the left).
5. Close the door and turn the discs in order to cover the
code.
IV. Change of code for the ST-KS-200N / ST-KS-300N model:
1. Open the door in accordance with the instructions above.
2. On the back of the device, move the RESET lever to the
right and up.
3. Set the discs to the selected code.
4. Move the RESET lever to the starting position (down and
to the left).
V. For the model ST-KS-300N:
Installation of the cipher box using the buckle:
1. Open the door.
2. Move the RELEASE latch to the left pulling the shackle:
5. Press the latch in order to make
sure that it moves without any
obstructions. If it moves without
any hindrance, it means that the
password has been correctly
changed.
6. Close the door and turn the discs in
order to cover the code.
3
2
1
EN
3. Release the RELEASE latch.
4. Place the shackle around the
object you want to place the box
on.
5. Latch the shackle.
I. Opis urządzenia
1. Klamra
(tylko dla modelu ST-KS-300N)
2. Przycisk otwarcia drzwi
3. Szyfr
II. Dla modeli ST-KS-100N / ST-KS-200N:
Otwieranie produktu:
1. Przesunąć zaślepkę szyfru w dół (tylko dla modelu ST-KS-
100N).
2. Obracając tarczami numerycznymi należy ustawić
odpowiedni kod (domyślne, fabryczne ustawienie kodu
jest na 0-0-0-0).
3. Nacisnąć przycisk otwarcia drzwi i je otworzyć.
4. Włożyć / usunąć klucze.
5. Zamknąć drzwi (przy zamykaniu należy pamiętać aby kod
był prawidłowo ustawiony).
6. Obrócić tarcze numeryczne aby ukryć kod.
7. Przesunąć zaślepkę szyfru ku górze (tylko dla modelu ST-
KS-100N).
III. Zmiana kodu dla modelu ST-KS-100N:
1. Otworzyć drzwiczki zgodnie z powyższą instrukcją.
2. Z tylu urządzenia należy przesunąć dźwignię RESET
w prawo i do góry.
3. Ustawić tarcze na wybrany kod.
4. Przesunąć dźwignię RESET do pozycji wyjściowej (w dół
i w lewo).
5. Zamknąć drzwiczki i obrócić tarcze aby zakryć kod.
IV. Zmiana kodu dla modelu ST-KS-200N / ST-KS-300N:
1. Otworzyć drzwiczki zgodnie z powyższą instrukcją.
2. Z tylu urządzenia należy przesunąć dźwignię RESET
w prawo i do góry.
3. Ustawić tarcze na wybrany kod.
4. Przesunąć dźwignię RESET do pozycji wyjściowej (w dół
i w lewo).
V. Dla modelu ST-KS-300N:
Montaż skrzynki szyfrowej za pomocą klamry:
1. Otworzyć drzwiczki.
2. Przesunąć zatrzask RELEASE w lewo ciągnąć za szeklę:
3. Zwolnić zatrzask RELEASE.
4. Umieścić szeklę wokół przedmiotu,
na którym chce się umieścić
skrzynkę.
5. Zatrzasnąć szeklę.
5. Wcisnąć zatrzask aby upewnić
się, że porusza się bez żadnych
przeszkód. Jeżeli porusza się
bez żadnych utrudnień oznacza
to, że hasło zostało prawidłowo
zmienione.
6. Zamknąć drzwiczki i obrócić tarcze
aby zakryć kod.
3
2
1
PL
CONTACT
expondo Polska sp. z o.o. sp. k.
ul. Nowy Kisielin – Innowacyjna 7
66-002 Zielona Góra | Poland, EU
e-mail: info@expondo.com
expondo.com
Rev. 07.11.2019
Tuotetiedot
| Merkki: | Stamony |
| Kategoria: | Holvi |
| Malli: | ST-KS-100N |
Tarvitsetko apua?
Jos tarvitset apua merkille Stamony ST-KS-100N esitä kysymys alla ja muut käyttäjät vastaavat sinulle
Holvi Stamony Käyttöohjeet

15 Lokakuuta 2024
15 Lokakuuta 2024
15 Lokakuuta 2024
15 Lokakuuta 2024
Holvi Käyttöohjeet
Viimeisimmät Holvi Käyttöohjeet
1 Huhtikuuta 2025
1 Huhtikuuta 2025
1 Huhtikuuta 2025
1 Huhtikuuta 2025
1 Huhtikuuta 2025
27 Maaliskuuta 2025
1 Helmikuuta 2025
25 Tammikuuta 2025
25 Tammikuuta 2025
25 Tammikuuta 2025