Growatt SYN 50-XH-30 Käyttöohje
Growatt Ei luokiteltu SYN 50-XH-30
Lue alta 📖 käyttöohje suomeksi merkille Growatt SYN 50-XH-30 (2 sivua) kategoriassa Ei luokiteltu. Tämä opas oli hyödyllinen 40 henkilölle ja sai 4.5 tähden keskimäärin 6 käyttäjältä
Sivu 1/2
1
1
1
11.
.
.
..
2
2
2
22.
.
.
..
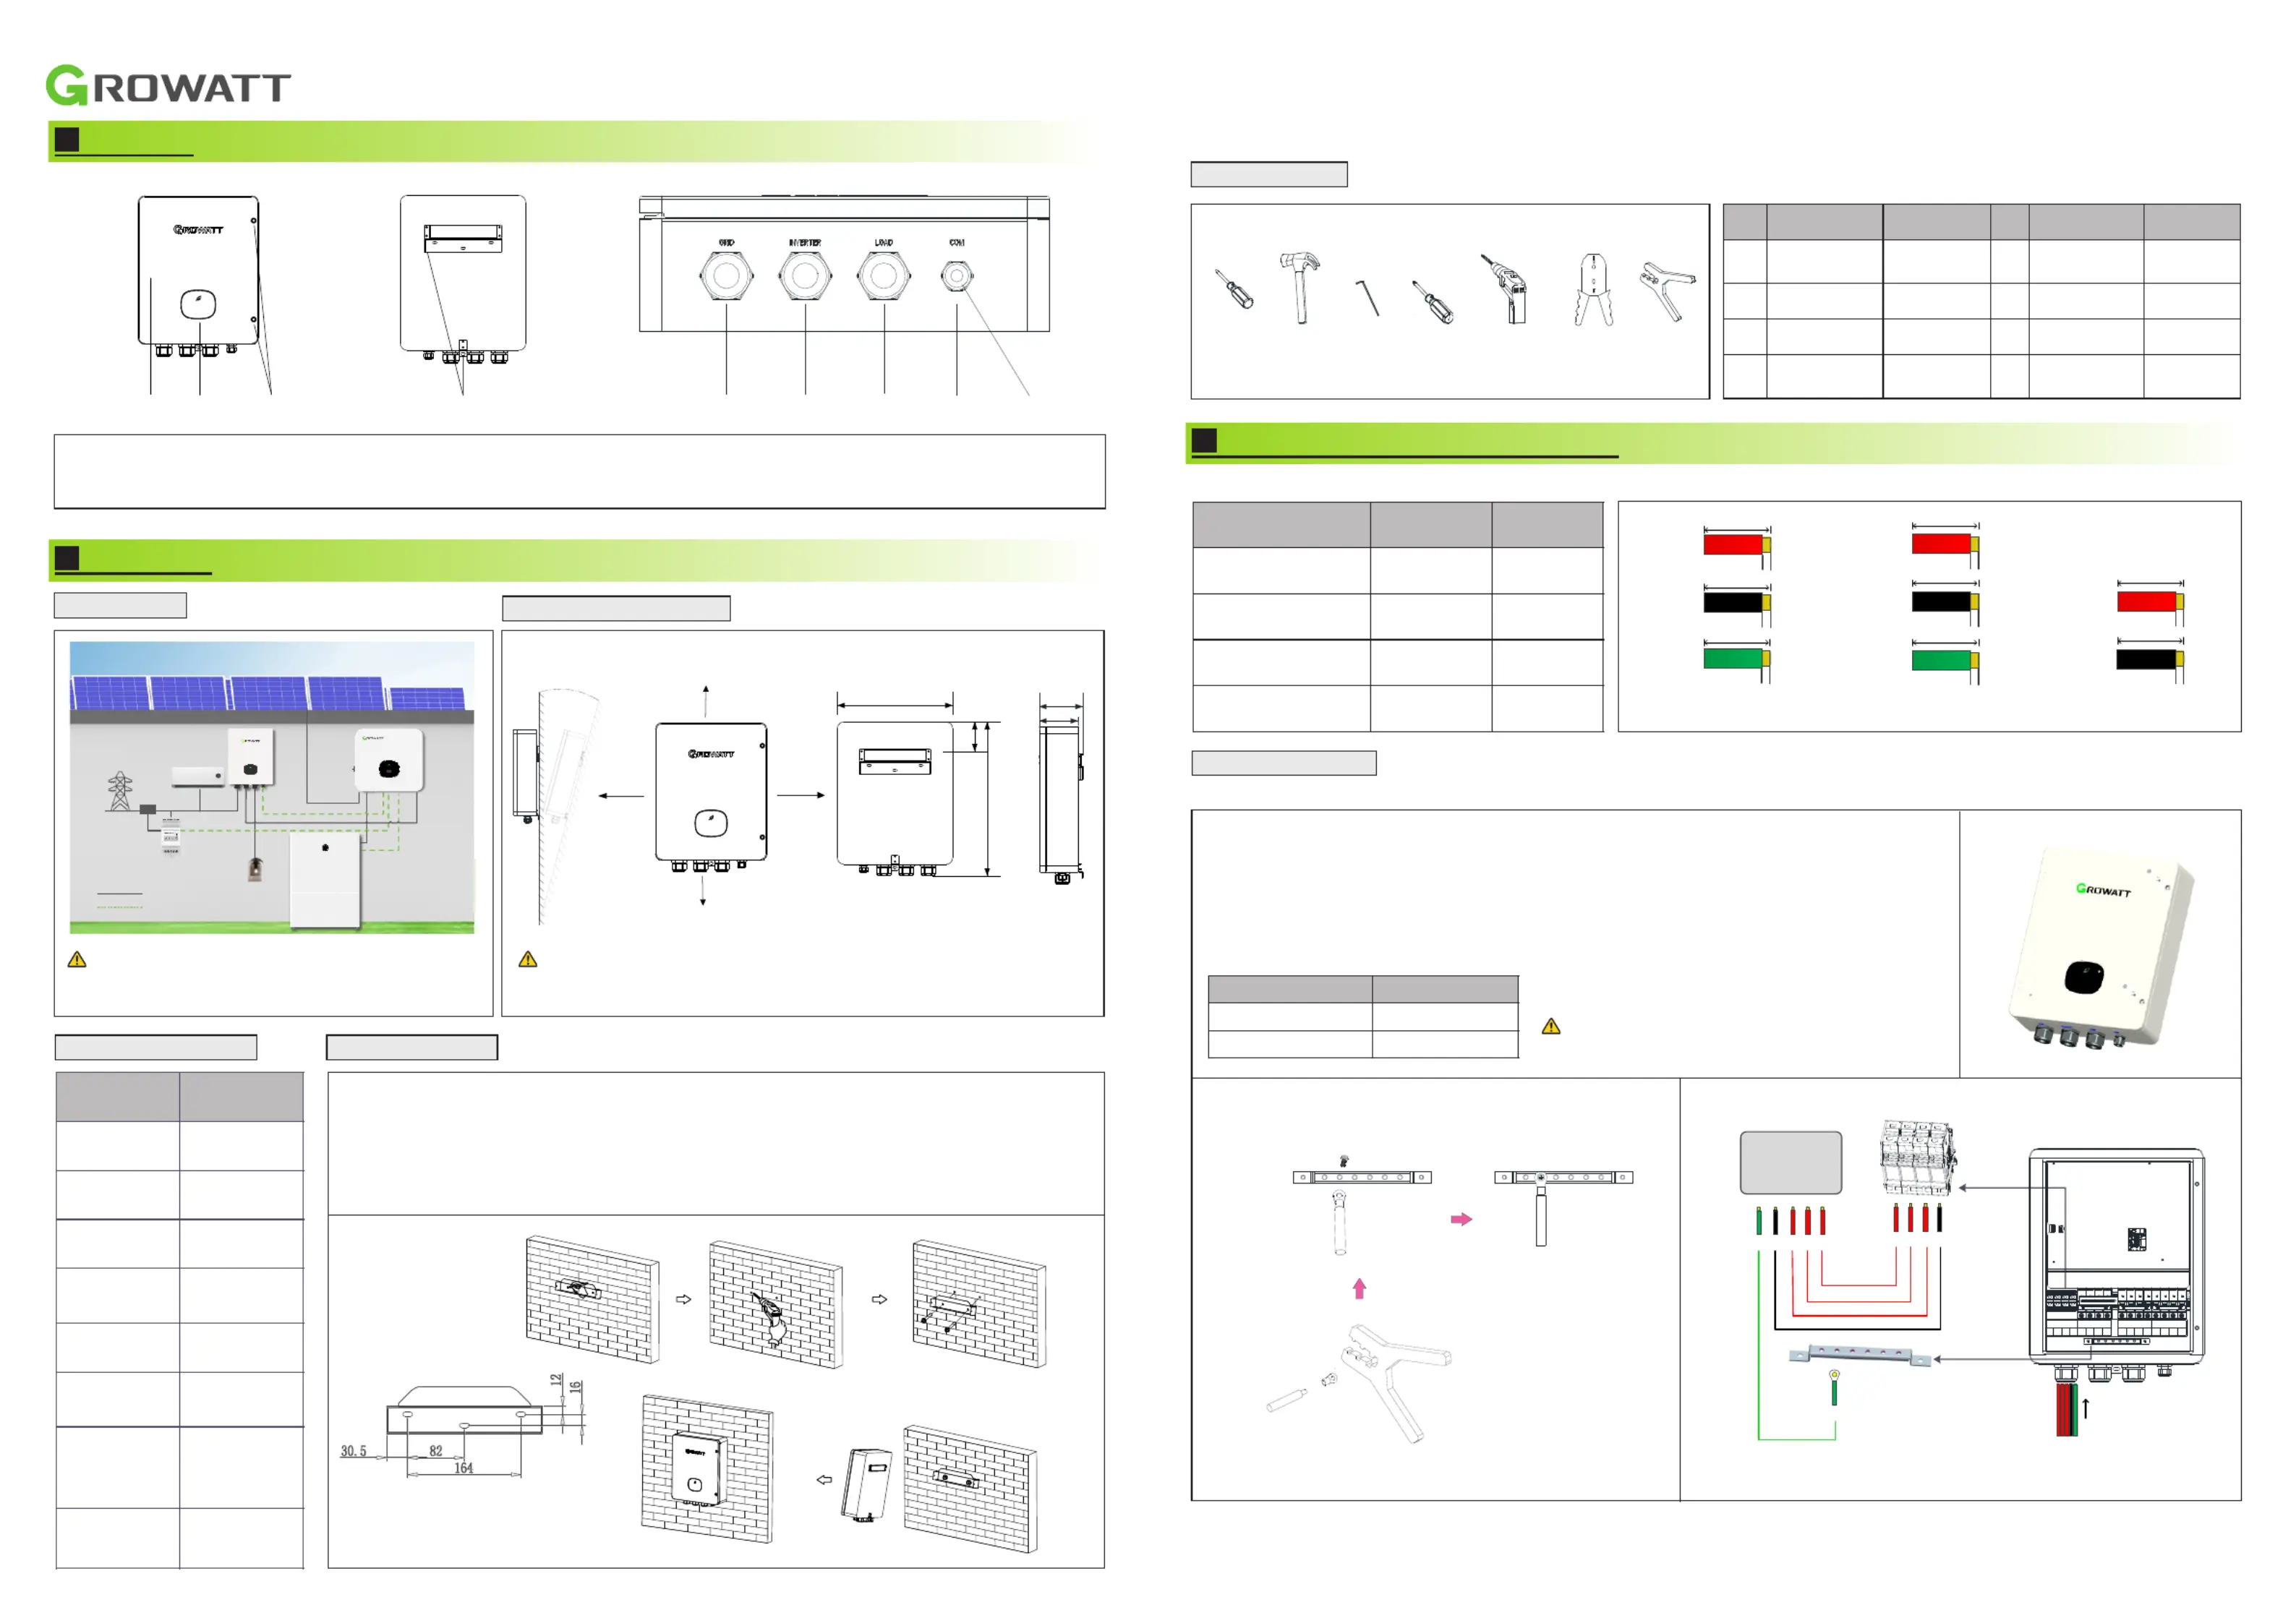
SYN 50-XH-30 Quick Guide
Overview
Installation
System overview
2.2 Installation requirements
2.1 Electrical parameters
1234
56
7
2
Note: The above dimensions are in "mm".
12345
6
789
1
Screw torque
Power grid terminals
26.5 to 31 in*lbs
Ground terminal
13 in*lbs
Nomal Loads
Critical Loads
Interver
Battery
Meter
Bakup
Box
CT
Communication cable
Power cable
≤15°
≥300
≥300
≥300
≥500
365.0
486.3
92.5
134.7
120.2
Note:
The critical load power depends on the power rating of
the inverter and battery
3
SYN 50-XH-30
Grid
Grid
PE
N
L3L2L1
L1
L2
L3
N
PE
L1L2L3NL1L2L3NL1L2L3NL1L2L3N
GRID
BYPASS
INVERTER
LOAD
Model name
SYN 50-XH-30
Nominal grid
voltage
3W/N/PE
230/400 a.c.V
Range of grid
voltage
312485 a.c.V~
Max. grid
current
63 a.c.A
Max.
continuous
grid current
50 a.c.A
Nominal grid
frequency
50/60Hz
Range of grid
frequency
4565Hz~
Max.
continuous
inverter input
current
26.1 a.c.A
Max. backup
output current
26.1 a.c.A
(1)Front panel
(2)LED indicator
(3)Screw for front panel
(4)Mounting bracket
(9)Waterproof plugs
() 5Gridwiringport
()6Inverter wiring port
() 7Loadwiringport
()8COM wiring port
2.3 Installation steps
1.Choose a suitable installation position. The SYN 50-XH-30 can be mounted on a solid wall, a stud
framing or a pole and keep it free from direct sunlight.
2.To ensure heat dissipation, please maintain at least a 300mm clearance between the SYN 50-XH-30
and other objects.
3.Place the mounting bracket against the wall/pole and mark the drilling hole positions.
4.Drill holes and mount the bracket. Ensure that the bracket is securely installed.
5.Install the SYN 50-XH-30 onto the mounting bracket.
Dimensions (Unit: mm)
24.Required tools
No.
Name
Size
No.
Name
Size
1
Flat-blade
screwdriver
Φ2&5mm
2
Hammer
/
3
Allen wrench
Φ5mm
4
Phillips
screwdriver
Φ5mm
5
Electric drill
Φ6mm
6
Wire stripper
/
7
Pliers
/
3
3
3
33.
.
.
..
Recommended cable specifications
The cable specifications of this SYN 50-XH-30 are as follows, and the stripped length of the cable is 10mm.
Cable
Cable outer
diameter
Cable length
Grid input cable
6-8AWG
10m
Inverter input cable
8-12AWG
20m
Load output cable
8-12AWG
20m
Communication cable
22-26AWG
20m
6-8AWG
10m
L
10mm
10m
6-8AWG
6-8AWG
N
10mm
10m
PE
10mm
Grid AC cable
20m
8-12AWG
L
10mm
20m
8-12AWG
8-12AWG
N
10mm
20m
PE
10mm
Load and lnverter AC cable
20m
20m
22-26AWG
22-26AWG
L
10mm
N
10mm
Communication cable
31. Wiring instructions
3.1.1 Connecting SYN 50-XH-30 to the Grid
1.Remove the two screws on the upper cover of the SYN 50-XH-30 to open the upper cover, and do
not remove the cover inside the machine.
2.Twist the plastic cover printed with "Grid" counterclockwise, remove the five waterproof plugs, and
reserve five holes.
3.Route the five power grid cables (L1/L2/L3/N/PE) through the five holes and connect them to the
power grid input terminals and the ground copper bar. Screw torques for tightening the power grid
terminals and ground terminals are shown in the following table.
4.Finally, fasten the plastic cover clockwise. The wiring method is shown in Figure 3.
Note:PE cables needs to be crimped with the O-type
terminal in the accessory bag, as shown in Figure 2.
Connecting to the Grid
3.1.2 Connecting SYN 50-XH-30 to the Inverter
When connecting the SYN 50-XH-30 to the XH Inverter, we need to connect the AC power cables and the communication cables.
Tuotetiedot
| Merkki: | Growatt |
| Kategoria: | Ei luokiteltu |
| Malli: | SYN 50-XH-30 |
Tarvitsetko apua?
Jos tarvitset apua merkille Growatt SYN 50-XH-30 esitä kysymys alla ja muut käyttäjät vastaavat sinulle
Ei luokiteltu Growatt Käyttöohjeet

30 Maaliskuuta 2025
10 Helmikuuta 2025
26 Joulukuuta 2024
26 Joulukuuta 2024
17 Joulukuuta 2024
17 Joulukuuta 2024
16 Lokakuuta 2024
16 Lokakuuta 2024
16 Lokakuuta 2024
16 Lokakuuta 2024
Ei luokiteltu Käyttöohjeet
Viimeisimmät Ei luokiteltu Käyttöohjeet
9 Huhtikuuta 2025
9 Huhtikuuta 2025
9 Huhtikuuta 2025
9 Huhtikuuta 2025
9 Huhtikuuta 2025
9 Huhtikuuta 2025
9 Huhtikuuta 2025
9 Huhtikuuta 2025
9 Huhtikuuta 2025
9 Huhtikuuta 2025