Foscam FN9108W-B4 Käyttöohje
Foscam Ei luokiteltu FN9108W-B4
Lue alta 📖 käyttöohje suomeksi merkille Foscam FN9108W-B4 (2 sivua) kategoriassa Ei luokiteltu. Tämä opas oli hyödyllinen 43 henkilölle ja sai 4.1 tähden keskimäärin 5 käyttäjältä
Sivu 1/2
1
2
345
89
11
10
12
13
14
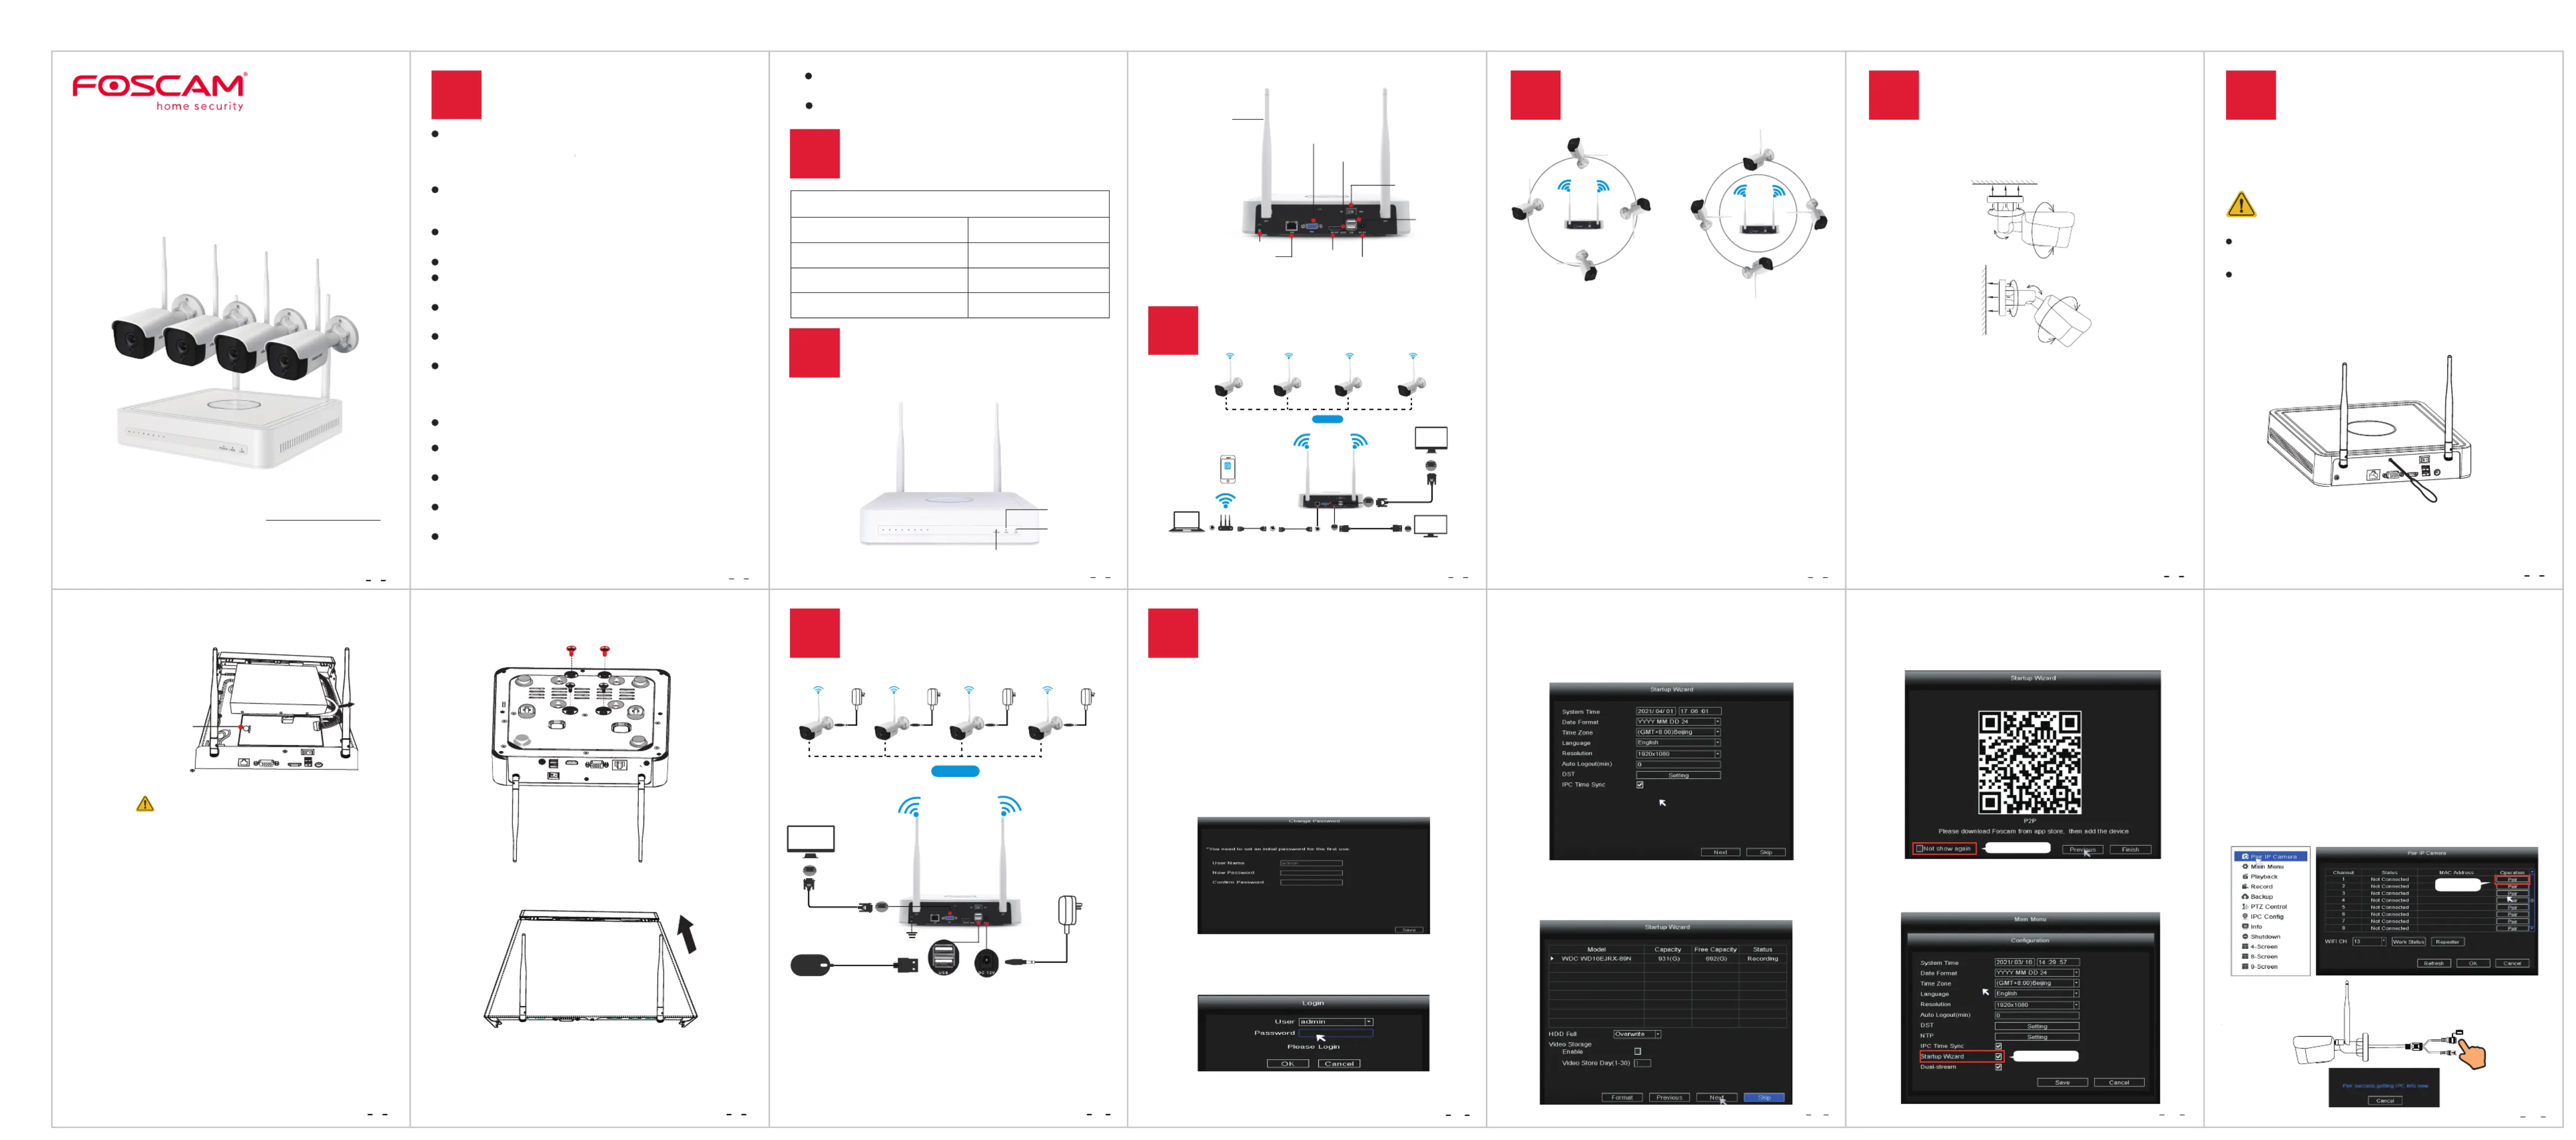
Quick Setup Guide
Security Tips
1
V1.0
305503001108
3
NVR Rear Panel
9
Software Operation
5
Placement of Wireless
IP Camera
1. Log In
2
NVR Kit Contents
8-Channel NVR
1.5m (5 ft) Ethernet Cable 4 x Bullet IP Cameras
USB Mouse
Mounting Screws
For detailed manuals, tools, etc., please visit foscam.com/downloads.
4
Wireless Connectivity
WiFi Connection
Router
Computer
HD-OUT Cable
TV
LAN
Ethernet Cable
LAN
LAN
HD-OUT
Monitor
VGA Cable
VGA
VGA
HD-OUT
Foscam
Foscam cameras and NVRs require good security practices to
safeguard your privacy. You should regularly change your
camera or NVR password which is the combination of
numbers, letters and symbols.
You should update your camera or NVR regularly. Make sure
your camera or NVR has the latest rmware installed for your
specic model and better experience.
Please keep the device horizontally and avoid inclination or
inversion.
Do not install the NVR in humid and dusty environment.
Put the NVR in drafty environment in case of ventilation port
being blocked.
Don't touch the power switch with wet hand or damp items
to avoid shock.
Do not splash liquid or metal ling on the NVR To avoid
short-circuit fault or blaze.
Explosion may happen because of improper replacement of
battery, do not replace it by yourself; If you need, make sure it
is the same type of battery. And do not open or repair the
battery.
Do not take the device apart when it is operating (or
connecting to power).
Please use suitable and professional hard disk to ensure
continues and stable recording.
Lightning protection is needed when device is connected to
communication cables.
Check the power supply to avoid damage because of voltage
mismatch.
Make sure the NVR working within suitable temperature and
humidity environment.
Right placement Wrong placement
4 x Power Adapters for Cameras
1 x Power Adapter for NVR
Quick Setup Guide
Warranty Card
2. Setup Wizard
The Setup Wizard can walk you through some important
settings on the NVR.
6
Camera Installation
7
Hard Disk Installation
Important Note:
When installing the cameras please ensure that the connection
ports at the end of the pig tail wiring are not exposed, as they
are not weather-resistant.
0~90°
0~360°
0~360°
0~90°
0~360°
0~360°
Place the cameras in your preferred locations and use the
included screws to mount them.
The shape of wireless NVR signal coverage is a ball, antenna is
located in the center. Signal is strong around antenna, and weak
in the dent area of the 2 antennas.
Based on the signal spreading ways, please make the wireless IP
Camera keeping parallel or tangent with wireless NVR, which
ensure stable signal transmission and better picture quality.
8
Powering Up
DC 12V/2A
Mouse
WiFi Connection
GND
Please make sure the voltage of power supply is matched
with wireless NVR, and ground connection work well in
socket. Connect the NVR and cameras as shown in the gures
above. Once the NVR is plugged in, press the power switch
located on the rear panel.
After the NVR starts up successfully, the Power LED indicators
will turn green, it means system runs smoothly.
DC 12V/1ADC 12V/1ADC 12V/1ADC 12V/1A
VGA
Monitor
VGA Cable
VGA
6
7
HD-OUT
VGA Output
USB
Antenna
Reset
Power Input
(DC12V / 2A)
Power Switch
Ethernet Port
GND
① Turn on the power switch on the rear panel.
After the NVR starts up successfully, the power LED and HDD
LED indicators will turn green. The startup page is displayed
on the screen.
② Change password .
For your security, please set a new password for your NVR
before Log In.
④ After modifying the password, you will be taken to the
Setup Wizard.
① Setting the time.
Uncheck the checkbox
② Format HDD. Click the button to set up the HDD. Format
Note that this will delete all les on the HDD.
HDD Full SettingSelect Stop Record and Overwrite . .
③ P2P. If you want to know the UID of the device, please scan
the QR code. If you don’t want to use the Setup Wizard
next time, uncheck the Setup Wizard checkbox. Click the
Finish button to complete the setup wizard.
or Right-click uncheck →MainMenu→Conguration →
the checkbox. Click thebutton to Setup Wizard Finish
complete the setup wizard.
Uncheck the checkbox
The live view interface will show you the video feed of each IP
Camera.
3. NVR adds IP Camera method
Note: The NVR and IP Camera are already paired. If you need to
match more cameras, please refer to the following steps.
F19925W is supported in this kit, besides the battery camera the
other Foscam models can be added by LAN.
① Right-click on main interface, select Pair IP Camera.
② Click and press the pairing button of the camera tail Pair
cableat the same time, until it prompts that the pairing is
successful.
③ When nished code matching, The live view interface
willshow you the video feed of each IP Camera.
1. Click Pair
③ Login page.
Enter the Username and Password, then click on the OK
button.
press the
pairing button
Add F19925W:
WARNING
Before installing a hard disk drive (HDD), please make sure
the power is disconnected from the NVR.
It is recommended that a hard drive be used in 7200
high-speed or above.
1. Remove the cover from the NVR by unfastening the screws
on the rear and bottom.
2. Connect one end of the data cable and power cable to the
motherboard of NVR and the other end to the HDD.
3. Place the HDD on the bottom of the device and then fasten
the screws on the bottom to x the HDD.
Must be disposed of properly, always follow the local waste
and recycle laws when you get rid of the used battery.
May explode if damaged or disposed of in re.
Do not short-circuit.
Do not disassembie
Do not use if soaked into water.
Do not attempt to disassemble, open or service the battery.
Non rechargeable.
If the battery level is low, please replace the button battery
with a new one according to the model after disassembling
in steps 1 and 2.
CAUTION:
●
●
●
●
●
●
●
4. Re-install the cover of the NVR and fasten screws.
HDD
+
CR1220
CR1220 Battery
(3V, 35mAh,0.105Wh,
Chemical System:
Lithium)
Data cable
If the factory NVR already has a hard drive, there is no need to
reinstall it.
Short circuit may occur when dust become wet on circuit
board. Please clean the dust on connectors and NVR case.
Operating Temperature0°C ~ 50°C (32°F ~ 122°F). :
Power
HDD
LAN
Tuotetiedot
| Merkki: | Foscam |
| Kategoria: | Ei luokiteltu |
| Malli: | FN9108W-B4 |
Tarvitsetko apua?
Jos tarvitset apua merkille Foscam FN9108W-B4 esitä kysymys alla ja muut käyttäjät vastaavat sinulle
Ei luokiteltu Foscam Käyttöohjeet

11 Helmikuuta 2025
14 Tammikuuta 2025
12 Tammikuuta 2025
Ei luokiteltu Käyttöohjeet
Viimeisimmät Ei luokiteltu Käyttöohjeet
9 Huhtikuuta 2025
9 Huhtikuuta 2025
9 Huhtikuuta 2025
9 Huhtikuuta 2025
9 Huhtikuuta 2025
9 Huhtikuuta 2025
9 Huhtikuuta 2025
9 Huhtikuuta 2025
9 Huhtikuuta 2025
9 Huhtikuuta 2025