Extron FF 220T Käyttöohje
Lue alta 📖 käyttöohje suomeksi merkille Extron FF 220T (17 sivua) kategoriassa Kaiutin. Tämä opas oli hyödyllinen 54 henkilölle ja sai 5.0 tähden keskimäärin 3 käyttäjältä
Sivu 1/17
1
FF 220T • Setup Guide
This setup guide contains installation information about the Extron FF 220T Flat Field
®
speaker. This speaker is designed for use
in plenum rated ceiling spaces and can be dropped into a standard square (2-foot by 2-foot or 600 mm by 600 mm) or rectangular
(2-foot by 4-foot or 600 mm by 1200 mm with supplied cross bars) false ceiling tile space on a T-bar grid.
WARNING:May result in serious injury. Installation and service must be performed by authorized personnel only.
NOTE: The FF 220T comes in two ceiling tile configurations depending on the tile unit of measurement:
•US version (part #42-141-03) Drops into 2 x 2 (61 cm x 61 cm) or 2 x 4 (61 cm x 122 cm) —''''
suspended tile ceilings
•Metric version (part #42-141-23)
— Drops into 600 mm x 600 mm or 600 mm x 1200 mm suspended tile
ceilings
Be sure to order the correct part number as the two configurations are not interchangeable and will not
fit correctly.
Factors to Consider Before Installation
zInstallation of conduit and conduit adapters must conform to all applicable
building codes and local ordinances.
zInstallation in a plenum-rated environment requires a wire gauge of
12 AWG to 18 AWG, as shown on the right. Conduit may be required.
zIf using secondary support cables, the installer provides the cables.
Installation
1. Disconnect power— Power down all attached devices before proceeding.
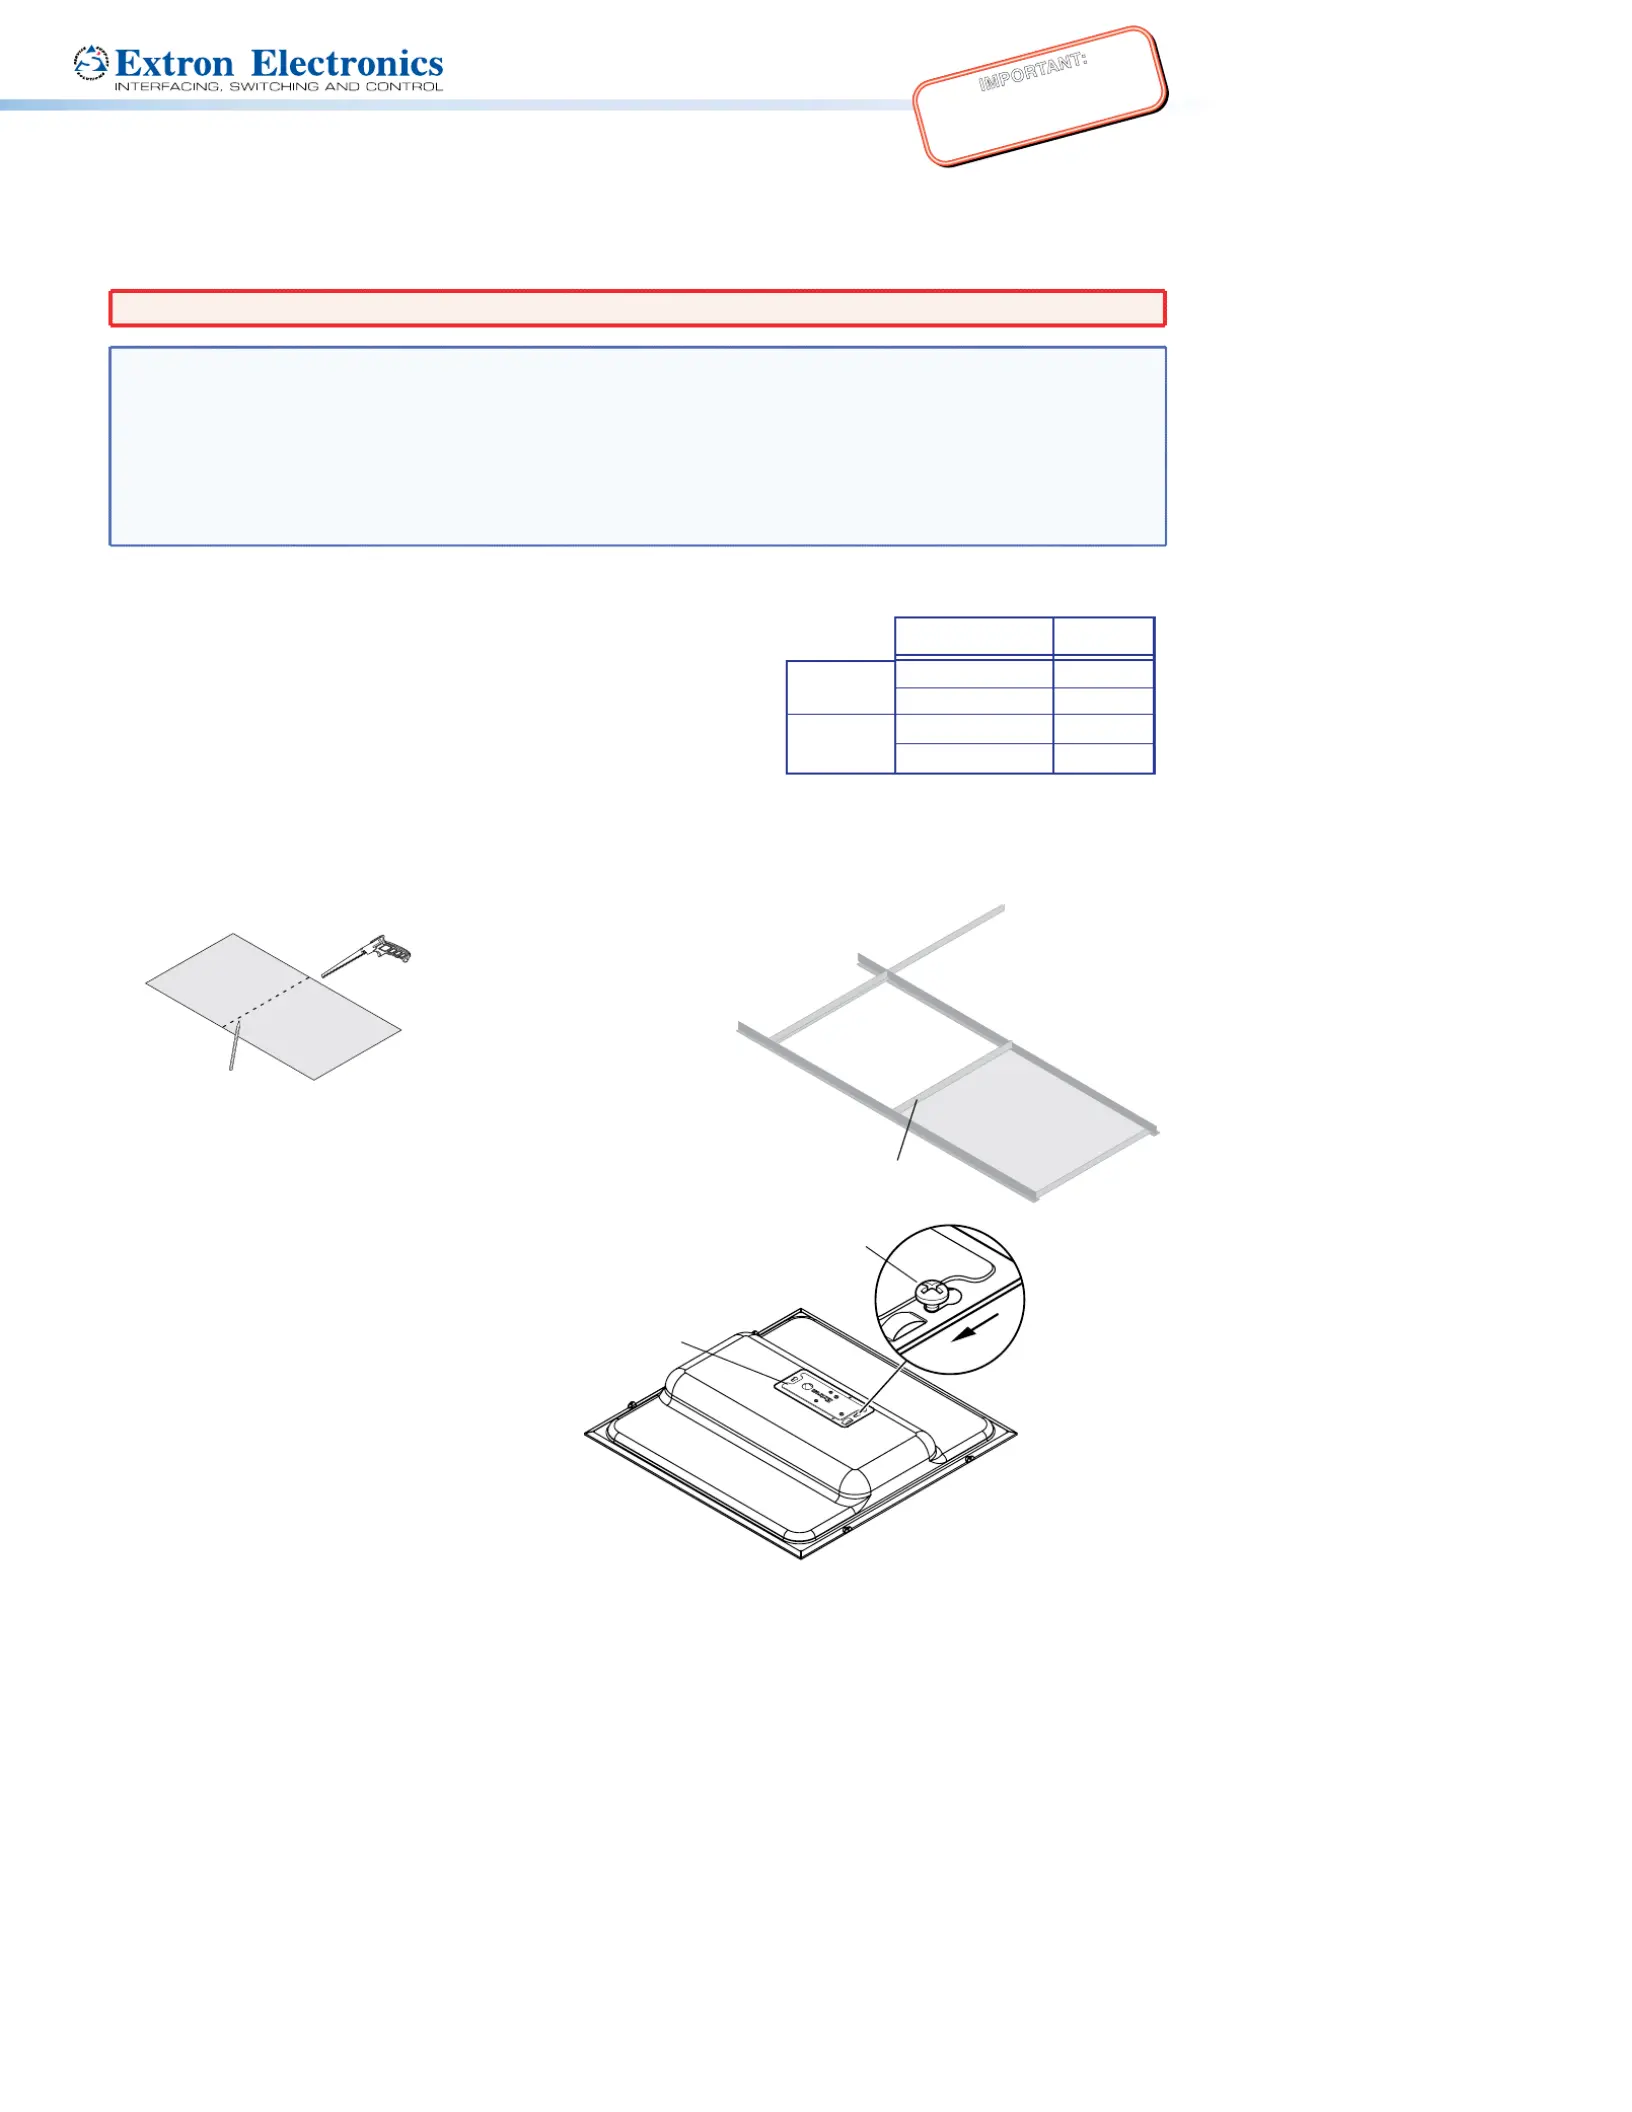
2. Remove and cut ceiling tile — Remove the square ceiling tile where the FF 220T will be installed. If the ceiling has
rectangular tiles, cut the tile in half, as shown below.
Rectangular Ceiling Tile
Dr Line At aw
Halfw Pointay
Cut Material
3. Install the T-rail in a rectangular tile— When the ceiling uses rectangular
tiles, install the T-rail crosspiece into the ceiling opening up against the
cut tile, as shown on the right.
4. Transformer cover plate — Loosen, but do
not remove, the two screws on the top of
the transformer cover plate, as shown on
the right. Next, slide and remove the
transformer cover plate, which is installed
with the transformer side down.
IMPORTANT:
Refer to www.extron.com for the complete
user guide, installation instructions, and
specifications before connecting the
product to the power source.
T-rail
Crosspiece
(supplied)
Ceiling Tile
Number of Wires
per Connection Point
Maximum
Wire Gauge
1 12 GAW
2 14 GAW
1 14 GAW
2 16 GAW
Wire Gauge Table
8Ω
Configuration
70 V/100 V
Configuration
Loosen, t do not remobuve
the 2 transformer cor plate ve
screws in the 2 yhole slotkes.
Transformer Cover Plate
Tuotetiedot
| Merkki: | Extron |
| Kategoria: | Kaiutin |
| Malli: | FF 220T |
Tarvitsetko apua?
Jos tarvitset apua merkille Extron FF 220T esitä kysymys alla ja muut käyttäjät vastaavat sinulle
Kaiutin Extron Käyttöohjeet

12 Maaliskuuta 2025
23 Joulukuuta 2024
16 Lokakuuta 2024
15 Lokakuuta 2024
15 Lokakuuta 2024
15 Lokakuuta 2024
15 Lokakuuta 2024
15 Lokakuuta 2024
15 Lokakuuta 2024
15 Lokakuuta 2024
Kaiutin Käyttöohjeet
Viimeisimmät Kaiutin Käyttöohjeet
8 Huhtikuuta 2025
8 Huhtikuuta 2025
8 Huhtikuuta 2025
7 Huhtikuuta 2025
7 Huhtikuuta 2025
7 Huhtikuuta 2025
5 Huhtikuuta 2025
3 Huhtikuuta 2025
3 Huhtikuuta 2025
3 Huhtikuuta 2025