D-Link DES-6505 Käyttöohje
D-Link Audio/video-muunnin DES-6505
Lue alta 📖 käyttöohje suomeksi merkille D-Link DES-6505 (13 sivua) kategoriassa Audio/video-muunnin. Tämä opas oli hyödyllinen 52 henkilölle ja sai 5.0 tähden keskimäärin 8 käyttäjältä
Sivu 1/13
Introduction
This Quick Installation Guide gives step-by-step
instructions for installing modules in the D-Link
DES-6500 Modular Ethernet Switch. This switch is
used to connect an entire department to your
Ethernet backbone. For more detailed information
about the switch, its components, making network
connections, configuration and technical
specifications, please refer to the User’s Guide
included in Adobe Acrobat format on the CD-ROM
that was included with the switch.
Step 1 – Unpacking
Please ensure your box contents included:
One switch networking module
This Quick Installation Guide
Step 2 - Hardware Installation
The DES-6500 ships as a base unit which includes:
DES-6501 Backplane Chassis –
provides electrical power to and conveys
transmissions between modules
DES-6502 CPU Module– Switching and
management module located in the
uppermost slot
DES-6511Redundant Power Supply
Module– located in one of the two large
slots at the bottom of the switch
Networking modules sold separately include:
DES-6502CPU module
DES-650412-port 100BASE-FX SFF Fast
Ethernet Switch module
DES-6505 8-port 1000BASE-SX SC
Gigabit Ethernet Switch module
DES-650624-port RJ45 Patch Panel
module
DES-650712-port 1000BASE-T + 2-port
Combo SFP slot Gigabit Ethernet Switch
module
DES-6508 16-port
10BASE-T/100BASE-TX (RJ45) Fast
Ethernet Switch module
DES-6509 12-port Mini GBICGigabit
Ethernet Switch module
DES-6510 24-port 10/100 RJ21Switch
module
DES-6511 Redundant Power Supply
module
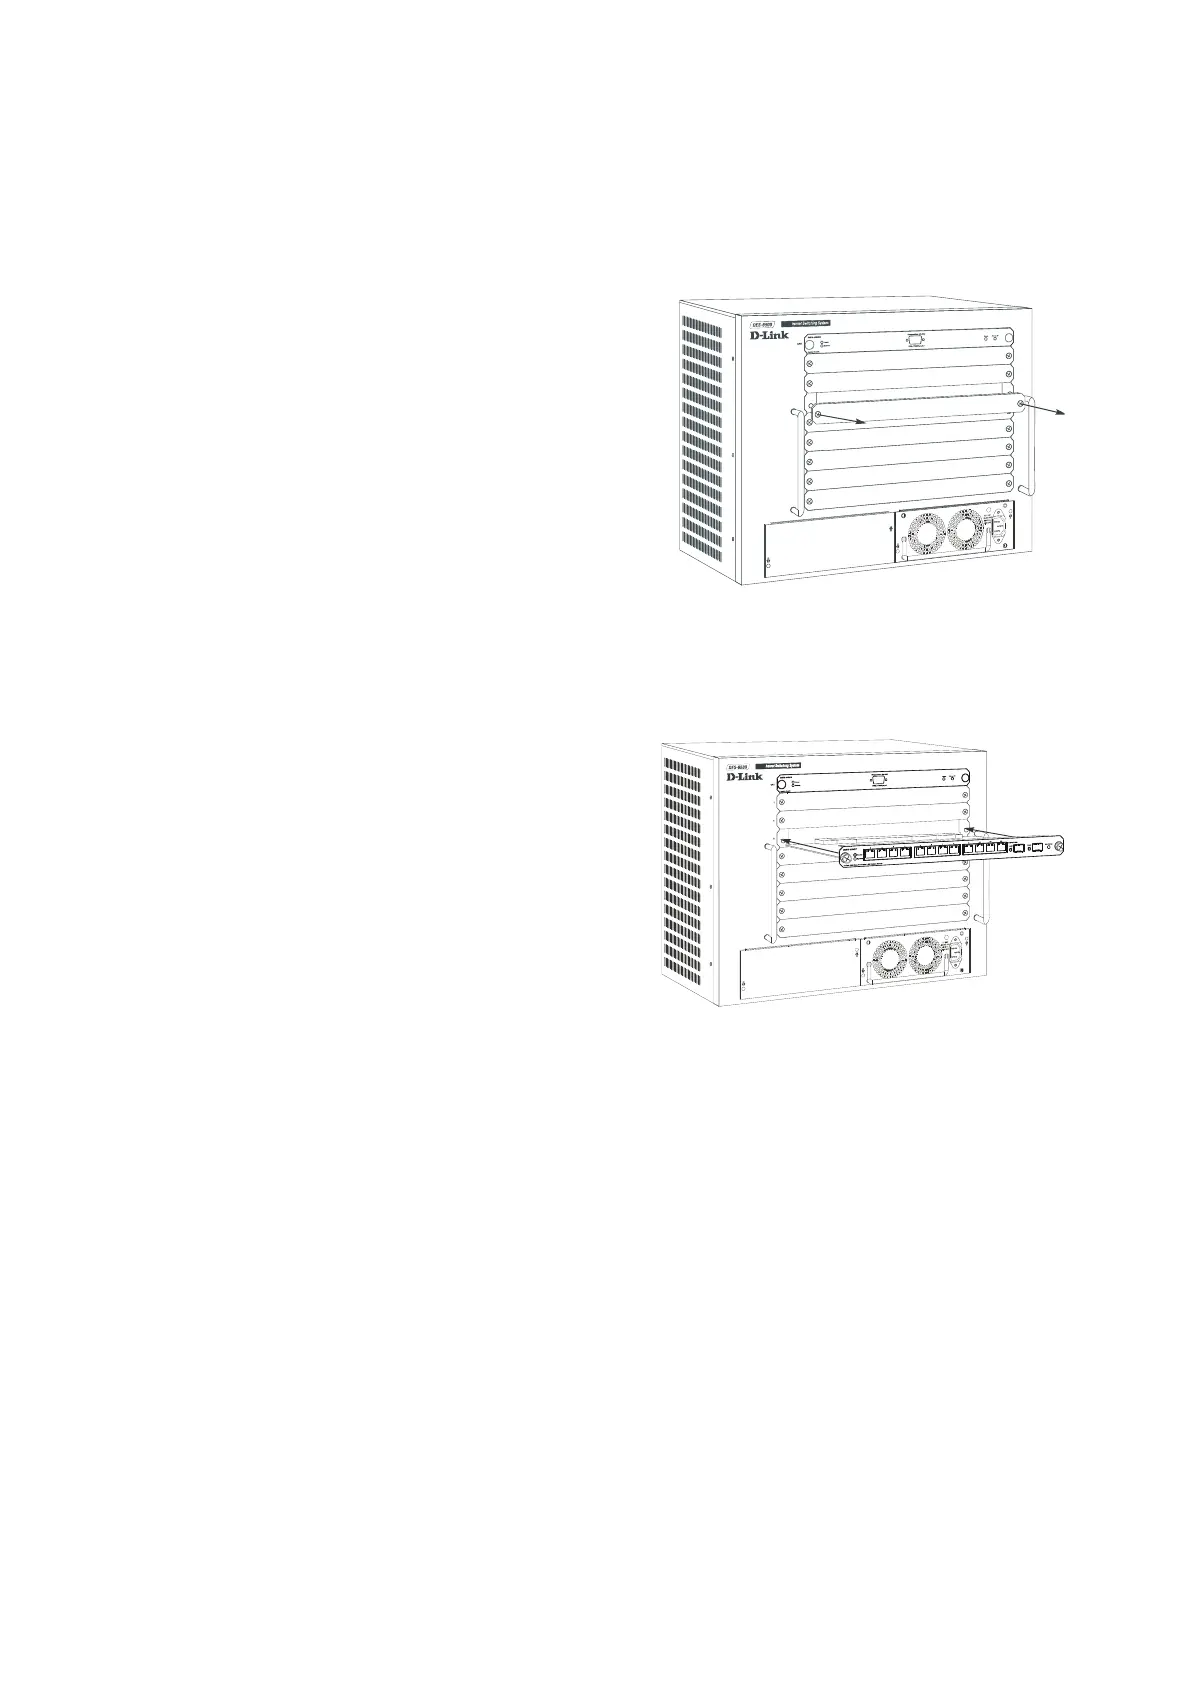
Carefully follow the procedures defined below to
install modules in the switch. Networking modules
can be installed in any unused slot with the
exception of the DES-6502 CPU module which must
be installed in the uppermost slot (only).
1.Remove a blank slot cover.
2.Carefully slide a module into the slot, making
sure that its sides are inside the guide rails.
3.When the module reaches the back of the chassis,
push gently but firmly to connect the rear
sockets of the module to the backplane. Ensure
that the module is completely inserted into the
chassis such that its front panel is flush with the
front panel of the chassis.
4.Tighten the two large module screws to ensure
that the module is held firmly in place.
Note:Networking modules are hot-swappable,
meaning they can be added and removed while power
to the switch is ON. The CPU module however, is
NOT hot-swappable. Removing or inserting the CPU
module while the power is on may cause irreparable
damage to the module and/or to the switch itself.
Further, make sure you have unplugged the power
cord from the removable power supply module before
inserting or removing it from the switch.
Tuotetiedot
| Merkki: | D-Link |
| Kategoria: | Audio/video-muunnin |
| Malli: | DES-6505 |
Tarvitsetko apua?
Jos tarvitset apua merkille D-Link DES-6505 esitä kysymys alla ja muut käyttäjät vastaavat sinulle
Audio/video-muunnin D-Link Käyttöohjeet

13 Tammikuuta 2025
11 Tammikuuta 2025
4 Tammikuuta 2025
4 Tammikuuta 2025
24 Joulukuuta 2024
23 Lokakuuta 2024
21 Lokakuuta 2024
Audio/video-muunnin Käyttöohjeet
Viimeisimmät Audio/video-muunnin Käyttöohjeet
7 Huhtikuuta 2025
3 Huhtikuuta 2025
2 Huhtikuuta 2025
2 Huhtikuuta 2025
1 Huhtikuuta 2025
1 Huhtikuuta 2025
1 Huhtikuuta 2025
29 Maaliskuuta 2025
28 Maaliskuuta 2025
26 Maaliskuuta 2025