Cateye Blitz Auto TL-AU330G Käyttöohje
Lue alta 📖 käyttöohje suomeksi merkille Cateye Blitz Auto TL-AU330G (2 sivua) kategoriassa Helpotus. Tämä opas oli hyödyllinen 44 henkilölle ja sai 5.0 tähden keskimäärin 5 käyttäjältä
Sivu 1/2
BATTERY SAFETY LIGHT
BLITZ AUTO
TL-AU330
HOW TO USE
ATTACH TO THE BICYCLE
Design Pat. Pending
Copyright© 2011 CATEYE Co., Ltd.
AU33-110831 066610301 2
HOW TO USE
ATTACH TO THE REAR RACK
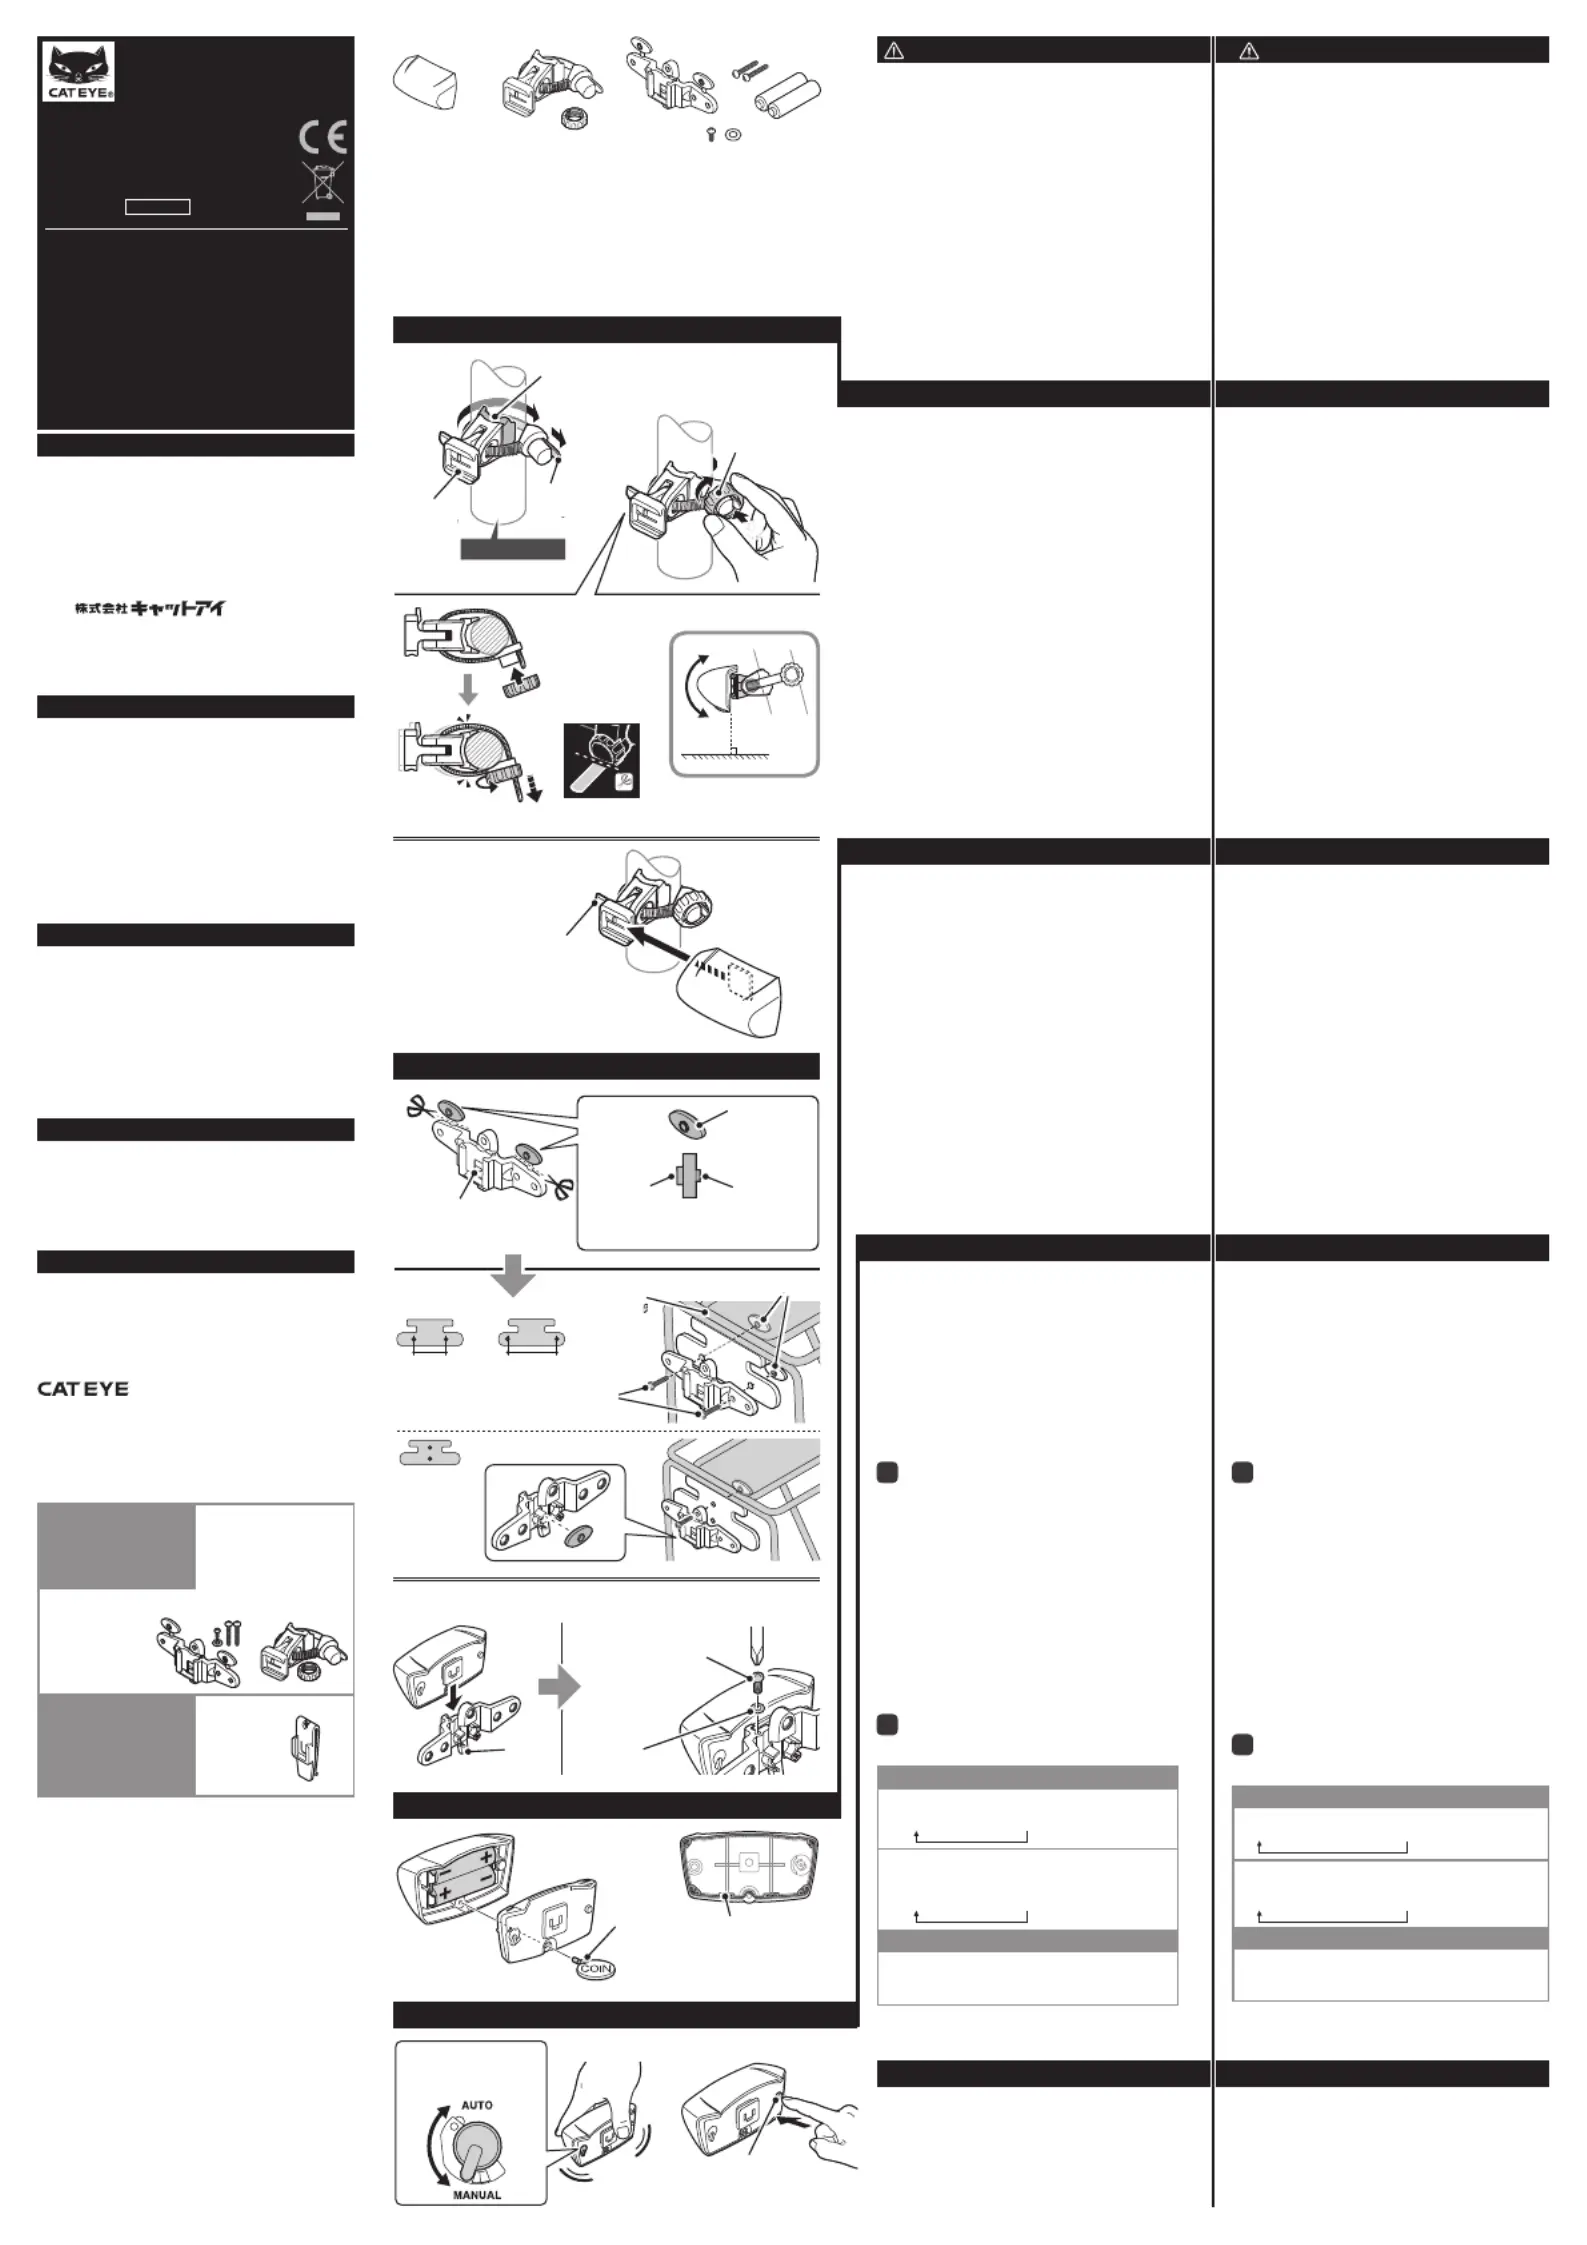
COMPONENTS
Light unit
FlexTight™ bracket (SP-11)
Rear rack bracket
Screw x 2
Lock screw x 1
Washer x 1
AA alkaline battery x 2
COMPOSANTS
Lampe
Support FlexTight™ (SP-11)
Support rack arrière
Vis x 2
Vis de verrouillage x 1
Rondelle x 1
Piles alcalines AA x 2
HOW TO MOUNT THE LIGHT
MONTAGE DE LA LAMPE
HOW TO MOUNT THE LIGHT
MONTAGE DE LA LAMPE
50 mm
or
80 mm
90˚
製品保証について日本語
2年保証:ライト本体のみ
正常な使用状態で故障した場合は無料修理・交換いたしま
す。返品にあたっては、お客様の連絡先・故障状況を明記
の上、ご購入日が確認できる領収書のコピー等を添えて、
当社宛に直接お送りください。ご購入日が特定できない場
合、保証期間は製造年月日から起算させて頂きます。事故
などによる外的要因や取扱説明書に記載していない用途・
方法での誤使用による要因では保証の対象外となります。
なお、お送りいただく際の送料はお客様にてご負担願いま
す。修理完了後、送料弊社負担でお届けさせていただきます。
[宛先]カスタマーサービス
〒546-0041大阪市東住吉区桑津2丁目8番25号
TEL:(06)6719-6863ダイヤルイン
FAX:(06)6719-6033
ホームページhttp://www.cateye.com
Eメールsupport@cateye.co.jp
LIMITED WARRANTY ENG
2-year Warranty: Light unit only
CatEye products are warranted to be free of defects from materials
and workmanship for a period of 2 years from original purchase.
If the product fails to work during normal use, CatEye will repair
or replace the defect at no charge. Service must be performed by
CatEye or an authorized retailer. To return the product, pack it
carefully and enclose the warranty certifi cate (proof of purchase)
with instruction for repair. Please write or type your name and
address clearly on the warranty certifi cate. Insurance, handling
and transportation charges to CatEye shall be borne by person
desiring service. For UK and REPUBLIC OF IRELAND consum-
ers, please return to the place of purchase. This does not affect
your statutory rights.
GARANTIE LIMITÉE FR
Garantie de 2 ans : Lampe uniquement
Les produits CatEye sont garantis sur le produit et la main d’oeuvre
pendant une période de 2 ans après la date d’achat originale. Si
le produit tombait en panne lors d’une utilisation normale, Cateye
remplacerait ou réparerait le compteur gratuitement. Ce service devant
être effectué par CatEye ou un revendeur autorisé. Lorsque vous re-
tournez le produit, emballez le soigneusement et joignez au compteur
le certifi cat de garantie (preuve d’achat), avec vos instructions sur le
dysfonctionnement. Veuillez écrire lisiblement vos coordonnées sur le
certifi cat de garantie, les frais de transport pour le retour du produit
sont à la charge de CatEye, les frais pour l’envoi du produit sont à la
charge de la personne souhaitant la garantie.
有限保固 繁中
2年保固:僅保證燈具
CatEye提供自購買日起,2年產品物料和製作瑕疵更換的保固
服務。若產品於正常使用下發生故障,CatEye將提供免費維
修或更換的服務,且需由CatEye或授權經銷商進行維修。如
要寄回產品,請小心包裝產品,並附上保固證明書(購買證
明)及維修說明。請在保固證明書上書寫或打上您的姓名和
地址。顧客需自行負擔保險、處理及運送費用。
有限保固 简中
2年保固:仅保证灯具
CatEye提供自购买日起,2年产品物料和制作瑕疵更换的保固
服务。若产品于正常使用下发生故障,CatEye将提供免费维
修或更换的服务,且需由CatEye或授权经销商进行维修。如
要寄回产品,请小心包装产品,并附上保固证明书(购买证
明)及维修说明。请在保固证明书上书写或打上您的姓名和
地址。顾客需自行负担保险、处理及运送费用。
3
2-8-25, Kuwazu, Higashi Sumiyoshi-ku,
Osaka 546-0041 Japan
Attn: CATEYE Customer Service Section
Phone : (06)6719-6863
Fax : (06)6719-6033
E-mail : support@cateye.co.jp
URL : http://www.cateye.com
[For US Customers]
CATEYE AMERICA, INC.
2825 Wilderness Place Suite 1200,
Boulder CO80301-5494 USA
Phone : 303.443.4595
Toll Free : 800.5CATEYE
Fax : 303.473.0006
E-mail : service@cateye.com
SPARE PARTS
PIECES DE RECHANGE
スペアパーツ
備用零件
备用零件
OPTION PARTS
PIÈCES OPTIONNELLES
オプションパーツ
選購零件
选购零件
CO
.,LTD.
2
1
ご使用の前に必ず本取扱説明書を最後までよく読ん
で、いつでも見られるように大切に保管してください。
Before using the product, please thoroughly read
this manual and keep it for future reference.
Avant d’utiliser le produit, veuillez lire attentivement ce
manuel et le garder pour une consultation ultérieure.
使用本產品前,請先詳閱本手冊,並妥善保存以供
日後參考之用。
在使用产品之前,请通读本手册并妥善保存,以
备今后使用。
Lever
Levier
FlexTight™ bracket(SP-11)
Support FlexTight™(SP-11)
フレックスタイトブラケット
(SP-11)
FlexTight™托架(SP-11)
FlexTight™托架(SP-11)
5342280
Screw
Vis
For 8 mm
eyelet
Pour œillet
de 8 mm
For 5 mm
eyelet
Pour œillet
de 5 mm
Rear rack bracket
Support rack arrière
A
Rear rack
Rack arrière
A
Screw
Vis
Lock screw
Vis de verrouillage
Washer
Rondelle
Rear rack bracket
Support rack arrière
リアラックブラケット
貨架用托架
货架用托架
5445620
Clip
Attache
クリップ
燈夾
灯夹
5440900N
A
Seal
Joint
CAUTION! ENG
Before your trip, please make sure the •
light is fi rmly mounted to the bracket, it
lights up, and the light is not blocked by
baggage, etc.
Turn on/off the auto-mode switch when the •
bicycle stops.
This unit is not totally waterproof. Please •
wipe and dry it completely after using in rain.
Otherwise, it may cause failure.
If the light unit or parts become dirty with •
mud, etc., clean with a soft cloth which
is moistened with mild soap. Never apply
paint thinner, benzine or alcohol; damage
will result.
HOW TO MOUNT
Slide the light onto the bracket until it “clicks” •
into place.
To remove the light, press the lever and •
slide it off.
Attach to the bicycle
CAUTION!:
Be sure to tighten the dial by hand. When •
you tighten it too hard with a tool, the screw
thread may be stripped.
Check the dial and screw (*1) on the bracket •
periodically, and use them without any
loosening.
Round off the cut edge of the bracket strap •
to prevent injury.
Attach to the rear rack
CAUTION!:
We recommend that you securely
attach lock screws to prevent theft.
HOW TO INSTALL BATTERY
Loosen and remove the screw on the back 1
of the light using a coin, etc. to remove the
lens from the light.
Install batteries in the direction shown in 2
the fi gure.
Fit the light to the lens in place, and tighten 3
the screw as before.
CAUTION!:
Do not use in combination with new and old bat-•
teries, or different types of batteries.
Be sure to install batteries in the correct direction.•
Install the seal correctly to maintain water-•
proof features.
Remove and store batteries when you will •
not use the light for a long period of time.
Otherwise, batteries may leak liquid, which
may result in failure.
HOW TO USE
This unit detects darkness and motion with a
sensor, and lights up/off automatically during
your trip at night.
When you put it in your bag or pocket, *
please change to the manual mode.
It may light up at a certain darkness, in *
cloudy weather or indoor.
We recommend you switch to the manual *
mode when you do not use it.
1
Auto-mode switch
(Switching Auto/Manual)
Switch Auto/Manual using the auto-mode switch
on the back of the light.
Auto mode•
The unit detects darkness and mo-
tion, and lights up/off automatically.
(It lights up for about 50 seconds after mo-
tion stops.)
Manual mode•
Switch ON/OFF and the lighting mode using
the switch.
2
Switch operation
(switching the lighting mode)
Switch operation
Auto mode
RapidFlashON → → : Single press
Manual mode
ONOFF ↔: Long press
RapidFlashON → → : Single press
Standard operating time
Rapid : Approx. 200 hours
Flash : Approx. 400 hours
ON : Approx. 200 hours
When it is ON, it returns to the lighting *
mode used previously.
SPECIFICATIONS
Battery .........................AA alkaline battery x 2
Operating time .............ON : Approx. 200 hours, Flash : Approx.
400 hours, Rapid : Approx. 200 hours
Temperature range .......14˚F – 104˚F (-10˚C – 40˚C)
Dimensions/weight ......3-5/16” x 1-13/16” x 1-37/64”
(84 x 46 x 40 mm) / 3.1 oz (87.3 g)
(Including batteries)
The specifi cations and design are subject to change without notice.*
Lever
Levier
Dial
Disque
Rubber pad
Garniture en caoutchouc
Bracket
Support
Strap
Sangle
Auto-mode switch
Bouton de mode auto
Switch
Commutateur
ATTENTION! FR
Avant votre voyage, assurez-vous que la •
lumière est bien installée sur le support,
qu’il s’allume correctement et que la lumière
n’est pas bloquée par des valises etc.
Allume/éteint le bouton de mode auto lors-•
que le vélo s’arrête.
Cette unité n’est pas parfaitement étanche. •
Veuillez bien l’essuyer après une utilisation
sous la pluie, vous vous exposez sinon à
une défaillance.
Si la lampe ou certaines parties de la lampe •
sont salies par de la boue, etc., nettoyez à
l’aide d’un chiffon propre humecté de savon
doux.Ne jamais utiliser de solvant, de benzène
ou d’alcool ; cela causerait des dommages.
MONTAGE
Faites glisser le phare sur le support jusqu’à ce •
qu’il s’enclenche en position (avec un « clic »).
Pour démonter le phare, appuyez sur le levier •
et faites glisser le phare.
Fixer sur le vélo
ATTENTION!:
Assurez-vous de bien serrer le disque à la •
main. Si vous le serrez trop fort avec un outil,
vous risquez d’endommager le pas de vis.
Vérifi ez régulièrement le disque et la vis •
(*1) sur le support, et ne les utilisez que
s’ils sont bien serrés.
Arrondir l’extrémité de la sangle du support •
qui a été coupée pour éviter les blessures.
Fixer sur le rack arrière
ATTENTION!:
Nous vous recommandons de bien fi xer les
vis de verrouillage afi n de vous prémunir
des risques de vol.
UTILISATION
Cet appareil détecte la nuit et les mouvements
avec un capteur, et s’allume/s’éteint automati-
quement lorsque vous voyagez la nuit.
Lorsque vous le mettez dans un sac ou une *
poche, changez au mode manuel.
Il peut s’allumer dans des endroits obscurs, *
les jours nuageux ou à l’intérieur.
Nous vous recommandons de basculer en *
mode manuel lorsque vous ne l’utilisez pas.
1
Bouton du mode auto
(Changement Auto/Manuel)
Change entre Auto/Manuel en utilisant le bouton
de mode auto à l’arrière de la lampe.
Mode Auto•
Cet appareil détecte la nuit, les mouvements
et les vibrations, et s’allume/s’éteint automa-
tiquement. (il reste allumé pendant environ
50 secondes après que les mouvements se
soient arrêtés.)
Mode Manuel•
Allume/Éteint et le mode d’éclairage en utili-
sant le bouton.
2
Utilisation du bouton
(sélection du mode d’éclairage)
Commutateur
Mode Auto
RapideClignotantMarche → →: Pression simple
Mode Manuel
MarcheArrêt ↔: Pression longue
RapideClignotantMarche → →: Pression simple
Durée de fonctionnement standard
Rapide: Environ 200 heures
Marche: Environ 400 heures
Clignotant: Environ 200 heures
Lorsqu’il est ALLUMÉ, il retourne automati-*
quement au dernier mode d’éclairage utilisé.
CARACTERISTIQUES
Pile ..........................Piles alcalines AA x2
Durée de fonctionnement
................................
Marche : Environ 200 heures, Clignotant : Envi-
ron 400 heures, Rapide : Environ 200 heures
Température ............-10˚C – 40˚C
Dimensions/poids ...84 x 46 x 40 mm / 87,3 g (avec les batteries)
Les caractéristiques, la forme et la présentation générale sont *
sujettes à modifi cation sans avis préalable.
INSTALLATION DES PILES
Desserrez et enlevez la vis à l’arrière du phare 1
avec une pièce de monnaie ou autre pour
démonter la lentille du phare.
Installez les piles dans la direction indiquée 2
sur la fi gure.
Remettez la lentille en position et serrez la 3
vis comme auparavant.
ATTENTION!:
Ne pas mélanger des piles neuves avec des •
piles usées ou des piles de différents types.
Assuez-vous de mettre les piles dans le bon sens.•
Installez correctement le joint pour préserver •
l’étanchéité.
Retirez les piles et rangez-les si vous n’avez •
pas l’intention d’utiliser la lampe pendant une
longue période. Les piles pourraient couler et
causer des défectuosités.
ø21.5 - 32 mm
Tuotetiedot
| Merkki: | Cateye |
| Kategoria: | Helpotus |
| Malli: | Blitz Auto TL-AU330G |
Tarvitsetko apua?
Jos tarvitset apua merkille Cateye Blitz Auto TL-AU330G esitä kysymys alla ja muut käyttäjät vastaavat sinulle
Helpotus Cateye Käyttöohjeet

30 Joulukuuta 2025
30 Joulukuuta 2025
30 Joulukuuta 2025
30 Joulukuuta 2025
30 Joulukuuta 2025
17 Joulukuuta 2024
17 Joulukuuta 2024
17 Joulukuuta 2024
17 Joulukuuta 2024
17 Joulukuuta 2024
Helpotus Käyttöohjeet
Viimeisimmät Helpotus Käyttöohjeet
9 Huhtikuuta 2025
8 Huhtikuuta 2025
8 Huhtikuuta 2025
8 Huhtikuuta 2025
8 Huhtikuuta 2025
7 Huhtikuuta 2025
5 Huhtikuuta 2025
5 Huhtikuuta 2025
5 Huhtikuuta 2025
5 Huhtikuuta 2025