Bliss Outdoors BH-998 Käyttöohje
Bliss Outdoors Lelut BH-998
Lue alta 📖 käyttöohje suomeksi merkille Bliss Outdoors BH-998 (2 sivua) kategoriassa Lelut. Tämä opas oli hyödyllinen 49 henkilölle ja sai 4.5 tähden keskimäärin 8 käyttäjältä
Sivu 1/2
Form No. SJ-BH-998-880E-M
READ THIS PAGE FIRST BEFORE ASSEMBLING & USING THIS PRODUCT
IMPORTANT: Please save this instruction and information sheet in the
event that the manufacturer has to be contacted.
WEIGHT CAPACITY: 400 LBS
SAFETY & MAINTENANCE INFORMATION
CAUTION: If you are not familiar with construction, please use a qualied
general contractor to install. Improper installation may cause injury. Swinging
with the NETTED TREE GLIDER involves an inherent risk that can cause
serious injury or even death. NETTED TREE GLIDER is more dangerous
than a regular swing. Head injuries and strangulation is possible and can
cause brain injury. Use with caution. Purchaser and users assume all risk,
responsibility, and liability for use of the NETTED TREE GLIDER, including
any resulting loss or damage to persons or property. Do not install home
playground equipment over concrete, asphalt, packed earth, grass, carpet,
or any other hard surface. A fall onto a hard surface can result in serious
injury or death to the equipment user. To prevent serious injury, cautionary
statements shall be included which warn that children must not use the
equipment until properly installed. Bliss Hammocks, Inc. assumes no liability
arising from the use and application of this product and specically disclaims
any and all consequential and incidental damages.
SAFETY & MAINTENANCE: Before using the NETTED TREE GLIDER,
inspect your NETTED TREE GLIDER, tree straps, installation points and
objects supporting your NETTED TREE GLIDER for wear or weakness.
Make sure the straps are not frayed. Tighten all hardware. Check metal
parts for rust Always make sure your NETTED TREE GLIDER and tree are
in good condition before using it. Proceed carefully and take your time
installing it. Misuse or rough play may result in falls and may wear out your
NETTED TREE GLIDER and hardware prematurely. Children should be
supervised while using the NETTED TREE GLIDER. Make sure to leave more
than enough room in between the NETTED TREE GLIDER, obstacles and
people surrounding its installation area. Check all deterioration. Replace as
needed. Empty your pockets of all hard or sharp objects. Do not attempt
to ride more than one person on the NETTED TREE GLIDER. Do not use
headphones while using the NETTED TREE GLIDER. Wearing a bike helmet
is recommended when using this swing.
OPERATING INFORMATION: Instruct children not to walk close to,
in front of, behind, or between moving items. Instruct children not to
twist swing chains or ropes or loop them over the top support structure
since this may reduce the strength of the chain or rope. Instruct children
not to swing an empty swing. Instruct children not to use the equipment
in a manner other than intended. Make sure children do not get off
equipment while it is in motion. Instruct children not to attach the item to
the playground equipment that is not specically designed for use with
the equipment, such as, but not limited to, jump ropes, clothesline, pet
leashes, cables and chain as they may cause a strangulation hazard. Make
sure to dress children with well-tting and full foot enclosing footwear.
Examples of inappropriate footwear are clogs, ip ops, and sandals.
Never add extra length to chain or rope. The chains or ropes provided are
the maximum lengths designed for the swinging elements(s). Do not use
around vehicles or power lines.
DISPOSAL INSTRUCTIONS: Disassemble and dispose of the playground
equipment in such a way that no unreasonable hazards will exist at the
time the equipment is discarded. Follow all local disposal requirements.
CONSUMER INFORMATION SHEET FOR PLAYGROUND
SURFACING MATERIALS
The U.S Consumer Product Safety Commission (CPSC) estimates that
about 100,000 playground equipment related injuries resulting from falls
to the ground surface are treated annually in the U.S hospital emergency
rooms. Injuries involving this hazard pattern tend to be among the
most serious of all playground injuries, and have the potential to be
fatal, particularly when the injury is to the head. The surface under and
around the playground equipment can be a major factor in determining
the injury causing potential of a fall. It is self evident that a fall onto
a shock-absorbing surface is less than likely to cause a serious injury
than a fall onto a hard surface. Playground equipment should never be
placed on hard surfaces such as concrete of asphalt and while grass may
appear to be acceptable, it may juicily turn to hard packed earth in areas
of high trafc. Shredded bark, wood chips, nd sand or ne gravel are
considered to be acceptable shock-absorbing surfaces when installed and
maintained at a sufcient depth under and around playground equipment.
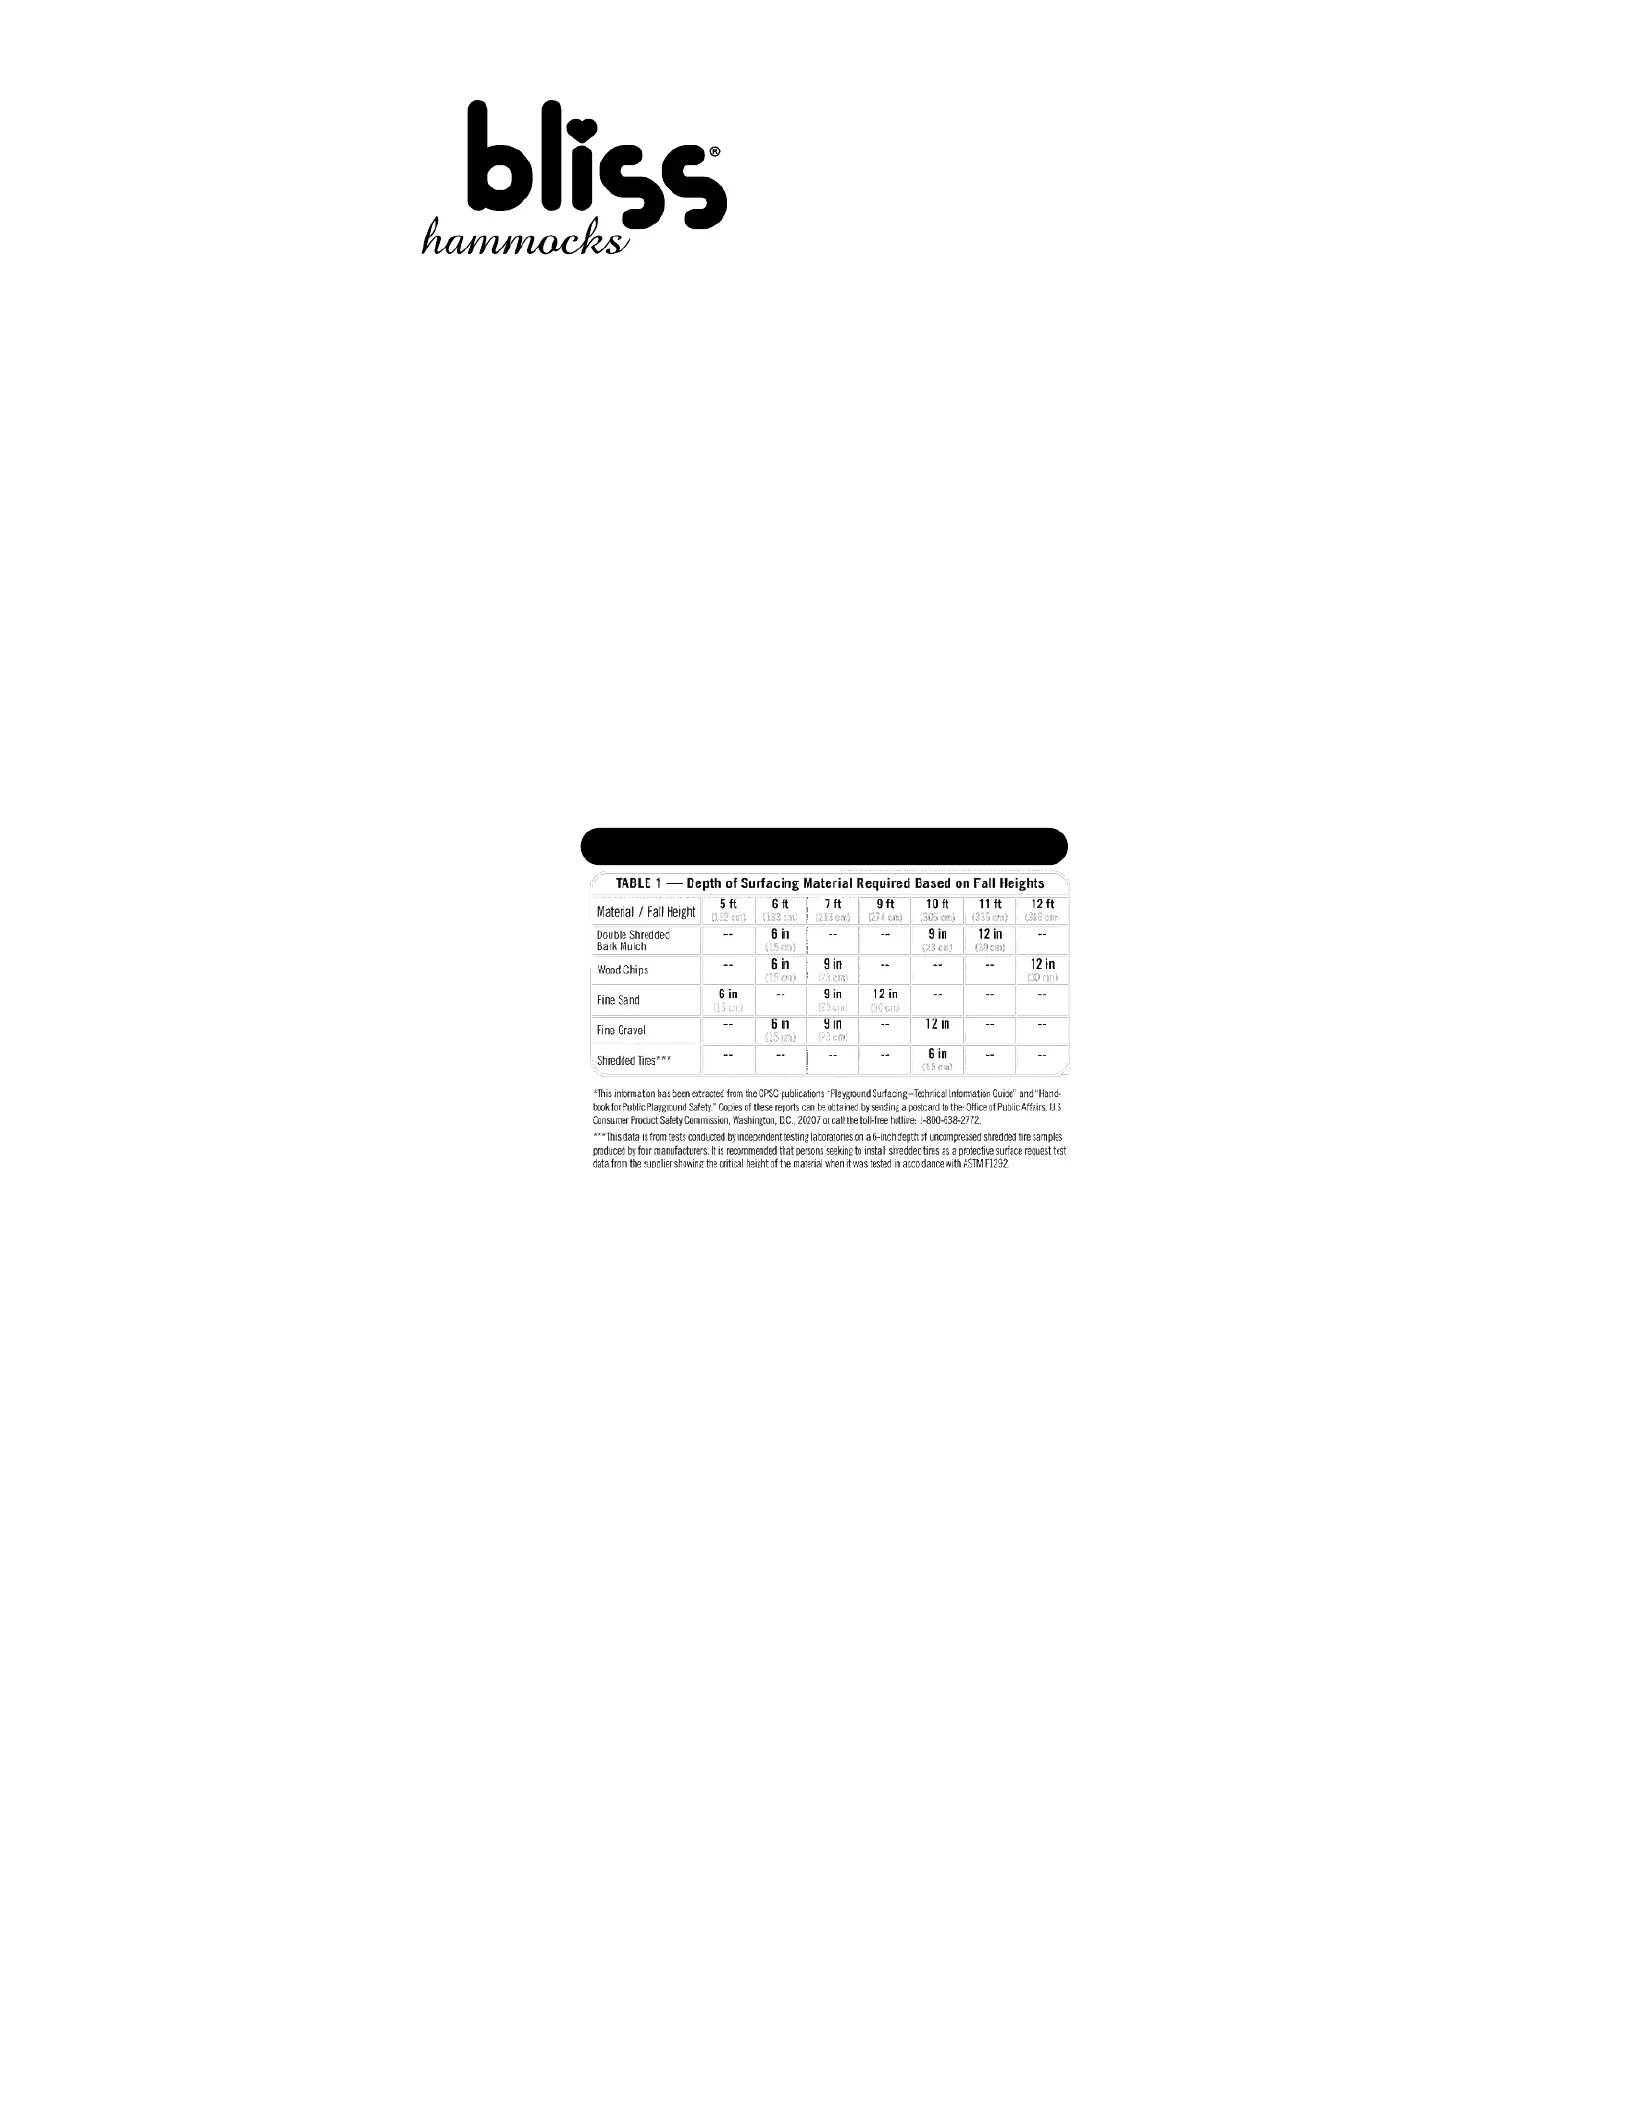
Table 1 lists the maximum height from which a child would not be
expected to sustain a life-threatening head injury in a fall onto different
loose-ll surfacing materials if they are installed and maintained at depths
of 6, 9, and 12 inches. However, it should be recognized that all injuries
due to falls cannot be prevented no matter what surfacing material is used.
It is recommended that a shock-absorbing material should extend
a minimum of 6 ft. In all directions from the perimeter of stationary
equipment such as climbers and slides. However, because children may
deliberately jump from a moving swing, the shock absorbing material
should extend to the front and rear of a swing a minimum distance of 2
times height of pivot point measured from a point directly beneath the
pivot on the supporting structure.
This information is intended to assist in comparing the relative shock-
absorbing properties of various materials. No particular material is
recommended over another. However, each material is only effective when
maintained. Materials should be checked periodically and replenished to
maintain correct depth as determined necessary for your equipment. The
choice of a material depends on the type and height of the playground
equipment, the availability of the material in your area, and its cost.
ADDITIONAL SAFETY TIPS:
•Two adults in good physical condition are required for the following
assembly. Wear proper shoes. Failure to follow all instructions and
warnings exactly may result in serious injury.
•Keep children away from the swing during assembly.
•ecting area.Keep ngers away from the ends of the rails in the conn
•Take the Tree Glider out of the box and check the material. If the
material has any structural damage( weakness) such as bents or tears
on the net, stop use immediately.
CIRCULAR TREE GLIDER
BH-998
**The maximum fall height for this product is 60 in (152 cm).
We recommend using 6 in (15 cm) of Double Shredded Bark Mulch. **
Tuotetiedot
| Merkki: | Bliss Outdoors |
| Kategoria: | Lelut |
| Malli: | BH-998 |
Tarvitsetko apua?
Jos tarvitset apua merkille Bliss Outdoors BH-998 esitä kysymys alla ja muut käyttäjät vastaavat sinulle
Lelut Bliss Outdoors Käyttöohjeet

27 Joulukuuta 2024
Lelut Käyttöohjeet
Viimeisimmät Lelut Käyttöohjeet
9 Huhtikuuta 2025
9 Huhtikuuta 2025
9 Huhtikuuta 2025
9 Huhtikuuta 2025
8 Huhtikuuta 2025
8 Huhtikuuta 2025
7 Huhtikuuta 2025
7 Huhtikuuta 2025
6 Huhtikuuta 2025
5 Huhtikuuta 2025