AXESS 99-5851CH Käyttöohje
AXESS Ei luokiteltu 99-5851CH
Lue alta 📖 käyttöohje suomeksi merkille AXESS 99-5851CH (16 sivua) kategoriassa Ei luokiteltu. Tämä opas oli hyödyllinen 45 henkilölle ja sai 5.0 tähden keskimäärin 8 käyttäjältä
Sivu 1/16
Metra. The World’s Best Kits.
®
MetraOnline.com © COPYRIGHT 2020 METRA ELECTRONICS CORPORATION REV. 12/8/22 INST99-5851CH
INSTALLATION INSTRUCTIONS
99-5851CH
Attention!With the key out of the ignition,
disconnect the negative battery terminal
before installing this product. Ensure that all
installation connections are secure before
cycling the ignition to test this product.
Patent # 10,579,232
KIT FEATURES
• ISO DIN radio provision with pocket
• ISO DDIN radio provision
• Touchscreen display for climate and personalization features
• Included interface for climate and steering wheel functions
• Integrated hazard button and passenger airbag indicator
• Painted charcoal
Note: The self parking feature is not supported at this time.
KIT COMPONENTS
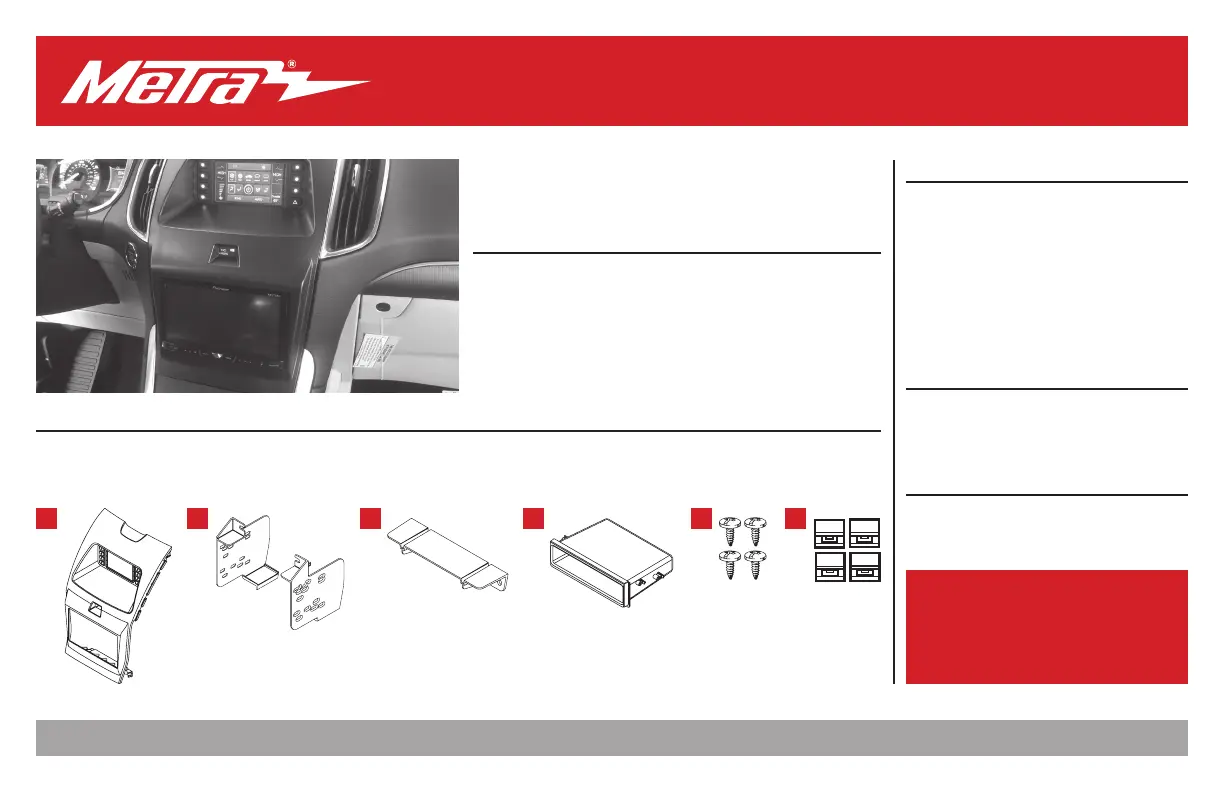
• A) Radio trim panel with touchscreen display • B) Radio brackets • C) Lower radio bracket • D) Pocket • E) (4) Phillips screws • F) (4) Panel clips
• G) HVAC interface and wiring harness (not shown) • H) Antenna adapter (not shown)
TOOLS REQUIRED
• Panel removal tool • Phillips screwdriver
• 9/32” Socket wrench • 5.5mm Socket wrench
• Cutting tool
TABLE OF CONTENTS
Dash Disassembly ..................................................2
Kit Preparation .......................................................2
Kit Assembly
–ISO DIN radio provision with pocket ..................3
–ISO DDIN radio provision .....................................3
Axxess interface installation ............................4-14
Final assembly .......................................................9
WIRING & ANTENNA CONNECTIONS
Wiring Harness: Axxess interface built into
touchscreen
Antenna Adapter: Included with kit
AB
D
C
Ford Edge 2015-2020
EF
*Visit MetraOnline.com for up-to-date vehicle specific applications.
Tuotetiedot
| Merkki: | AXESS |
| Kategoria: | Ei luokiteltu |
| Malli: | 99-5851CH |
Tarvitsetko apua?
Jos tarvitset apua merkille AXESS 99-5851CH esitä kysymys alla ja muut käyttäjät vastaavat sinulle
Ei luokiteltu AXESS Käyttöohjeet

26 Helmikuuta 2025
26 Helmikuuta 2025
26 Helmikuuta 2025
26 Helmikuuta 2025
26 Helmikuuta 2025
26 Helmikuuta 2025
26 Helmikuuta 2025
26 Helmikuuta 2025
26 Helmikuuta 2025
26 Helmikuuta 2025
Ei luokiteltu Käyttöohjeet
Viimeisimmät Ei luokiteltu Käyttöohjeet
9 Huhtikuuta 2025
9 Huhtikuuta 2025
9 Huhtikuuta 2025
9 Huhtikuuta 2025
9 Huhtikuuta 2025
9 Huhtikuuta 2025
9 Huhtikuuta 2025
9 Huhtikuuta 2025
9 Huhtikuuta 2025
9 Huhtikuuta 2025