Asus ROG MAXIMUS Z890 EXTREME Käyttöohje
Asus Pistorasia ROG MAXIMUS Z890 EXTREME
Lue alta 📖 käyttöohje suomeksi merkille Asus ROG MAXIMUS Z890 EXTREME (44 sivua) kategoriassa Pistorasia. Tämä opas oli hyödyllinen 41 henkilölle ja sai 4.8 tähden keskimäärin 8 käyttäjältä
Sivu 1/44
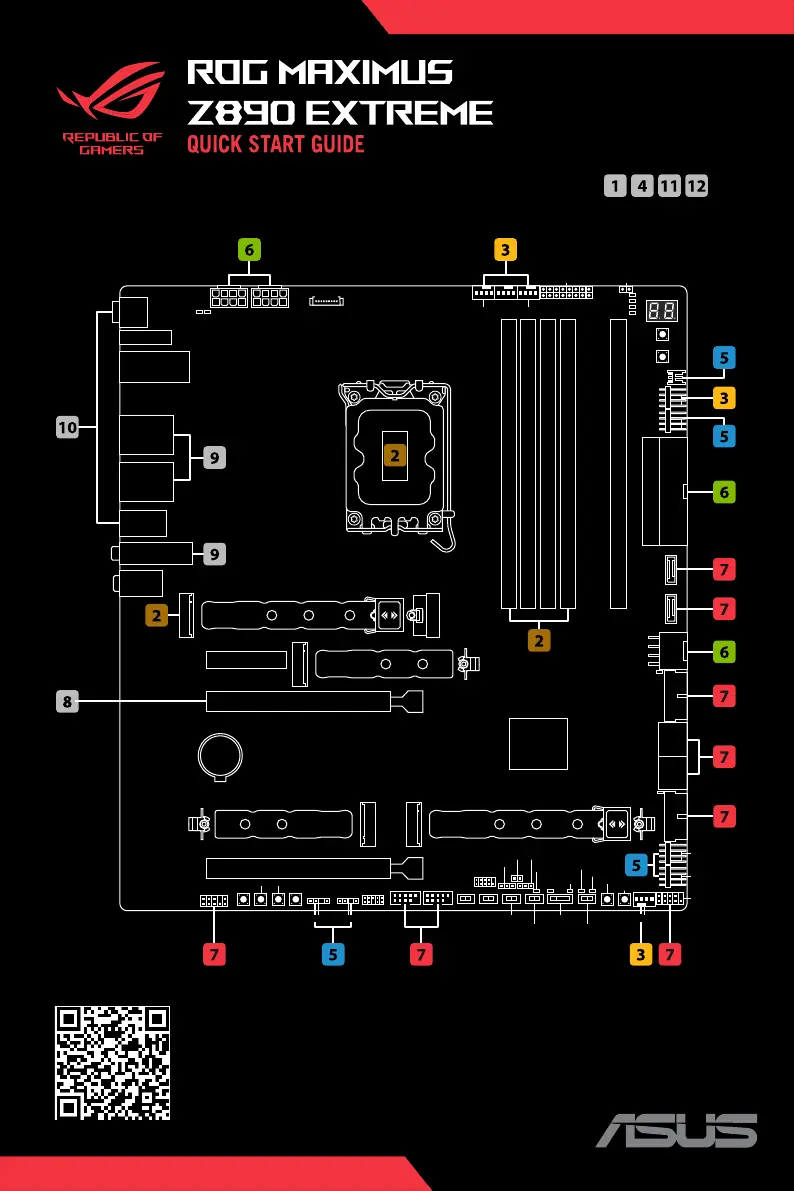
The items labeled below correspond to the installation steps, for steps
and more information on the steps, please refer to the rest of the guide.
Support
SEEKING A SOLUTION?
Scan now for assistance
BATTERY
LGA1851
MAXIMUS Z890 EXTREME
CPU_12V_1CPU_12V_2
CPU_PROTECT_LED
CPU_12V_LED
HDMI
PCIEX16(G5)_1
PCIEX16(G5)_2
SATA6G_3
SATA6G_4
SATA6G_1
SATA6G_2
AUDIO
U10G_E123
U10G_EC4
LAN1_U10G_1
U10G_C3
LAN2_U10G_2
M.2(TBT5)_1
M.2(TBT5)_2
U20G_C5
M.2(WIFI)
U5G_E12U5G_E34
M.2_2(SOCKET3)
M.2_1(SOCKET3)
2280
M.2_4(SOCKET3)
2280
2280
22110
22602242
M.2_3(SOCKET3)
2280
22110
22602242
HD_LED
22602242
FLBK_CL_CMOS
ADD GEN2_3ADD GEN2_4
CPU_BCLK-SOC_BCLK+
CPU_BCLK+SOC_BCLK-
F_AUDIO
USB_E34USB_E12
RSVD_4
PCIEX4(G4)
F_PANEL
22422260
LED2
LED1
PAUSE_LED
RETRY BUTTON
BIOS_LED1
BIOS_LED2
SAFE_BOOT
T_SENSORLN2_MODE
RSVD_1RSVD_2
BIOS_SELECT
DDR5 DIMM_B2
1st
(64bit, 288-pin module)
DDR5 DIMM_B1 (64bit, 288-pin module)
DDR5 DIMM_A2
1st
(64bit, 288-pin module)
DDR5 DIMM_A1 (64bit, 288-pin module)
ATX_PWR
U10G_C4
U20G_C9
BOOT
VGA
DRAM
CPU
Q_CODE
START
FLEXKEY
CHA_FAN2
RAD_FAN1
RAD_FAN2
W_PUMP+2
CPU_FAN
CPU_OPT
CHA_FAN1
ADD GEN2_12
Intel
®
Z890
WB_SENSOR
DIMM.2_SLOT
ProbeItProbeIt
ALT_PCIE_MODESLOW_MODE
PAUSEBIOS_SWITCH
W_PUMP+1
PCIE_8PIN_PWR
PCIE_8PIN_LED
ARGB
ARGB
USB 10Gbps
Chassis Fan
USB 20Gbps
USB 5Gbps
USB 5Gbps
USB 2.0
Front Panel System
Front Panel Audio
Tuotetiedot
| Merkki: | Asus |
| Kategoria: | Pistorasia |
| Malli: | ROG MAXIMUS Z890 EXTREME |
Tarvitsetko apua?
Jos tarvitset apua merkille Asus ROG MAXIMUS Z890 EXTREME esitä kysymys alla ja muut käyttäjät vastaavat sinulle
Pistorasia Asus Käyttöohjeet

3 Huhtikuuta 2025
3 Huhtikuuta 2025
3 Huhtikuuta 2025
2 Huhtikuuta 2025
2 Huhtikuuta 2025
2 Huhtikuuta 2025
1 Huhtikuuta 2025
27 Helmikuuta 2025
27 Helmikuuta 2025
27 Helmikuuta 2025
Pistorasia Käyttöohjeet
Viimeisimmät Pistorasia Käyttöohjeet
3 Huhtikuuta 2025
2 Huhtikuuta 2025
1 Huhtikuuta 2025
1 Huhtikuuta 2025
29 Maaliskuuta 2025
28 Maaliskuuta 2025
28 Maaliskuuta 2025
13 Maaliskuuta 2025
12 Maaliskuuta 2025
10 Maaliskuuta 2025