Ansmann Comfort Check Käyttöohje
Ansmann Mittauslaitteet Comfort Check
Lue alta 📖 käyttöohje suomeksi merkille Ansmann Comfort Check (2 sivua) kategoriassa Mittauslaitteet. Tämä opas oli hyödyllinen 30 henkilölle ja sai 4.5 tähden keskimäärin 7 käyttäjältä
Sivu 1/2
DE
BEDIENUNGSANLEITUNG
Lesen Sie die Bedienungsanleitung sorgfältig.
Das Produkt darf ausschließlich für den dafür vorgesehenen Zweck verwendet werden.
BESTIMMUNGSGEMÄSSER GEBRAUCH
Das Produkt dient dem Testen der gebräuchlichsten Alkaline- und Lithium-Batterie-
typen mit 1.5V, 3.0V, 9V, inkl. diverser Knopfzellen, sowie aufladbaren NiMH-Akkus mit
1.2V und Li-Ion Akkus mit 3.6 (3.7) V Nennspannung.
Einfachste Handhabung
Dezimalanzeige der Spannung in V
Restkapazität wird durch Balkenanzeige mit 22 Segmenten dargestellt
Der Tester ist immer einsatzbereit und funktioniert ohne eigene Stromversorgung
Klein, leicht, robust und handlich – passt in jede Hosentasche
SICHERHEITSHINWEISE
Zellen immer nur einzeln testen, Rund-
zelle und 9V E-Block nicht zeitgleich
kontaktieren.
Zum Reinigen ein mit etwas Wasser be-
feuchtetes Tuch verwenden und keine
scharfen Lösungs- und Reinigungsmittel.
Setzen Sie das Gerät keinen extremen
Temperaturen, keinen permanenten
Sonnenstrahlen und keiner hohen Luft-
feuchtigkeit aus.
Eigenmächtiges Reparieren, Ändern oder gar
ein Umbau des Gerätes ist nicht gestattet.
Batterien / Akkus gehören nicht in die
Hände von Kindern.
Sie beinhalten zumeist gefährliche Stof-
fe, wie z.B. Säuren oder Laugen. Durch
ausgelaufene Akkus / Batterien kann es
zu schweren Verätzungen der Haut oder
der Augen kommen. Lebensgefahr be-
steht insbesondere beim Verschlucken!
Bei Verdacht auf ein Verschlucken
nehmen Sie sofort medizinische Hilfe in
Anspruch! Bei Kontakt mit Hautflächen
und Augen sofort gründlich mit Wasser
ausspülen.
SE
BRUKSANVISNING
Läs bruksanvisningen noggrant.
Produkten får endast användas ändamålsenligt.
AVSEDD ANVÄNDNING
Produkten används för testning av de vanligaste typerna av alkalin- och litiumbat-
terier på 1,5 V, 3,0 V, 9 V, inklusive olika knappcellsbatterier, samt uppladdningsbara
NiHM-batterier på 1,2 V och uppladdningsbara litiumjonbatterier på 3,6 (3,7) V nominell
spänning.
Enkel hantering
Decimalindikering för spänning in V
Batteriets kvarstående batterinivå visas med hjälp av stapelindikeringen med 22
segment
Testaren är alltid redo att användas och fungerar utan egen strömförsörjning
Liten, lätt, robust och behändig – passar i varje byxficka
ALLMÄNNA SÄKERHETSANVISNINGAR
Testa knappcellsbatterier enbart enskilt,
anslut inte knappcellsbatterier och 9 V
e-block samtidigt.
Använd en något fuktig trasa för att
rengöra produkten. Använd inte skarpa
lösnings- och rengöringsmedel.
Utsätt inte produkten för extrema tempe-
raturer, permanent solstrålning och hög
luftfuktighet.
All reparation, ändring eller ombyggnad
av produkten på egen hand är förbjudet.
Batterier/uppladdningsbara batterier hör
inte i barns händer.
De innehåller mestadels farliga ämnen,
som t.ex. syror eller baser. Läckande
uppladdningsbara batterier/batterier kan
orsaka allvarliga frätskador på huden eller
ögonen. Livsfara framför allt vid sväljning!
Om du misstänker att batterierna sval-
des, ska du genast uppsöka en läkare!
Skölj genast med rikligt med vatten vid
hud- och ögonkontakt.
Försök aldrig att öppna, klämma, värma
upp eller tända ett batteri. Kasta inte i eld.
PT
MANUAL DE INSTRUÇÕES
Leia atentamente o manual de instruções.
O produto pode ser utilizado exclusivamente para o fim a que se destina.
UTILIZAÇÃO CORRETA
O produto é usado para testar os tipos mais comuns de pilhas alcalinas e de lítio com
1,5 V, 3,0 V, 9 V, incluindo várias pilhas tipo botão, bem como pilhas recarregáveis NiMH
com 1,2 V e baterias de iões de lítio com tensão nominal de 3,6 (3,7) V.
Manuseamento simples
Indicação decimal da tensão em V
A capacidade restante é apresentada por indicador de barras com 22 segmentos
O dispositivo de teste está sempre pronto a utilizar e funciona sem alimentação de
corrente própria
Pequeno, leve, robusto e prático – cabe em qualquer bolso das calças
INSTRUÇÕES DE SEGURANÇA GERAIS
Testar as pilhas sempre individualmente,
não testar pilhas cilíndricas e blocos de
9 V em simultâneo.
Para a limpeza, utilizar um pano humede-
cido com um pouco de água e não utilizar
soluções e produtos de limpeza agressivos.
Não sujeite o aparelho a temperaturas
extremas, à luz solar permanente e a
humidade do ar elevada.
Não são permitidas reparações, alte-
rações ou conversões do aparelho por
iniciativa própria.
As baterias / pilhas não devem estar ao
alcance de crianças.
Geralmente, contêm substâncias perigo-
sas, como ácidos ou álcalis. As baterias /
pilhas com fugas podem causar ferimentos
graves nas mãos ou nos olhos. Existe peri-
go de vida, especialmente se ingeridas!
Em caso de suspeita de ingestão, procu-
re imediatamente ajuda médica! Em caso
de contacto com a pele e olhos, lavar
imediatamente com água abundante.
Nunca tente abrir, esmagar, aquecer ou
FR
MODE D’EMPLOI
Lisez attentivement le mode d‘emploi.
Le produit ne doit être utilisé que pour l‘usage auquel il est destiné.
UTILISATION CONFORME AUX PRESCRIPTIONS
Le produit sert à tester les types de piles alcalines et au lithium les plus courants de
1,5V, 3,0V, 9V, y compris diverses piles boutons, ainsi que les accus rechargeables
NiMH de 1,2V et les accus Li-Ion de 3,6 (3,7) V de tension nominale.
Manipulation facile
Affichage décimal de la tension en V
La capacité restante est représentée par un graphique à barres de 22 segments
Le testeur est toujours prêt à l‘emploi et fonctionne sans alimentation électrique
propre
Petit, léger, robuste et maniable - se glisse dans une poche de pantalon
CONSIGNES DE SÉCURITÉ GÉNÉRALES
Toujours tester les piles individuellement,
ne pas contacter en même temps la pile
ronde et le bloc E 9V.
Pour le nettoyage, utiliser un chiffon
humidifié avec un peu d‘eau et ne pas
utiliser de solvants ou de détergents
agressifs.
N‘exposez pas l‘appareil à des tempéra-
tures extrêmes, aux rayons permanents
du soleil ou à un taux d‘humidité élevé.
Il est interdit de réparer, de modifier ou
même de transformer l‘appareil de son
propre chef.
Les piles / accumulateurs doivent être
laissés hors de la portée des enfants.
Ils contiennent pour la plupart des
substances dangereuses, telles que des
acides ou des bases. Les piles/accumu-
lateurs qui fuient peuvent provoquer de
graves brûlures de la peau ou des yeux.
Danger de mort, en particulier en cas
d‘ingestion !
En cas de suspicion d‘ingestion, deman-
dez immédiatement une aide médicale
! En cas de contact avec la peau et les
ES
INSTRUCCIONES DE SEGURIDAD
Lea las instrucciones de servicio a fondo.
El producto debe emplearse exclusivamente para su uso previsto.
USO PRESCRITO
El producto sirve para la comprobación de los tipos de baterías alcalinas y de litio más
habituales de 1.5V, 3.0V, 9V, incl. diversas células de botón así como baterías recarga-
bles NiMH de 1.2V y baterías de iones de litio de 3.6 (3.7) V de tensión nominal.
Facilísimo manejo
Señalización de decimales de la tensión en voltios
La capacidad restante se representa por medio de una señalización de barras de
22 segmentos
El comprobador se encuentra siempre disponible para el servicio y funciona sin
suministro de corriente propio
Pequeño, ligero, robusto y manejable; cabe en cualquier bolsillo de pantalón
INDICACIONES DE SEGURIDAD GENERALES
Compruebe siempre las células solamen-
te de una en una y no contacte simul-
táneamente las células de botón y los
bloques E de 9V.
Para la limpieza emplee un paño humede-
cido con algo de agua pero no use ningún
disolvente o agente de limpieza agresivo.
No someta el dispositivo a temperaturas
extremas, radiación solar prolongada o
alta humedad ambiente.
No se autoriza la reparación, modifica-
ción o remodelación del dispositivo por
cuenta propia.
Las baterías / baterías recargables no
deben encontrarse accesibles a los niños.
En su mayoría contienen substancias
peligrosas, por ejemplo, ácidos y bases. Las
baterías / baterías recargables con fugas
pueden ser causa de quemaduras químicas
graves en la piel o los ojos. ¡Especialmente
la ingestión supone peligro de muerte!
¡De sospecharse un caso de ingestión,
busque inmediatamente ayuda médica!
Enjuagar inmediatamente con abundante
GB
OPERATING MANUAL
Read the operating instructions carefully.
The product may only be used for its intended purpose.
INTENDED USE
The product is used to test the most common alkaline and lithium battery types with
1.5 V, 3.0 V, 9 V, incl. various button cells, as well as rechargeable NiMH batteries with
1.2 V and Li-Ion batteries with 3.6 (3.7) V nominal voltage.
Extremely easy to use
Decimal display of the voltage in V
Remaining capacity is shown by a bar display with 22 segments
The tester is always ready for use and works without its own power supply
Small, light, robust and handy – fits in any trouser pocket
GENERAL SAFETY INSTRUCTIONS
Only ever test cells individually; do not
contact the round cell and 9 V e-block at
the same time.
For cleaning, use a cloth moistened with
a little water and do not use any harsh
solvents or cleaning agents.
Do not expose the appliance to extreme
temperatures, permanent sunlight or
high humidity.
Unauthorised repair, modification or even
conversion of the appliance is not permitted.
Batteries/rechargeable batteries must
not be handled by children.
They usually contain hazardous sub-
stances such as acids or alkalis. Leaking
batteries can cause severe burns to the
skin or eyes. There is a danger to life,
especially if swallowed!
If ingestion is suspected, seek medical
assistance immediately! In the event of
contact with skin and eyes, rinse tho-
roughly with water immediately.
Never try to open, crush or heat a stan-
dard/rechargeable battery or set it on
fire. Do not throw into a fire.
Niemals versuchen, eine Batterie/Akku
zu öffnen, zu quetschen, zu erhitzen
oder in Brand zu setzen. Nicht ins Feuer
werfen.
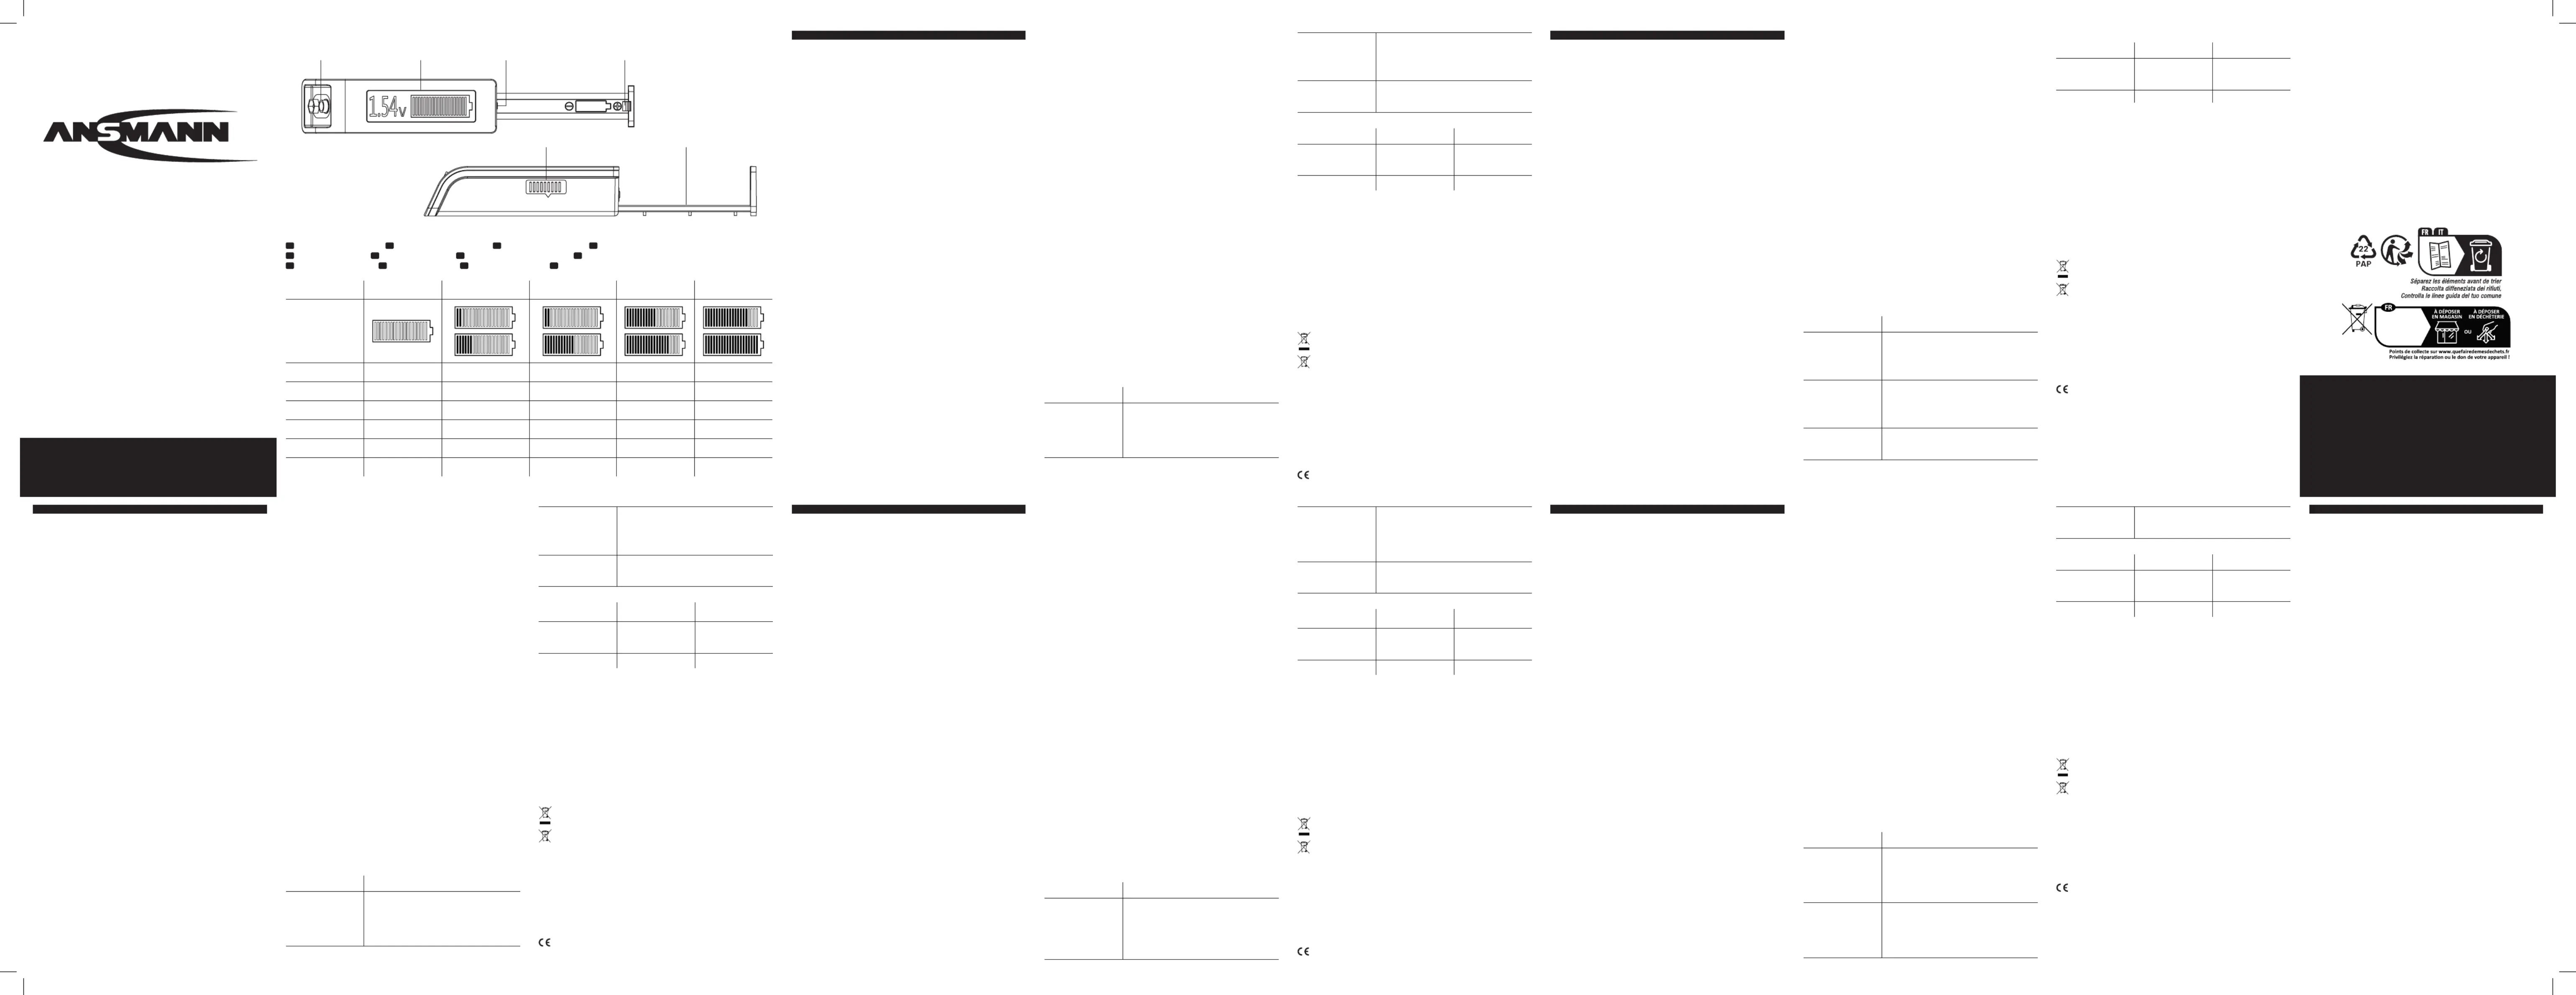
AUFBAU DES TESTERS SIEHE ABBILDUNG
1. Ausziehbarer Schlitten zum Einlegen der zu testenden Rundzelle
2. Plus - Pol (+)
3. Minus - Pol (-)
4. 9V Kontakte
5. Schiebeschalter zum Einstellen der Batteriespannung für Rundzellen
(1.2V, 1.5V, 3V, 3.6V); eine 9V Batterie wird automatisch erkannt
6. LC-Display mit Spannungs- und Balkenanzeige
LIEFERUMFANG
Batterietester
Bedienungsanleitung
INBETRIEBNAHME
Der Tester kann sofort, ohne jegliche Vorbereitung in Betrieb genommen werden.
Für die Testfunktion versorgt er sich selbst mit Energie aus der zu überprüfenden
Batterie.
Erfolgt keine Anzeige ist die zu überprüfende Batterie komplett entladen.
BEDIENUNG
Test einer 1,2V / 1,5V / 3V oder 3,6V Rundzelle:
Stellen Sie zuerst die passende Spannung der zu überprüfenden Zelle über den
Schiebeschalter ein. Ziehen Sie dann den Schlitten heraus und legen Sie die Zelle mit
dem Plus-Pol (+) nach außen (gemäß Batteriesymbol) ein.
Schieben Sie nun den Schlitten mit der eingelegten Zelle in Richtung des Displays.
Wenn die eingelegte Zelle den Kontakt berührt, üben Sie noch etwas Druck aus, um
eine sichere Kontaktierung zu gewährleisten.
Ist die Zelle nicht komplett leer und wurde sie richtig gepolt eingelegt, so erscheint im
Display sowohl die aktuelle Spannung als auch die Balkenanzeige.
Test eines 9V E-Blocks:
Ein 9V Block kann direkt an den seitlichen 9V Kontakten angeschlossen werden.
Achten Sie dabei auf die richtige Polarität! Die Einstellung des Schiebeschalters ist für
den 9V Block Test nicht von Bedeutung. Ist der 9V Block nicht komplett leer und wurde
er richtig gepolt kontaktiert, so erscheint im Display sowohl die aktuelle Spannung als
auch die Balkenanzeige.
FEHLERBESEITIGUNG
PROBLEM:MÖGLICHE URSACHEN:
Keine Anzeige
Die zu überprüfende Batterie wurde nicht polrichtig
eingelegt.
>Legen Sie die Batterie mit dem Pluspol nach
außen zeigend in Schublade ein
Die zu prüfende Batterie ist komplett leer (< 0.9V).
>Entsorgen Sie die Batterie ordnungsgemäß (siehe
Abschnitt Entsorgung)
queimar uma pilha / pilha recarregável.
Não atirar para o fogo.
ESTRUTURA DO DISPOSITIVO DE TESTE VER IMAGEM
1. Compartimento extraível para colocar a pilha cilíndrica a testar
2. Polo positivo (+)
3. Polo negativo (-)
4. Contactos para 9 V
5. Interruptor deslizante para definição da tensão das pilhas para pilhas cilíndricas
(1,2 V, 1,5 V, 3 V, 3,6 V); as pilhas de 9 V são detetadas automaticamente
6. Visor LCD com indicação da tensão e indicador de barras
VOLUME DE FORNECIMENTO
Dispositivo de teste de pilhas
Manual de instruções
COLOCAÇÃO EM FUNCIONAMENTO
O dispositivo de teste pode ser colocado em funcionamento imediatamente, sem
qualquer tipo de preparação.
Para a função de teste, o dispositivo alimenta-se com energia da pilha a testar.
Se não ocorrer qualquer indicação, a pilha a testar está completamente descarregada.
OPERAÇÃO
Teste de uma pilha cilíndrica de 1,2 V / 1,5 V / 3 V ou 3,6V:
Em primeiro lugar, defina a tensão da pilha a testar com o interruptor deslizante. Em
seguida, retire o compartimento e coloque a pilha com o polo positivo (+) voltado para
fora (conforme o símbolo da pilha).
Empurre agora o compartimento com a pilha colocada na direção do visor. Quando a pilha
colocada tocar no contacto, faça alguma pressão para garantir um contacto seguro.
Se a pilha não estiver completamente descarregada e for colocada com a polaridade
correta, aparece no visor tanto a tensão atual como o indicador de barras.
Teste de um bloco E de 9 V:
Os blocos de 9 V podem ser ligados diretamente aos contactos de 9 V laterais. Garanta
a polaridade correta! A definição através do interruptor deslizante é irrelevante para o
teste de blocos de 9 V. Se o bloco de 9 V não estiver completamente descarregado e
for colocado com a polaridade correta, aparece no visor tanto a tensão atual como o
indicador de barras.
REPARAÇÃO DE ERROS
PROBLEMA:CAUSAS POSSÍVEIS:
Nenhuma indicação
A pilha a testar não foi colocada com a polaridade
correta.
>Coloque a pilha no compartimento com o polo
positivo voltado para fora
A pilha a testar está completamente descarregada
(< 0,9 V).
>Elimine a pilha corretamente (ver secção Eliminação)
Indicação instável
Problema de contacto (resistência de transição
aumentada)
>Aumente ligeiramente a pressão de contacto
>Limpe os contactos
Os contactos do dispositivo de teste ou da pilha
estão sujos.
>Limpe os contactos com um pano húmido.
yeux, rincer immédiatement et abon-
damment à l‘eau.
Ne jamais tenter d’ouvrir, d’écraser, de
chauffer ou de mettre en feu une pile /
un accu. Ne pas jeter au feu.
STRUCTURE DU TESTEUR VOIR ILLUSTRATION
1. Chariot extensible pour insérer la pile ronde à tester
2. Pôle positif (+)
3. Pôle négatif (-)
4. Contacts 9V
5. L’interrupteur coulissant permett pour régler la tension de la pile pour les piles
rondes (1,2V, 1,5V, 3V, 3,6V) ; une pile de 9V est automatiquement reconnue
6. Écran LC avec affichage de la tension et des barres
ÉTENDUE DE LA LIVRAISON
Testeur de piles
Mode d‘emploi
MISE EN SERVICE
Le testeur peut être mis en service immédiatement, sans aucune préparation.
Pour la fonction de test, il s’alimente lui-même en énergie à partir de la pile/
batterie à contrôler.
Si aucune indication n‘apparaît, la batterie à contrôler est complètement déchargée.
UTILISATION
Test d‘une pile ronde de 1,2V / 1,5V / 3V ou 3,6V :
Réglez d‘abord la tension appropriée de la pile à vérifier à l‘aide de l‘interrupteur coulis-
sant. Retirez ensuite le chariot et insérez la pile avec le pôle positif (+) vers l‘extérieur
(selon le symbole de la batterie).
Poussez maintenant le chariot avec la pile insérée en direction de l‘écran. Lorsque la
pile insérée touche le contact, exercez encore un peu de pression pour garantir un
contact sûr.
Si la pile n‘est pas complètement épuisée et qu‘elle a été insérée en respectant la
polarité, l‘écran affiche à la fois la tension actuelle et l‘affichage à barres.
Test d‘un bloc électrique 9V :
Un bloc de 9V peut être directement connecté aux contacts 9V latéraux. Veillez à
respecter la polarité ! Le réglage de l‘interrupteur coulissant n‘a pas d‘importance pour
le test du bloc 9V. Si le bloc de 9V n‘est pas complètement épuisé et que la polarité a
été correctement respectée, l‘écran affiche à la fois la tension actuelle et l‘affichage
à barres.
DÉPANNAGE
PROBLÈME:CAUSES POSSIBLES:
pas d‘affichage
La pile à vérifier n‘a pas été insérée en respectant
la polarité.
>Placez la pile dans le tiroir avec le pôle positif vers
l‘extérieur
La pile à tester est complètement vide (< 0,9V).
>Éliminez la batterie de manière appropriée (voir la
section Élimination)
agua si se da el caso de entrar en con-
tacto con la piel o los ojos.
No intente nunca abrir una pila o acumu-
lador, aplastarla, calentarla ni quemarla.
No arrojar al fuego.
ESTRUCTURA DEL COMPROBADOR VÉASE LA IMAGEN
1. Deslizador extraíble para la colocación de las células de botón a comprobar
2. Polo positivo (+)
3. Polo negativo (-)
4. Contactos de 9V
5. Interruptor deslizante para el ajuste de la tensión de las células de botón
(1.2V, 1.5V, 3V, 3.6V); se reconocen automáticamente las baterías de 9V
6. Pantalla LC con señalización de la tensión y la señalización de barras
VOLUMEN DE SUMINISTRO
Comprobador de batería
Instrucciones de servicio
PUESTA EN SERVICIO
El comprobador puede ponerse en servicio inmediatamene, sin preparación alguna.
Para la función de comprobación se sirve autónomamente de la energía de la
batería a comprobar.
Si no se hace ninguna señalización, la batería a comprobar se encontrará comple-
tamente agotada.
MANEJO
Comprobación de una célula de botón de 1,2V / 1,5V / 3V o 3,6V:
Ajuste primero la tensión adecuada a la célula de botón a comprobar por medio del
interruptor deslizante. Extraiga entonces el deslizador y coloque la célula de botón con
el polo positivo (+) hacia fuera (de acuerdo al icono de la batería).
Desplace entonces el deslizador con la célula colocada en dirección a la pantalla. Cu-
ando la célula de botón colocada toque el contacto, ejerza un poquito más de presión
para asegurarse de que el contacto esté garantizado.
Si la célula de botón no se encontrase completamente agotada y se hubiera colocado con
la polaridad correcta, en la pantalla aparecerá la tensión actual y la señalización de barras.
Comprobación de un bloque E de 9V:
Los bloques de 9V pueden comprobarse directamente con los contactos laterales de
9V. ¡Observe a este respecto la polaridad correcta! El ajuste del interruptor deslizante
no importa en la comprobación de los bloques de 9V. Si el bloque de 9V no se encon-
trase completamente agotado y se hubiera colocado con la polaridad correcta, en la
pantalla aparecerá la tensión actual y la señalización de barras.
SOLVENTACIÓN DE FALLOS
PROBLEMA:POSIBLE CAUSA:
sin señalización
La batería a comprobar no se p1-ha colocado con la
polaridad correcta.
>Coloque la batería con el polo positivo mostrando
hacia fuera en el compartimento
La batería a comprobar se encuentra completamen-
te agotada (< 0.9V).
>-Elimine la batería correctamente (véase el aparta
do sobre la eliminación)
STRUCTURE OF THE TESTER SEE ILLUSTRATION
1. Extendable slide for inserting the round cell to be tested
2. Plus pole (+)
3. Minus pole (-)
4. 9 V contacts
5. Slide switch for setting the battery voltage for round cells
(1.2 V, 1.5 V, 3 V, 3.6 V); a 9 V battery is automatically recognised
6. LC display with voltage and bar display
SCOPE OF DELIVERY
Battery tester,
Operating instructions
FIRST USE
The tester can be put into operation immediately without any preparation.
For the test function, it supplies itself with energy from the battery to be tested.
If there is no display, the battery to be tested is completely discharged.
OPERATION
Test of a 1.2 V/1.5 V/3 V or 3.6 V round cell:
First set the appropriate voltage for the cell to be tested using the slide switch. Then
pull out the slide and insert the cell with the plus pole (+) facing outwards (according
to the battery symbol).
Now push the slide element with the inserted cell towards the display. If the inserted
cell touches the contact, apply a little more pressure to ensure a secure contact.
If the cell is not completely empty and has been inserted with the correct polarity, both
the current voltage and the bar graph will appear on the display.
Test of a 9 V e-block:
A 9 V block can be connected directly to the 9 V contacts on the side. Ensure correct
polarity! The setting of the slide switch is not important for the 9 V block test. If the 9 V
block is not completely empty and has been connected with the correct polarity, both
the current voltage and the bar graph will appear on the display.
TROUBLESHOOTING
PROBLEM:POSSIBLE CAUSES:
No display
The battery to be checked has not been inserted
with the correct polarity.
>Insert the battery in the drawer with the positive
terminal pointing outwards
The battery to be checked is completely flat (< 0.9 V).
>Dispose of the battery properly (see Disposal section)
Fluctuating display
Contact problem (increased contact resistance)
>Increase the contact pressure slightly
>Clean the contacts
The contacts of the test device or the battery are
dirty.
>Clean the contacts with a damp cloth.
Display Hi/Lo
The voltage of the battery to be tested is outside
the measuring range of the tester.
>Set the slide switch on the side to the correct
battery voltage.
Schwankende
Anzeige
Kontaktproblem (erhöhter Übergangswiderstand)
>Erhöhen Sie den Anpressdruck leicht
>Reinigen Sie die Kontakte
Die Kontakte des Testgeräts oder der Batterie sind
verschmutzt.
>Reinigen Sie die Kontakte mit einem feuchten Tuch.
Anzeige Hi / Lo
Die Spannung der zu prüfenden Batterie liegt außer-
halb des Messbereichs des Testers.
>Stellen sie den seitlichen Schiebeschalter auf die
richtige Batteriespannung ein.
TECHNISCHE DATEN
Testmöglichkeit für folgende Batterie- und Akkutypen:
1,5 V Batterien: AAAA (Mini) / AAA (Micro) / AA (Mignon) /
C (Baby) / D (Mono) / N (Lady)
1,2 V NiMH/NiCd-Akkus: AAA (Micro) / AA (Mignon) / C (Baby) / D (Mono)
9 V Batterie: 9 V Block (E)
9 V NiMH-Akku: 9 V (8.4 V) Block (E)
3, 6V/3,7 V Li-Ion-Akkus: 14500 / 14650 / 16340 / 17500 / 18500 /
18650 / 22650 / 26650
3 V Lithium-Knopfzellen: CR2025 / CR2032 / CR2320 / CR2330 / CR2354 /
CR2430 / CR2450 / CR2477 / CR3032
3 V Lithium-Photo-Batterien: CR2 / CR123A
UMWELTHINWEISE | ENTSORGUNG
Die Verpackung sortenrein entsorgen. Pappe und Karton zum Altpapier, Folie in
die Wertstoff-Sammlung.
Das unbrauchbare Produkt gemäß den gesetzlichen Bestimmungen entsorgen.
Die Kennzeichnung „Mülltonne“ weist darauf hin, dass Elektrogeräte in der EU
nicht mit dem normalen Haushaltsmüll entsorgt werden dürfen.
Produkt zur Entsorgung an einer speziellen Entsorgungsstelle für Altgeräte
abgeben, Rückgabe- und Sammelsysteme in ihrer Gemeinde verwenden oder an
den Händler wenden, bei dem das Produkt gekauft wurde.
HAFTUNGSAUSSCHLÜSSE
Die in dieser Bedienungsanleitung enthaltenen Informationen können ohne Vorankün-
digung geändert werden. Wir übernehmen keine Haftung für direkte, indirekte, zufällige
oder sonstige Schäden oder Folgeschäden, die durch unsachgemäße Handhabung/
falscher Verwendung oder durch Missachtung der in dieser Bedienungsanleitung ent-
haltenen Informationen entstehen.
GARANTIEHINWEIS
Unsere Garantiebestimmungen finden Sie online unter www.ansmann.de. Bei Schäden
am Gerät, die infolge Nichtbeachtung der Bedienungsanleitung entstehen, kann keine
Garantie gewährt werden. Ihr gesetzlicher Gewährleistungsanspruch wird hierdurch
nicht beeinträchtigt.
Technische Änderungen vorbehalten. Für Druckfehler übernehmen wir keine Haftung.
MESSBEREICHESCHALTERSTELLUNGSPANNUNGSBEREICH
Zylindrische Zellen
1.2 V
1.5 V
3 V
3.6 V
0.9…1.5 V
0.9…1.7 V
2.0…3.5 V
2.5…4.5 V
9 V E-Block
4.0…10.0 V
Das Produkt entspricht den Anforderungen der EU Richtlinien.
Indicação Hi / Lo
A tensão da pilha a testar está fora do intervalo de
medição do dispositivo de teste
>Defina o interruptor deslizante lateral para a
tensão correta da pilha.
DADOS TÉCNICOS
Possibilidade de teste dos seguintes tipos de pilhas e baterias:
Pilhas de 1,5 V: AAAA (Mini) / AAA (Micro) / AA (Mignon) /
C (Baby) / D (Mono) / N (Lady)
Pilhas de 1,2 V NiMH/NiCd: AAA (Micro) / AA (Mignon) / C (Baby) / D (Mono)
Pilhas de 9 V: bloco 9 V (E)
Pilhas de 9 V NiMH: bloco 9 V (8,4V) (E)
Baterias de iões de lítio de 3.6V/3.7V: 14500 / 14650 / 16340 / 17500 / 18500 /
18650 / 22650 / 26650
Pilhas de lítio tipo botão de 3 V: CR2025 / CR2032 / CR2320 / CR2330 / CR2354 /
CR2430 / CR2450 / CR2477 / CR3032
Pilhas de lítio fotográficas de 3 V: CR2 / CR123A
INDICAÇÕES RELATIVAS AO MEIO AMBIENTE | ELIMINAÇÃO
Elimine a embalagem de acordo com o seu tipo. Papelão e cartão junto com o
papel velho, película junto com plásticos.
Eliminar o produto inutilizável conforme as disposições legais. O símbolo do „cai-
xote do lixo“ indica que, na UE, os aparelhos elétricos não podem ser eliminados
em conjunto com o lixo doméstico normal.
Para a eliminação, encaminhar o produto para um ponto de recolha especial
para aparelhos usados, utilizar os sistemas de devolução e recolha do seu
município ou contactar o revendedor onde o produto foi adquirido.
EXCLUSÃO DA RESPONSABILIDADE
As informações das presentes instruções de operação podem ser alteradas sem aviso pré-
vio. Não assumimos qualquer responsabilidade por danos diretos, indiretos, acidentais ou
outros ou por danos subsequentes decorrentes do manuseamento / utilização incorreta
ou da inobservância das informações contidas no presente manual de instruções.
AVISO DE GARANTIA
Os nossos regulamentos da garantia podem ser consultados em www.ansmann.de.
A garantia exclui danos no aparelho decorrentes da inobservância das instruções de
operação. Os seus direitos legais relativos à reivindicação de garantia não são afetados.
Sujeito a alterações técnicas. Não nos responsabilizamos por erros de impressão.
INTERVALOS DE MEDIÇÃOPOSIÇÃO DO INTERRUPTORINTERVALO DE TENSÃO
Pilhas cilíndricas
1.2 V
1.5 V
3 V
3.6 V
0.9…1.5 V
0.9…1.7 V
2.0…3.5 V
2.5…4.5 V
9 V Bloco E
4.0…10.0 V
O produto cumpre os requisitos das diretivas UE.
Affichage fluctuant
Problèmes de contact (résistance de contact accrue)
>Augmentez légèrement la pression d‘appui
>Nettoyer les contacts
Les contacts de l‘appareil de test ou de la pile
sont sales.
>Nettoyez les contacts avec un chiffon humide.
Affichage Hi / Lo
La tension de la batterie à tester est en dehors de
la plage de mesure du testeur.
>Réglez l‘interrupteur coulissant latéral sur la
tension correcte de la batterie.
CARACTÉRISTIQUES TECHNIQUES
Possibilité de test pour les types de piles et d‘accumulateurs suivants :
Piles 1,5V : AAAA (Mini) / AAA (Micro) / AA (Mignon) /
C (Baby) / D (Mono) / N (Lady)
Accus 1,2V NiMH/NiCd : AAA (Micro) / AA (Mignon) / C (Baby) / D (Mono)
Pile alcaline de 9V : bloc de 9V (E)
Accu 9V NiMH : bloc de 9V (8,4V) (E)
Piles Li-Ion 3,6V/3,7V : 14500 / 14650 / 16340 / 17500 / 18500 /
18650 / 22650 / 26650
Piles bouton au lithium 3V : CR2025 / CR2032 / CR2320 / CR2330 / CR2354 /
CR2430 / CR2450 / CR2477 / CR3032
Piles photo 3V au lithium : CR2 / CR123A
REMARQUE CONCERNANT L’ENVIRONNEMENT | ÉLIMINATION
Éliminez l’emballage par type. Mettez le papier et le papier avec les déchets de
papier et le film avec les matières recyclables.
liminez le produit inutilisable conformément aux dispositions légales. Le mar-
quage avec la « poubelle » indique que dans l’UE, les appareils électriques ne
doivent pas être éliminés avec les déchets domestiques normaux.
Transmettez le produit à un point de collecte spécial pour appareils usagés en
vue de son élimination, utilisez les systèmes de reprise et de collecte de votre
commune ou adressez-vous au revendeur auprès de qui l’appareil a été acheté.
EXCLUSIONS DE RESPONSABILITÉ
Les informations fournies dans ce mode d‘emploi peuvent être modifiées sans
notification préalable. Nous n‘endossons aucune responsabilité pour les dommages ou
dommages conséquents directs, indirects, accidentels ou autre causés par la mani-
pulation inappropriée / l’utilisation incorrecte ou par le non-respect des informations
fournies dans ce mode d‘emploi.
NOTE DE GARANTIE
Vous trouverez nos conditions de garantie en ligne à l’adresse www.ansmann.de.
Aucune garantie n‘est accordée en cas de dommages sur l‘appareil causés par le non-
respect du mode d‘emploi. Cela n’affecte pas votre droit légal à la garantie.
Sous réserve de modifications techniques. Nous n‘endossons aucune responsabilité pour les erreurs d‘impression.
PLAGES DE MESURE
POSITION DE
L’INTERRUPTEUR
PLAGE DE TENSION
Cellules cylindriques
1.2 V
1.5 V
3 V
3.6 V
0.9…1.5 V
0.9…1.7 V
2.0…3.5 V
2.5…4.5 V
9V E-Block
4.0…10.0 V
Le produit est conforme aux exigences des directives européennes.
Señalización
fluctuante
Problema con el contacto (aumento de la resisten-
cia de contacto)
>Aumente ligeramente la presión de contacto
>Limpie los contactos
Los contactos del dispositivo de comprobación o de
la batería están sucios.
>Limpie los contactos con un paño húmedo.
Señalización Hi / Lo
La tensión de la batería a comprobar se encuentra
fuera de la gama de medición del comprobador.
>Ajuste el interruptor deslizante lateral a la tensión
de batería adecuada.
DATOS TÉCNICOS
Posibilidades de comprobación para los siguientes tipos de baterías recargables y baterías:
Baterías de 1,5V: AAAA (mini) / AAA (micro) / AA (miñón) /
C (baby) / D (mono) / N (lady)
Baterías de 1,2V NiMH/NiCd: AAA (micro) / AA (miñón) / C (baby) / D (mono)
Batería de 9V: bloque de 9V (E)
Batería recargable de 9V NiMH: 9V (8.4V) bloque (E)
Baterías recargables de
iones de litio de 3,6 V/3,7 V: 14500 / 14650 / 16340 / 17500 / 18500 /
18650 / 22650 / 26650
Células de botón de 3V de litio: CR2025 / CR2032 / CR2320 / CR2330 / CR2354 /
CR2430 / CR2450 / CR2477 / CR3032
Batería para fotos de 3V de litio: CR2 / CR123A
INDICACIÓN RELATIVA AL MEDIO AMBIENTE | ELIMINACIÓN
Elimine el embalaje después de clasificar sus materiales. La cartulina y el cartón
deben desecharse con el papel viejo mientras que la lámina debe ir a la sección
de reciclado de estos materiales.
Elimine el producto p1-ya inservible observando las prescripciones legales. El icono
del „cubo de basura“ indica que los aparatos eléctricos no deben eliminarse en
la UE con la basura doméstica normal.
Entregue el producto para su eliminación a un centro de eliminación especial
para aparatos viejos, sírvase de los sistemas de devolución o colecta de su
comunidad o diríjase al comercio en el que compró el producto.
EXCLUSIÓN DE RESPONSABILIDAD
Las informaciones contenidas en este manual de instrucciones se pueden modificar
sin aviso previo. No aceptamos ninguna responsabilidad por los daños directos,
indirectos, casuales o de otro tipo ni por los daños resultantes que se originen por
una manipulación inapropiada o errónea o por no tener en cuenta las informaciones
contenidas en estas instrucciones de servicio.
INDICACIÓN RELATIVA A LA GARANTÍA
Nuestras disposiciones de garantía se pueden consultar en www.ansmann.de En caso de
daños en el dispositivo que se originen por no respetar las instrucciones de uso no se podrá
hacer efectiva ninguna garantía. Su derecho legal a garantía no queda por ello afectado.
Reservado el derecho a introducir cambios técnicos. No aceptamos ninguna responsabilidad por errores de impresión.
GAMAS DE MEDICIÓN
POSICIÓN DEL
INTERRUPTOR
GAMA DE TENSIÓN
células cilíndricas
1.2 V
1.5 V
3 V
3.6 V
0.9…1.5 V
0.9…1.7 V
2.0…3.5 V
2.5…4.5 V
bloque E de 9V
4.0…10.0 V
El producto cumple las exigencias de las directivas de la UE.
TECHNICAL DATA
Test option for the following battery and rechargeable battery types:
1.5 V batteries: AAAA (Mini)/AAA (Micro)/AA (Mignon)/
C (Baby)/D (Mono)/N (Lady)
1.2 V NiMH/NiCd
rechargeable batteries: AAA (Micro)/AA (Mignon)/C (Baby)/D (Mono)
9 V battery: 9 V block-style (E)
9 V NiMH rechargeable battery: 9 V (8.4 V) block (E)
3.6 V/3.7 V Li-Ion
rechargeable batteries: 14500/14650/16340/17500/18500/
18650/22650/26650
3 V lithium button cells: CR2025/CR2032/CR2320/CR2330/CR2354/
CR2430/CR2450/CR2477/CR3032
3 V lithium photo batteries: CR2/CR123A
ENVIRONMENTAL INFORMATION | DISPOSAL
Dispose of packaging after sorting by material type. Cardboard and cardboard to
the waste paper, film to the recycling collection.
Dispose of the unusable product in accordance with legal provisions. The „waste
bin“ symbol indicates that, in the EU, it is not permitted to dispose of electrical
equipment in household waste.
For disposal, pass the product on to a specialist disposal point for old equip-
ment, use the return and collection systems in your area or contact the dealer
from whom you purchased the product.
LIABILITY DISCLAIMER
The information contained within these operating instructions can be changed without
prior notification. We accept no liability for direct, indirect, incidental or other damage
or consequential damage arising though improper handling/use or through disregard
of the information contained within these operating instructions.
WARRANTY NOTICE
You can find our warranty terms online at www.ansmann.de. The guarantee does not
apply to damage to the device arising through a failure to comply with the operating
instructions. Your statutory warranty rights are not affected by this.
Subject to technical changes. We assume no liability for printing errors.
MEASURING RANGESSWITCH POSITIONVOLTAGE RANGE
Cylindrical cells
1.2 V
1.5 V
3 V
3.6 V
0.9…1.5 V
0.9…1.7 V
2.0…3.5 V
2.5…4.5 V
9 V E block
4.0…10.0 V
The product complies with the requirements from the EU directives.
< 5%5…25%25…50%50…75%75…100%
Indication
1.2 V NiMH
< 1.1 V1.1 V…1.22 V1.22 V…1.26 V1.26 V…1.3 V1.3 V…1.4 V
1.5 V Alkaline
< 0.9 V0.9 V…1.2 V1.2 V…1.32 V1.32 V…1.45 V1.45 V…1.63 V
3 V Lithium (CR)
< 2.3 V2.3 V…2.67 V2.67 V…2.86 V2.86 V…2.98 V2.98 V…3.35 V
3.6 (3.7) V Li-Ion
< 2.8 V2.8 V…3.10 V3.1 V…3.70 V3.7 V…4.0 V4.0 V…4.2 V
9 V Alkaline
< 5.4 V5.4 V…7.0 V7.0 V…7.85 V7.85 V…8.5 V8.5 V…9.7 V
9 V NiMH
< 7.0 V7.0 V…8.5 V8.5 V…8.85 V8.85 V…9.0 V9.0 V…9.5 V
AUSWERTUNG DER MESSUNG ANALYSING THE MEASUREMENT ÉVALUATION DE LA MESURE EVALUACIÓN DE LA MEDICIÓN
AVALIAÇÃO DA MEDIÇÃO UTVÄRDERA MÄTNINGEN VALUTAZIONE DELLA MISURAZIONE ANALYSE VAN DE METING
EVALUERING AF MÅLINGEN MITTAUKSEN ARVIOINTI VURDERING AV MÅLINGEN ANALIZA POMIARU
DEGBFRES
PTSEITNL
DKFINOPL
BEDIENUNGSANLEITUNG
USER MANUAL
COMFORT CHECK
DE | EN | FR | ES | PT | SV
IT | NL | DK | FI | NO | PL
51
4623
Kundenservice | Customer service:
ANSMANN AG
Industriestrasse 10
97959 Assamstadt
Germany
Support & FAQ: ansmann.de
E-Mail: hotline@ansmann.de
Hotline: +49 (0) 6294 / 4204 3400
MA-1900-0110/V0/07-2024
Cet appareil
et ses piles
se recyclent
1 3 5 7 2 4 6 8
9 11 13 15 17 10 12 14 16 18
Tuotetiedot
| Merkki: | Ansmann |
| Kategoria: | Mittauslaitteet |
| Malli: | Comfort Check |
Tarvitsetko apua?
Jos tarvitset apua merkille Ansmann Comfort Check esitä kysymys alla ja muut käyttäjät vastaavat sinulle
Mittauslaitteet Ansmann Käyttöohjeet

21 Joulukuuta 2024
Mittauslaitteet Käyttöohjeet
Viimeisimmät Mittauslaitteet Käyttöohjeet
3 Huhtikuuta 2025
3 Huhtikuuta 2025
3 Huhtikuuta 2025
3 Huhtikuuta 2025
3 Huhtikuuta 2025
3 Huhtikuuta 2025
3 Huhtikuuta 2025
3 Huhtikuuta 2025
3 Huhtikuuta 2025
3 Huhtikuuta 2025