Akai ACRB-2000 Käyttöohje

Akai Katsella ACRB-2000

Lue alta 📖 käyttöohje suomeksi merkille Akai ACRB-2000 (20 sivua) kategoriassa Katsella. Tämä opas oli hyödyllinen 18 henkilölle ja sai 4.3 tähden keskimäärin 9.5 käyttäjältä

Sivu 1/20
EN#-#ENGLISH#
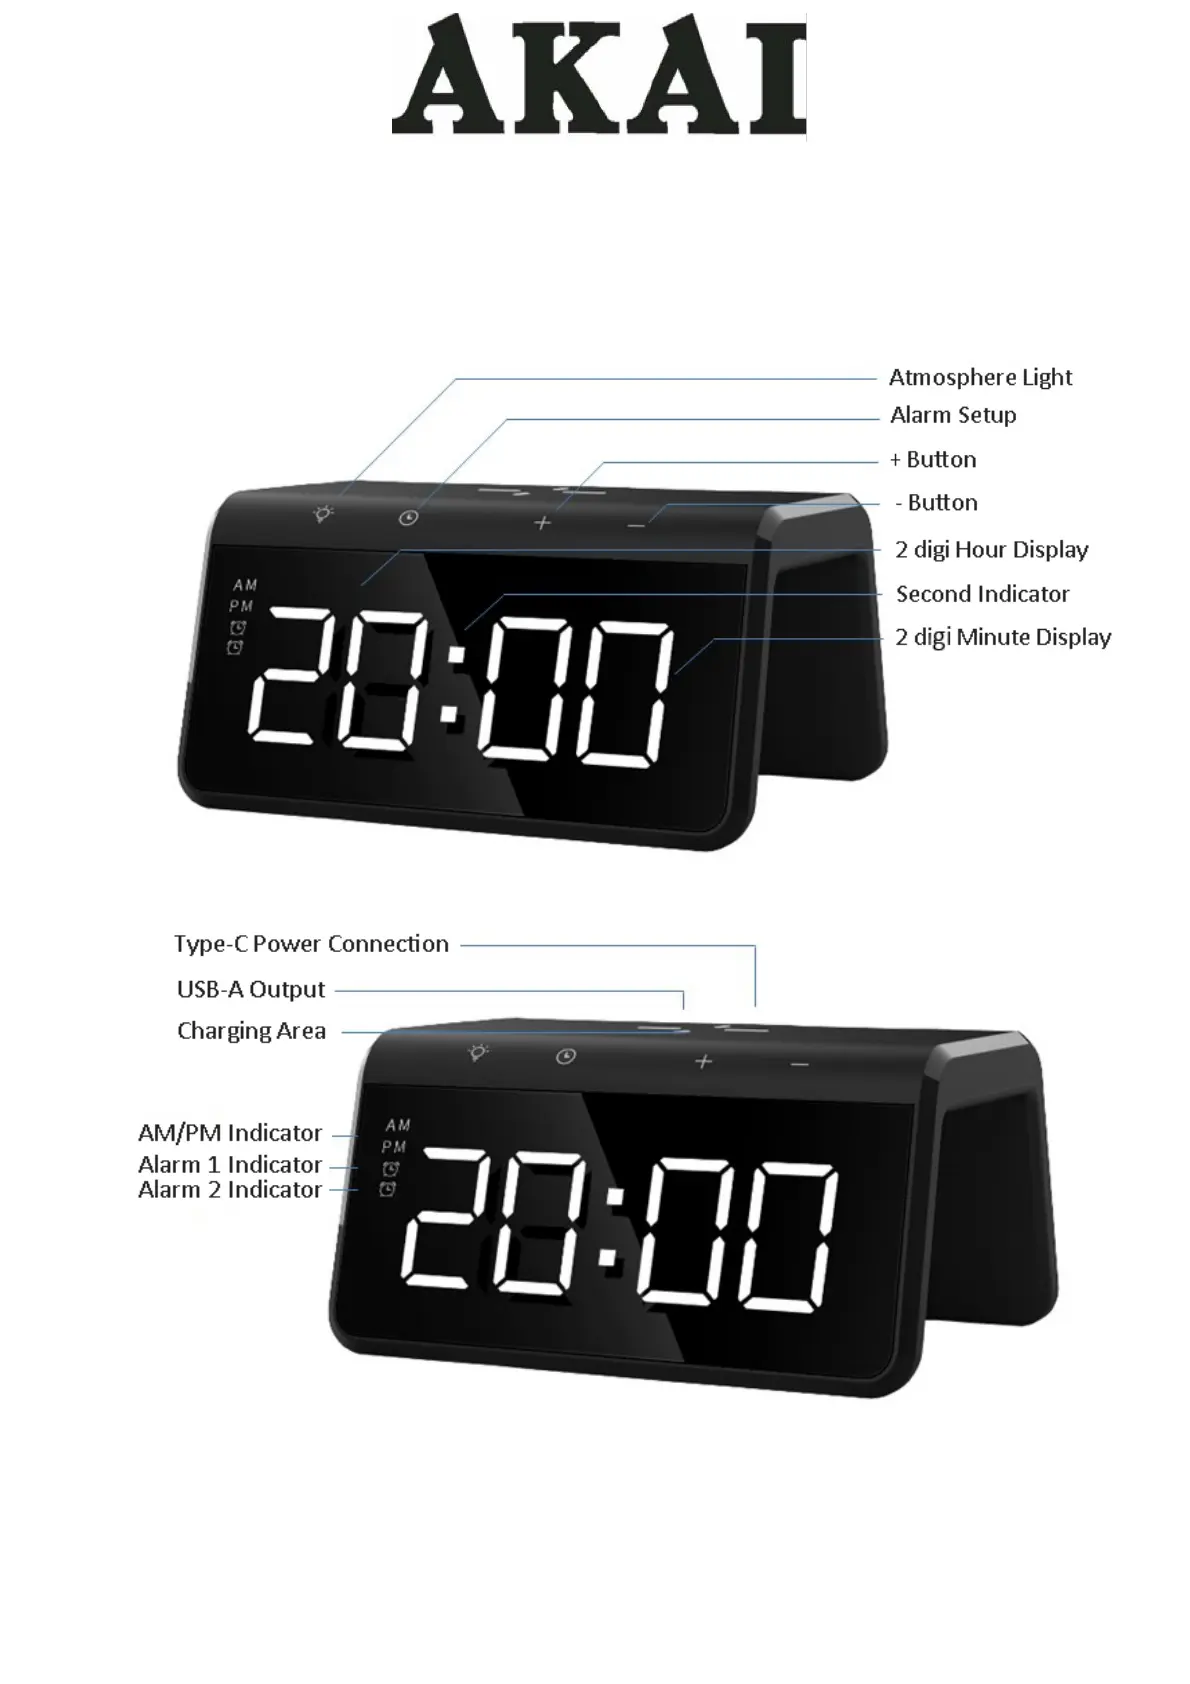
ALARM#CLOCK#WITH#WIRELESS#CHARGER#
ACRB-2000
I. Function Buttons
EN 1
EN#-#ENGLISH#
II. Functions
A. Power#Connection
1. Plug#the#USB-A#end#of#cable#into#the#power#adapter#while#plug#Type-C#end#into#the#product.
2. The#product#will#be#ready#and#stand#by#after#all#indicators#are#on.
B. Wireless#Charging
1. Output:#15W
2. Indicator#D is p la y:# Power#connection#successful#–#blue#light#flashes#once
Standby#–#light#off#
Charging#–#blue#light#on#
Charged#–#light#off#
FOD#–#blue#light#flashes#continuously#
C. Alarm#Clock#Functions
1. Four#Buttons:#Alarm ,#+,#-,#L ig h t.
2. Time#System#Setting:
Double#click#Alarm#button#to#setup#12-hour#time#and#24-hour#time#system.#PM #will#display#while#12-hour#time
system#is#set.
3. Time#Setting:
1) Click#Alarm#button#once#to#enter#minute#setting,#adjust#value#with#+/-;
2) Click#Alarm#button#once#after#minute#setting,#to#enter#hour#setting,#adjust#value#with#+/-;
3) Click#Alarm#button#a#third#time#to#finish#time#setting.
4. Alarm#Setting:
1) Press#“+”#3#seconds#to#activate#or#deactivate#Alarm#1;#Press#-”#3#seconds#to#activate#or#deactivate#Alarm#2.
Alarm#indicator#is#on#while#Alarm#is#activated;
2) While#activated,#press#Alarm#button#3#seconds#to#enter#alarm#minute#setting,#adjust#value#with#+/-;
3) Click#Alarm#button#once#after#alarm#minute#setting,#to#enter#alarm#hour#setting,#adjust#valu e#w ith#+/ -;
4) Click#Alarm#button#a#third#time#to#finish#alarm#time#setting;
5) Alarm#bell#rings#3#minutes#before#automatic#switch-off#while#no#any#operation.
6) Touch#any#button#to#enter#Sn ooze#Mode#when#bell#rings.#Bell#will#ring#for#2#more#times#after#5#minutes.#The
indicator#flashes#an d #Alarm#b u tt o n #is#out#of#function#during#t he #Snooze#Mode.#If#time#s et ting #is #n ee d ed ,#p lea se
long#press #“+ #to #sto p #a la rm#1#or#long#p r es s#“-”#to#stop#alarm#2.#All#buttons#will#function#normally;
7
) Time#display#brightness#can#be#adjuste d#ma nu a lly#to#4#gr
ades#(Off/Min/Second/Max).#“+”#and#-”#can#be#used
to#adjust#display#brightness#man ua lly.#The#defa ult#grade #is#max#brightn ess#w hen #pow er#is#conn ected .#Single#click
“-”#to#dark#the#display#one#grade.
5. Night#Light#Setting:
1) Night#light#can#be#set#into#9#color#modes:#white,#RGB#shade,#red,#orange,#yellow,#green,#light#blue,#blue#an d
pink
2) Touch#the#Light#button#once#to#turn#on#the#night#light#with#white#color.#Another#touch#shall#allow#you#to#set
another#color#in#turn#as#specified#in#5.#1).#The#last#touch#will#turn#off#night#light.
6. Eco-power#function:
1) The#battery#is#for#clock#back-up#only
.
2) All#functions#are#out#during#power#disconnection.#Functions#restored#when#power#is#connected.
D. Notes
1. Attention: In #orde r#to#func tio n #alarm,#w ir ele s s#cha rg in g,#nigh t#light#and #US B #outp u t#all#togeth e r,#power#shall#be
connected# by# a# QC2.0# or# QC3.0# ad apters.# If# con nected# by# a# 5V# adap ter,# only# w ireless# charging# and# a larm# can# wor
k
together.
EN 2
EN#-#ENGLISH#
2. Do#not#squeeze#or#collide.
3. Do#not#disassemble#or#put#into#the#fire,#water,#to#avoid#short-circuit#leakage.
4. Do#not#use#wireless#chargers#in# severe# high# temperature,#humidity#or# corrosive#environments#to# avoid# leakage# of
damaged#circuits.
5. Do# not# place# too# close# to# magnetic# cards# (ID# cards,# bank# cards,# etc.)# with# magnetic# strips# or# chips# to# avoid
magnetic#card#failure.
6. Keep# more# than# 20cm# between# the# implanted# medical# device# (pacemaker,# implantable# cochlea,# etc.)#and#th
e
wireless#charger#to#avoid#pot
e
ntial#disruption#to#medical#devices.
7. Keep#children#from#the#product#in#case#they#play#the#wireless#charger#as#a#toy#to#avoid#accidents.
8. Keep#the#wireless#charger#and#receiver#device#away#from#water#and#other#liquids.
9. To#clean#the#charger,#make#sure#the#power#supply#is#disconnected.
10. Usage#temperature:#0-45.
11. Usage#humidity:#20-85%#(40)
v All#pictures#shown#are#for#illustration#purpose#only.#Actual#product#may#vary#due#to#product#enhancem ent.
v Power#adapter#is#not#included.#Please#purchase#otherwise#or#use#phone#original#adapter.
III. Specifications
Input:#5V /3A,#9V/3A,#12V/2A
Output#power:#15W#(MAX)
Charging#efficiency:#75%
Charging#distance:#≤8mm
Frequency:#110-205KHz
Size:#140x117x73#mm
IV. Accessories
USB#cable#(1#meter)#
Instruction #manual#
V. Compatible Devices
Products#qualified#with#Qi#standard.
EN 3
DISPOSAL OF ELECTRICAL AND ELECTRONIC EQUIPMENT
This symbol on the product or packaging means that the product should not be treated as household waste
Do not throw garbage at the end of its life, but take it to a collection center for recycling. In this way you will
help to protect the environment and be able to prevent any negative consequences that it would have on
the environment and human health. To find your nearest collection center:
Contact local authorities
Access the website: www.mmediu.ro
Request additional information from the store where you purchased the product.

Tuotetiedot

Merkki: Akai
Kategoria: Katsella
Malli: ACRB-2000

Tarvitsetko apua?

Jos tarvitset apua merkille Akai ACRB-2000 esitä kysymys alla ja muut käyttäjät vastaavat sinulle