Radial Engineering EDU-DI Käyttöohje
Radial Engineering Ei luokiteltu EDU-DI
Lue alta 📖 käyttöohje suomeksi merkille Radial Engineering EDU-DI (2 sivua) kategoriassa Ei luokiteltu. Tämä opas oli hyödyllinen 50 henkilölle ja sai 4.5 tähden keskimäärin 7 käyttäjältä
Sivu 1/2
EDU-DI
True to the Music
www.radialeng.com
© Radial Engineering Ltd. 1845 Kingsway Ave., Port Coquitlam, BC V3C 1S9, Canada
(604) 942-1001 • info@radialeng.com • Manual Part #: R870 1095 99 / 07-2022 r1
1. RESISTORS:Start by placing the rst resistor (R1) in the
designated position. There is no polarity so you may install
the resistor in any direction. Bend the wire leads at 90 degree
angles to feed the leads through the board. Spread the wire
leads slightly to ensure the resistor stays in place. Solder the
leads from the bottom of the board, then clip the excess wire
leads. Repeat this for the remaining resistors R2-R5.
2. CAPACITORS:Place the rst capacitor (C1) in the assigned
designation. There is no polarity so you may install these in
any direction. You do not need to bend the leads to t, however
after it’s been inserted you can bend the wire slightly to secure
in place. Solder the leads from the bottom of the board and then
clip the excess wire leads. Repeat for C2.
3. PUSH SWITCHES: Place the rst push switch (S1) in the
assigned designation. Make sure it is facing outwards from the
board, ip the board over and ensure the switch is ush to the
board, then solder the 8 pins. You do not need to clip the wire
leads. Repeat for the other switch (S2).
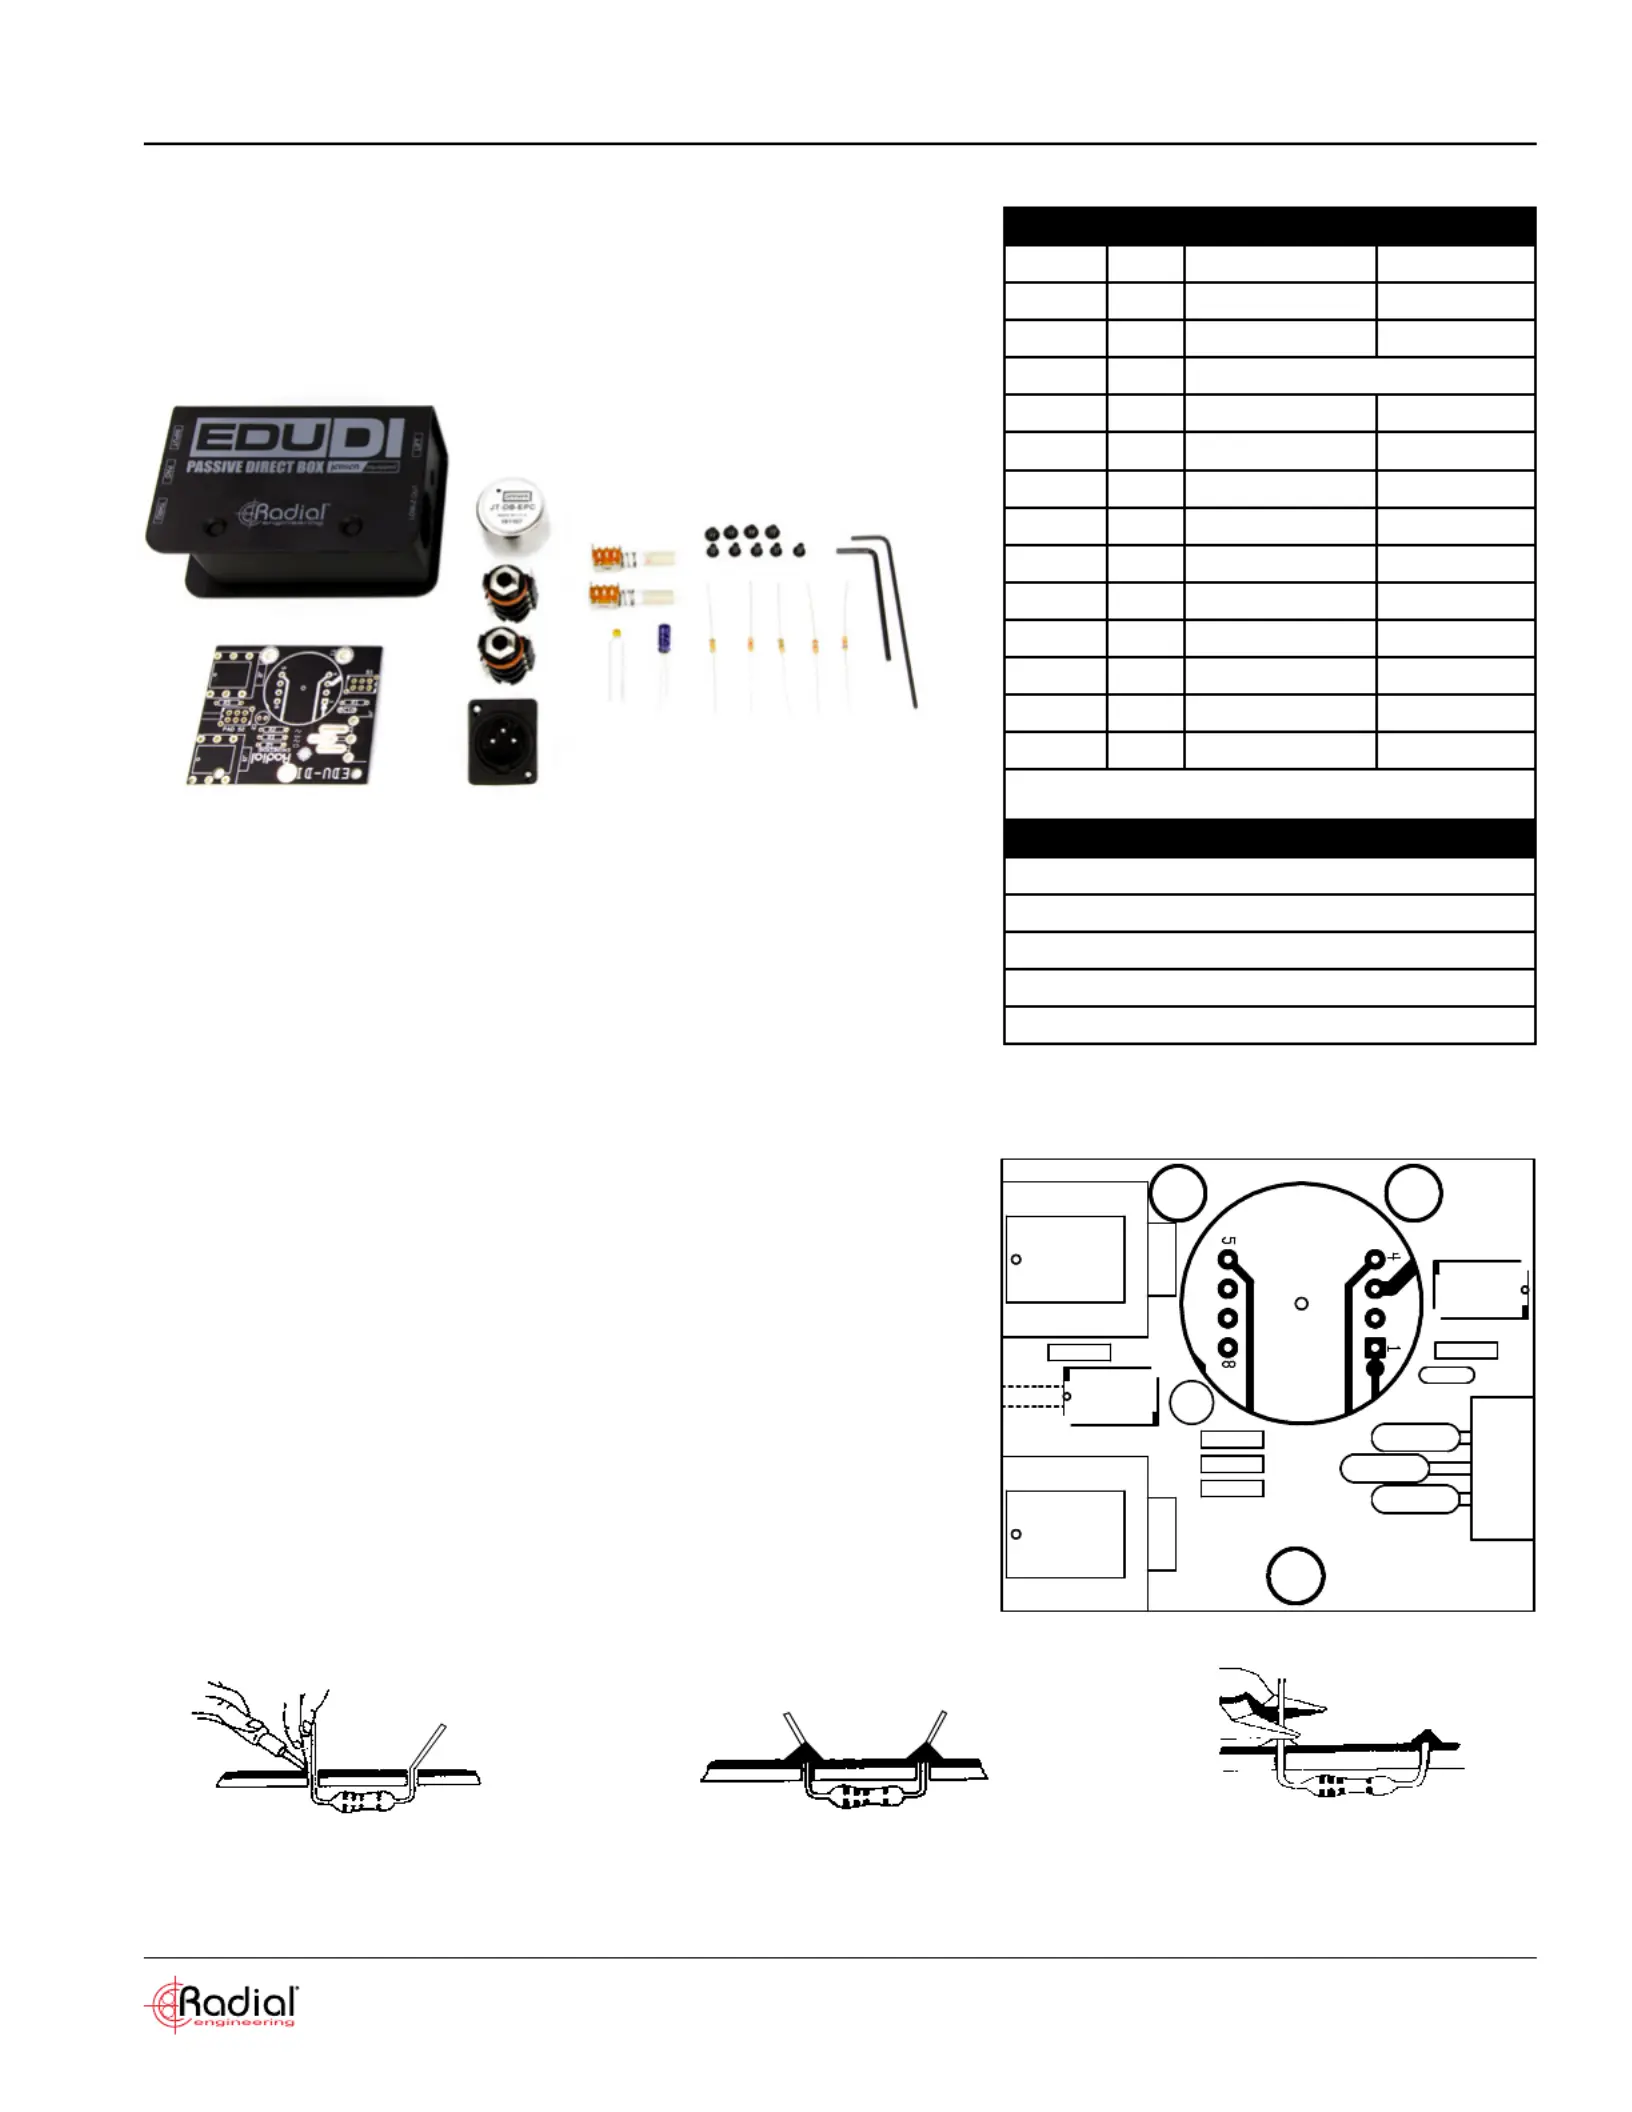
REFQTYDescriptionColor Code
PCB1BARE PCB
J11XLR MALE JACK
J2-J32TS ¼” JACK
T1112:1 JT-DB-EPC TRANSFORMER
S1-S22PUSH SWITCH
C110.01uf 100v 10%
C2122uf 25v 20%
R1151R 1/4w 1%Gn, Br, Br, Gd, Br
R211K8 1/4w 5%Br, Gy, Rd, Gd
R318K2 1/4w 5%Gy, Rd, Rd, Gd
R4115K 1/4w 5%Br, Gn, Or, Gd
R516K8 1/4w 5%Bl, Gy, Rd, Gd
Screw Lg46-32 3/16"
Screw Sm54-40 1/4"
Gn=Green, Br=Brown, Gd=Gold, Gy=Grey, Rd=Red, Bk=Black, Bl=Blue, Or=Orange
Tools Required
Hex Driver for 3/16" screws (Included)
Hex Driver for 1/4" screws (Included)
Side cutters
Nutdriver 7/16"
Soldering iron 25-40 watt and solder
Basic Instructions:
Inside you will nd all the parts required to build your own EDU-DI.
Use this document to assist you as you build your own direct box.
Build Instructions
PCB Layout
Soldering Hints:
1. Mount the component against the PCB
surface and bend the wire leads slightly.
2. Solder the wire leads from the bottom, make sure
the solder joints are cone-shaped and shiny.
3. Trim excess wire leads as close
as possible to the solder joint.
T1
S1
R1
C1
J1
J3
S2
R5
C2
R2
R3
R4
J2
© Radial Engineering Ltd. 1845 Kingsway Ave., Port Coquitlam, BC V3C 1S9, Canada
(604) 942-1001 • info@radialeng.com • Manual Part #: R870 1095 99 / 07-2022
Tuotetiedot
| Merkki: | Radial Engineering |
| Kategoria: | Ei luokiteltu |
| Malli: | EDU-DI |
Tarvitsetko apua?
Jos tarvitset apua merkille Radial Engineering EDU-DI esitä kysymys alla ja muut käyttäjät vastaavat sinulle
Ei luokiteltu Radial Engineering Käyttöohjeet

2 Huhtikuuta 2025
25 Helmikuuta 2025
25 Helmikuuta 2025
11 Helmikuuta 2025
11 Helmikuuta 2025
11 Helmikuuta 2025
11 Helmikuuta 2025
11 Helmikuuta 2025
11 Helmikuuta 2025
11 Helmikuuta 2025
Ei luokiteltu Käyttöohjeet
Viimeisimmät Ei luokiteltu Käyttöohjeet
9 Huhtikuuta 2025
9 Huhtikuuta 2025
9 Huhtikuuta 2025
9 Huhtikuuta 2025
9 Huhtikuuta 2025
9 Huhtikuuta 2025
9 Huhtikuuta 2025
9 Huhtikuuta 2025
9 Huhtikuuta 2025
9 Huhtikuuta 2025