Quoizel Buchanan BCN1716WT Käyttöohje
Lue alta 📖 käyttöohje suomeksi merkille Quoizel Buchanan BCN1716WT (2 sivua) kategoriassa Helpotus. Tämä opas oli hyödyllinen 24 henkilölle ja sai 4.1 tähden keskimäärin 8 käyttäjältä
Sivu 1/2
1of2
AssemblyInstructionSheet#IS-BCN1716WT
ForStyleBCN1716WT
6CORPORATEPARKWAY
GOOSECREEKSC29445
wwwquoizelcom
,.
..
ThankyouforpurchasingaQuoizelproduct.
Needassistancewithpartsorassembly?CallQuoizelcustomerserviceat1-631-273-2700
orvisituson-lineatwww.quoizel.com
2015QuoizelInc.
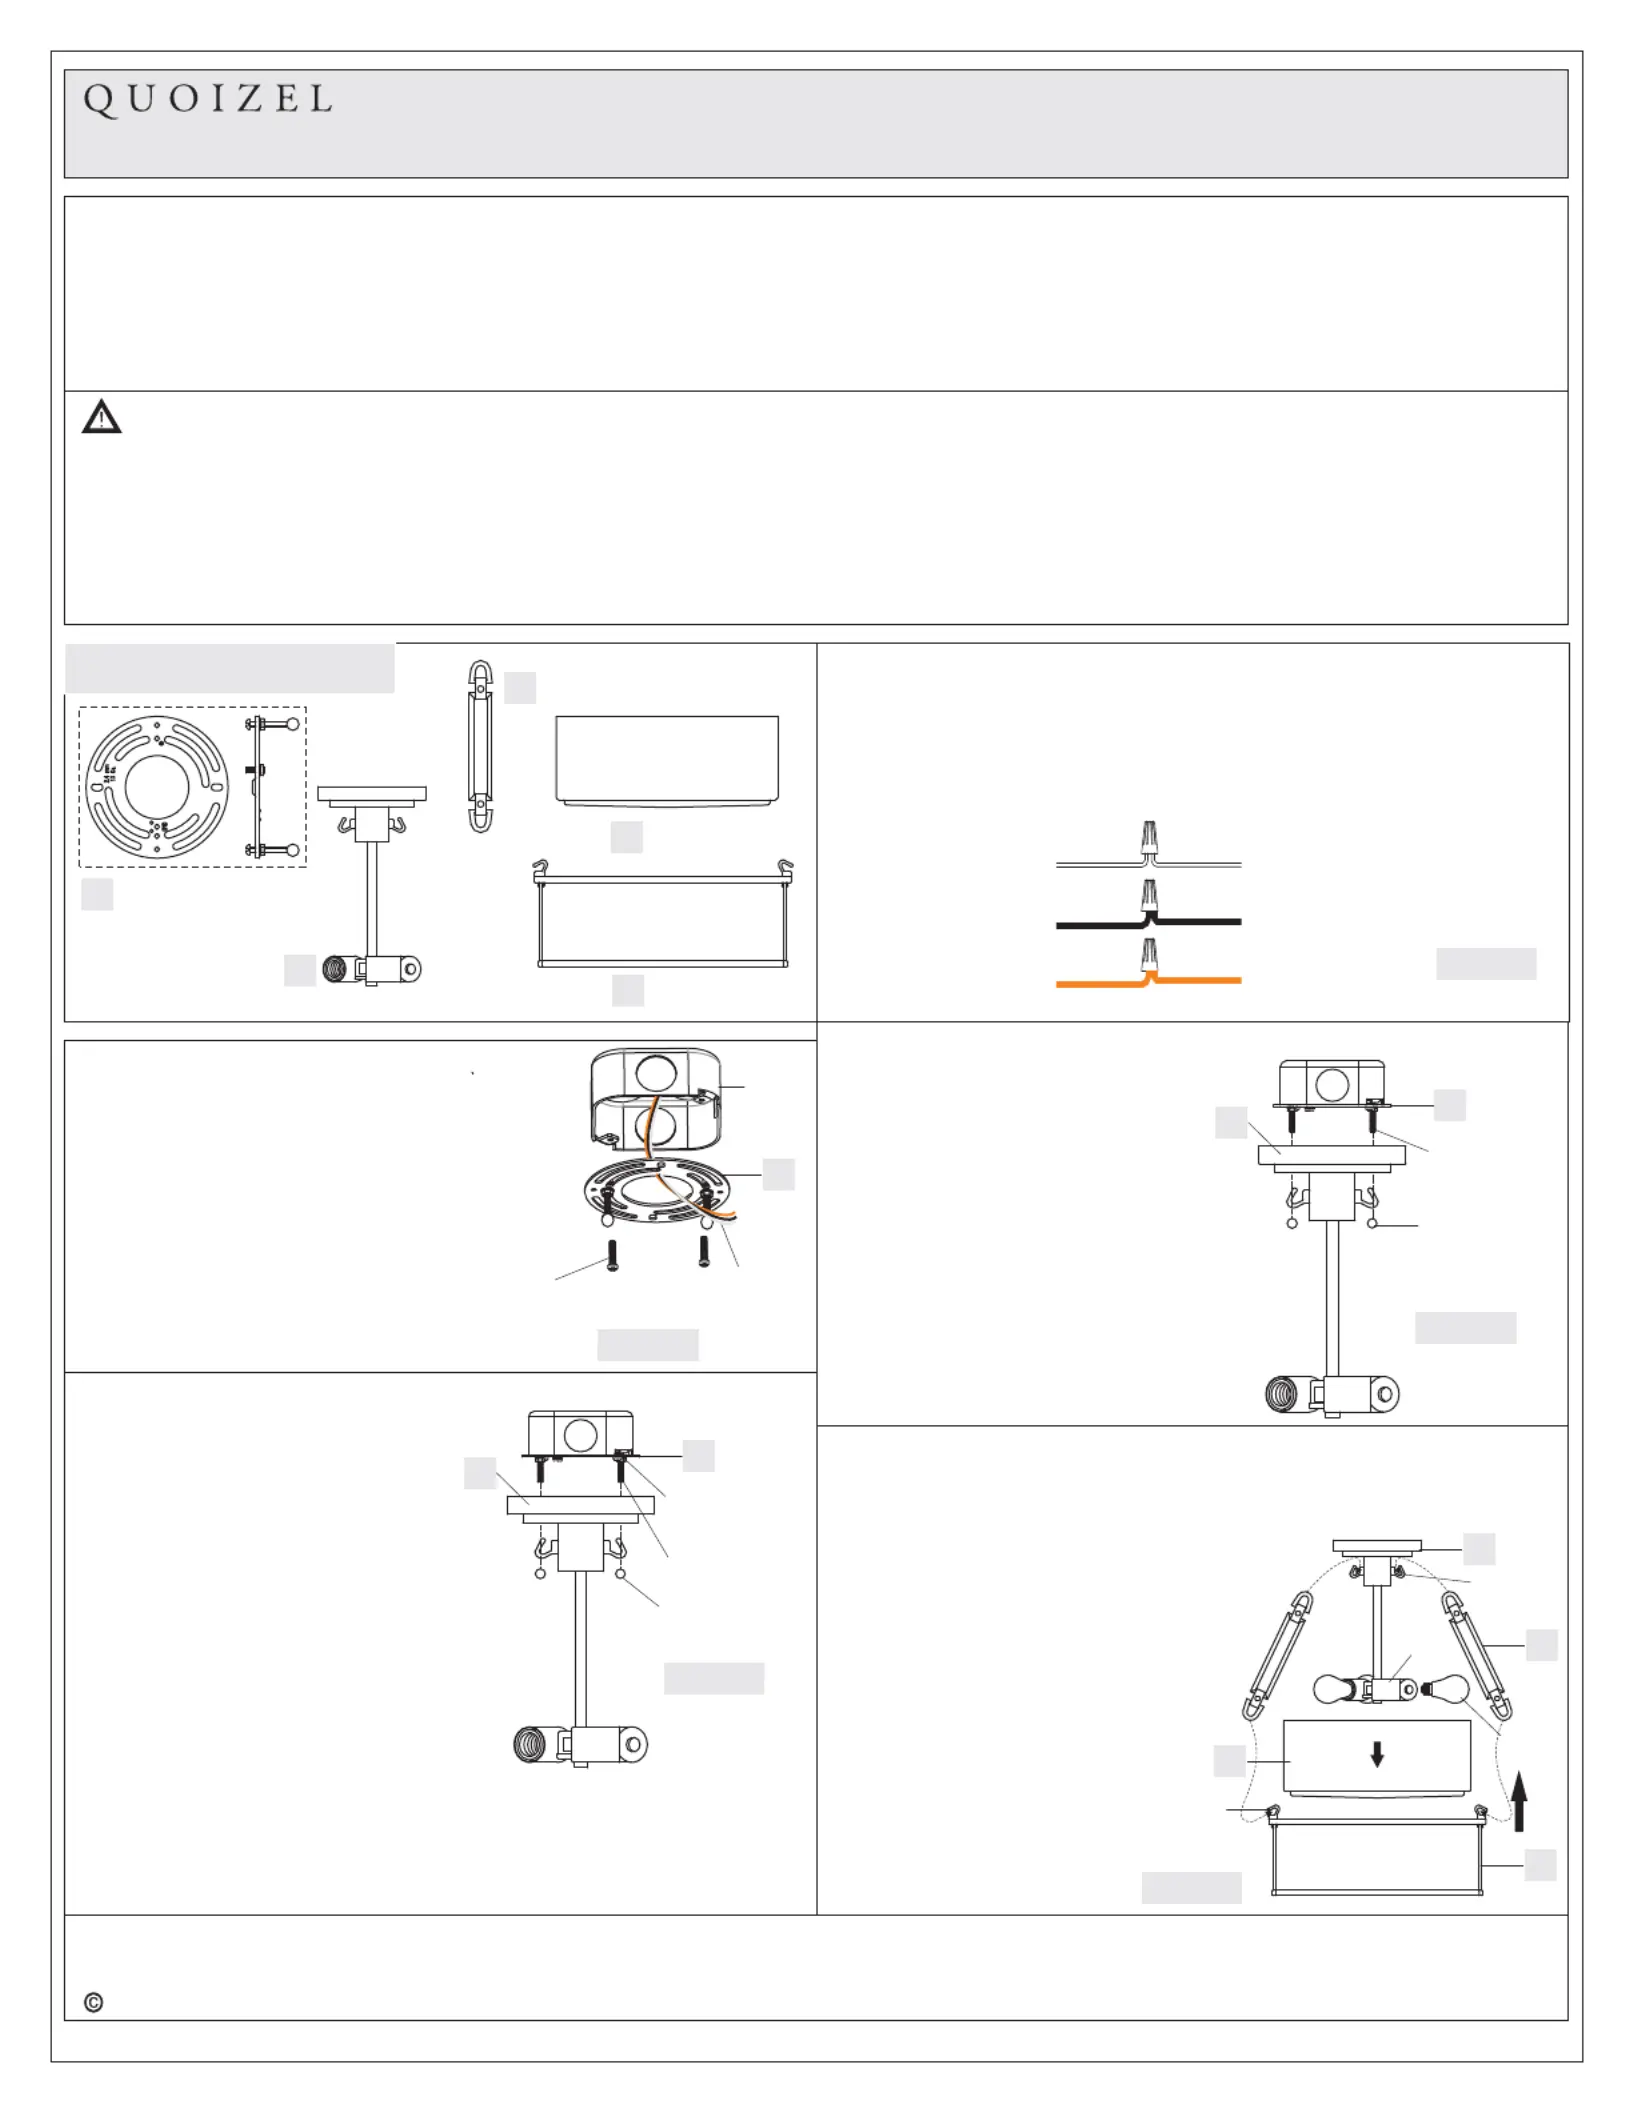
A
CrossbarAssembly
x1
STEP1InstallCrossbarAssembly-
A.PassthesupplywiresthroughtheCrossbar
Assembly(A).AttachtheCrossbar
Assembly(A)totheOutletBoxwiththe
headoftheGreenGroundScrewfacing
you.SecureitwithOutletBoxScrews(not
included).Tightenuntilsnug.
August2015
STEP2FitCeilingCanopyto
CrossbarAssembly
-
A.
eilingcanopyoftheSocket
Assemblytothe
ceiling
Removemountingballsfromthe
CrossbarAssembly(A).Fitthe
c
(B)Crossbar
Assembly(A)andsecurewith
mountingballs.Note:The
shouldbesnugagainstthe
andthemountingballs.If
Not,adjustthelengthofthenipple
ontheCrossbarAssembly(A)by
unscrewingthepreassembledhex
nutandlockwasherandthen
screwingthemountingscrewsin
ceiling
canopyoftheSocketAssembly
(B)
oroutofthecrossbaruntilthecorrectlengthisachieved.Oncethe
issecure,removethe
mountingballandSocketAssembly(B)andproceedtoStep3.
ceilingcanopyoftheSocketAssembly(B)
PackageContents
MountingScrew
HexNutand
LockWasher
B
A
MountingBall
STEP3-WireConnections
A.Usestandardwireconnectors(notincluded)tomakeallwire
connections.(Connectorsarenotincludedwithfixture.)Twist
connectorsuntilwiresaretightlyjoinedtogether.Wrapeach
connectionwithapprovedelectricaltapeandcarefullystuffallthe
connectedwiresintotheOutletBox.
Whitewire
fromfixture
Blackwire
fromfixture
Groundwire
fromfixture
Whitewire
fromsupply
Blackwirefrom
supply(orRed)
Groundwire
fromsupply
SupplyWires
withGroundWire
OutletBoxScrews
(notincluded)
Outlet
Box
Pleasegotoforproductcleaningtips.Gototheselection.
(3)A19MediumBase100WMaximum.AlternateBulbs(3)23WCFL.
30-45minutes
Identifyandinspectallpartsbeforebeginninginstallation.Checkpackagecontentlistanddiagramsbelowtobesureallpartsare
present.Ifanypartsaremissingordamaged,donotattempttoassemble,install,oroperatethefixture.Contactcustomerserviceforreplacement
parts.
www.quoizel.comCare+Maintenance
LightSource:
EstimatedAssemblyTime:
Preparation:
ToolsRequired:Flatheadscrewdriver,Phillipsscrewdriver,pliers,wirecutters,wirestrippers,electricaltape,safetyglasses.
WarningsandCautions
Turnoffelectricityatcircuitbreakerormainfuseboxbeforeinstallation.Consultalicensedelectricianifindoubt.
Theseinstructionsareprovidedforyoursafety.Itisveryimportantyoureadthemcompletelybeforeinstallingthefixture.Westrongly
recommendthatalicensed,professionalelectricianperformtheinstallation.
Disconnectfixturefrompowersourcebeforereplacingbulbs.Makesurebulbsaregivensufficienttimetocoolbeforeremoval.Donotsubject
glasspartstoanyshockwhileinoperationorshatteringmayresult.
B
Socket
Assembly
x1
C
SideArm
x3
D
Shade
x1
E
Cage
x1
Figure1
Figure2
A
Figure3
STEP4InstallFixtureBody-
A.Carefullytuckallwiresintothe
outletboxandpositiontheceiling
canopyoftheSocketAssembly
(B)overtheoutletbox.Alignthe
holesintheceilingcanopyofthe
SocketAssembly(B)withthe
mountingscrews,thenattachthe
ceilingcanopyusingthe
previouslyremovedmounting
balls.Handtightenuntilsnug.
Mounting
Screw
B
A
Mounting
Ball
Figure4
STEP5AssembleShade,CageandBulbs-
A.PlacetheShade(D)insideoftheCage(E).
B.AttachoneendsofSideArms(C)toHooksonthesideoftheSocket
D
E
C
B
Hook
Hook
Bulb
Socket
Assembly(B).LifttheCagewith
Shadeupwardandattachanother
endsofSideArms(C)toHooks
onthetopedgeoftheCage(E).
Carefullyreleaseyourhands
afterallSideArms(C)arehung
properly.
C.Thisfixtureusesstandardbulb
withstandardscrewbase.
Maximum100watts.Insertbulb
andscrewsnuglyintoplace.
Yourfixtureisnowassembled
andreadytouse.Enjoy!
Figure5
Tuotetiedot
| Merkki: | Quoizel |
| Kategoria: | Helpotus |
| Malli: | Buchanan BCN1716WT |
Tarvitsetko apua?
Jos tarvitset apua merkille Quoizel Buchanan BCN1716WT esitä kysymys alla ja muut käyttäjät vastaavat sinulle
Helpotus Quoizel Käyttöohjeet

1 Huhtikuuta 2025
25 Lokakuuta 2024
16 Lokakuuta 2024
16 Lokakuuta 2024
16 Lokakuuta 2024
16 Lokakuuta 2024
16 Lokakuuta 2024
16 Lokakuuta 2024
16 Lokakuuta 2024
16 Lokakuuta 2024
Helpotus Käyttöohjeet
Viimeisimmät Helpotus Käyttöohjeet
9 Huhtikuuta 2025
8 Huhtikuuta 2025
8 Huhtikuuta 2025
8 Huhtikuuta 2025
8 Huhtikuuta 2025
7 Huhtikuuta 2025
5 Huhtikuuta 2025
5 Huhtikuuta 2025
5 Huhtikuuta 2025
5 Huhtikuuta 2025