Quoizel BRX1614C Käyttöohje
Lue alta 📖 käyttöohje suomeksi merkille Quoizel BRX1614C (2 sivua) kategoriassa Helpotus. Tämä opas oli hyödyllinen 25 henkilölle ja sai 4.5 tähden keskimäärin 2 käyttäjältä
Sivu 1/2
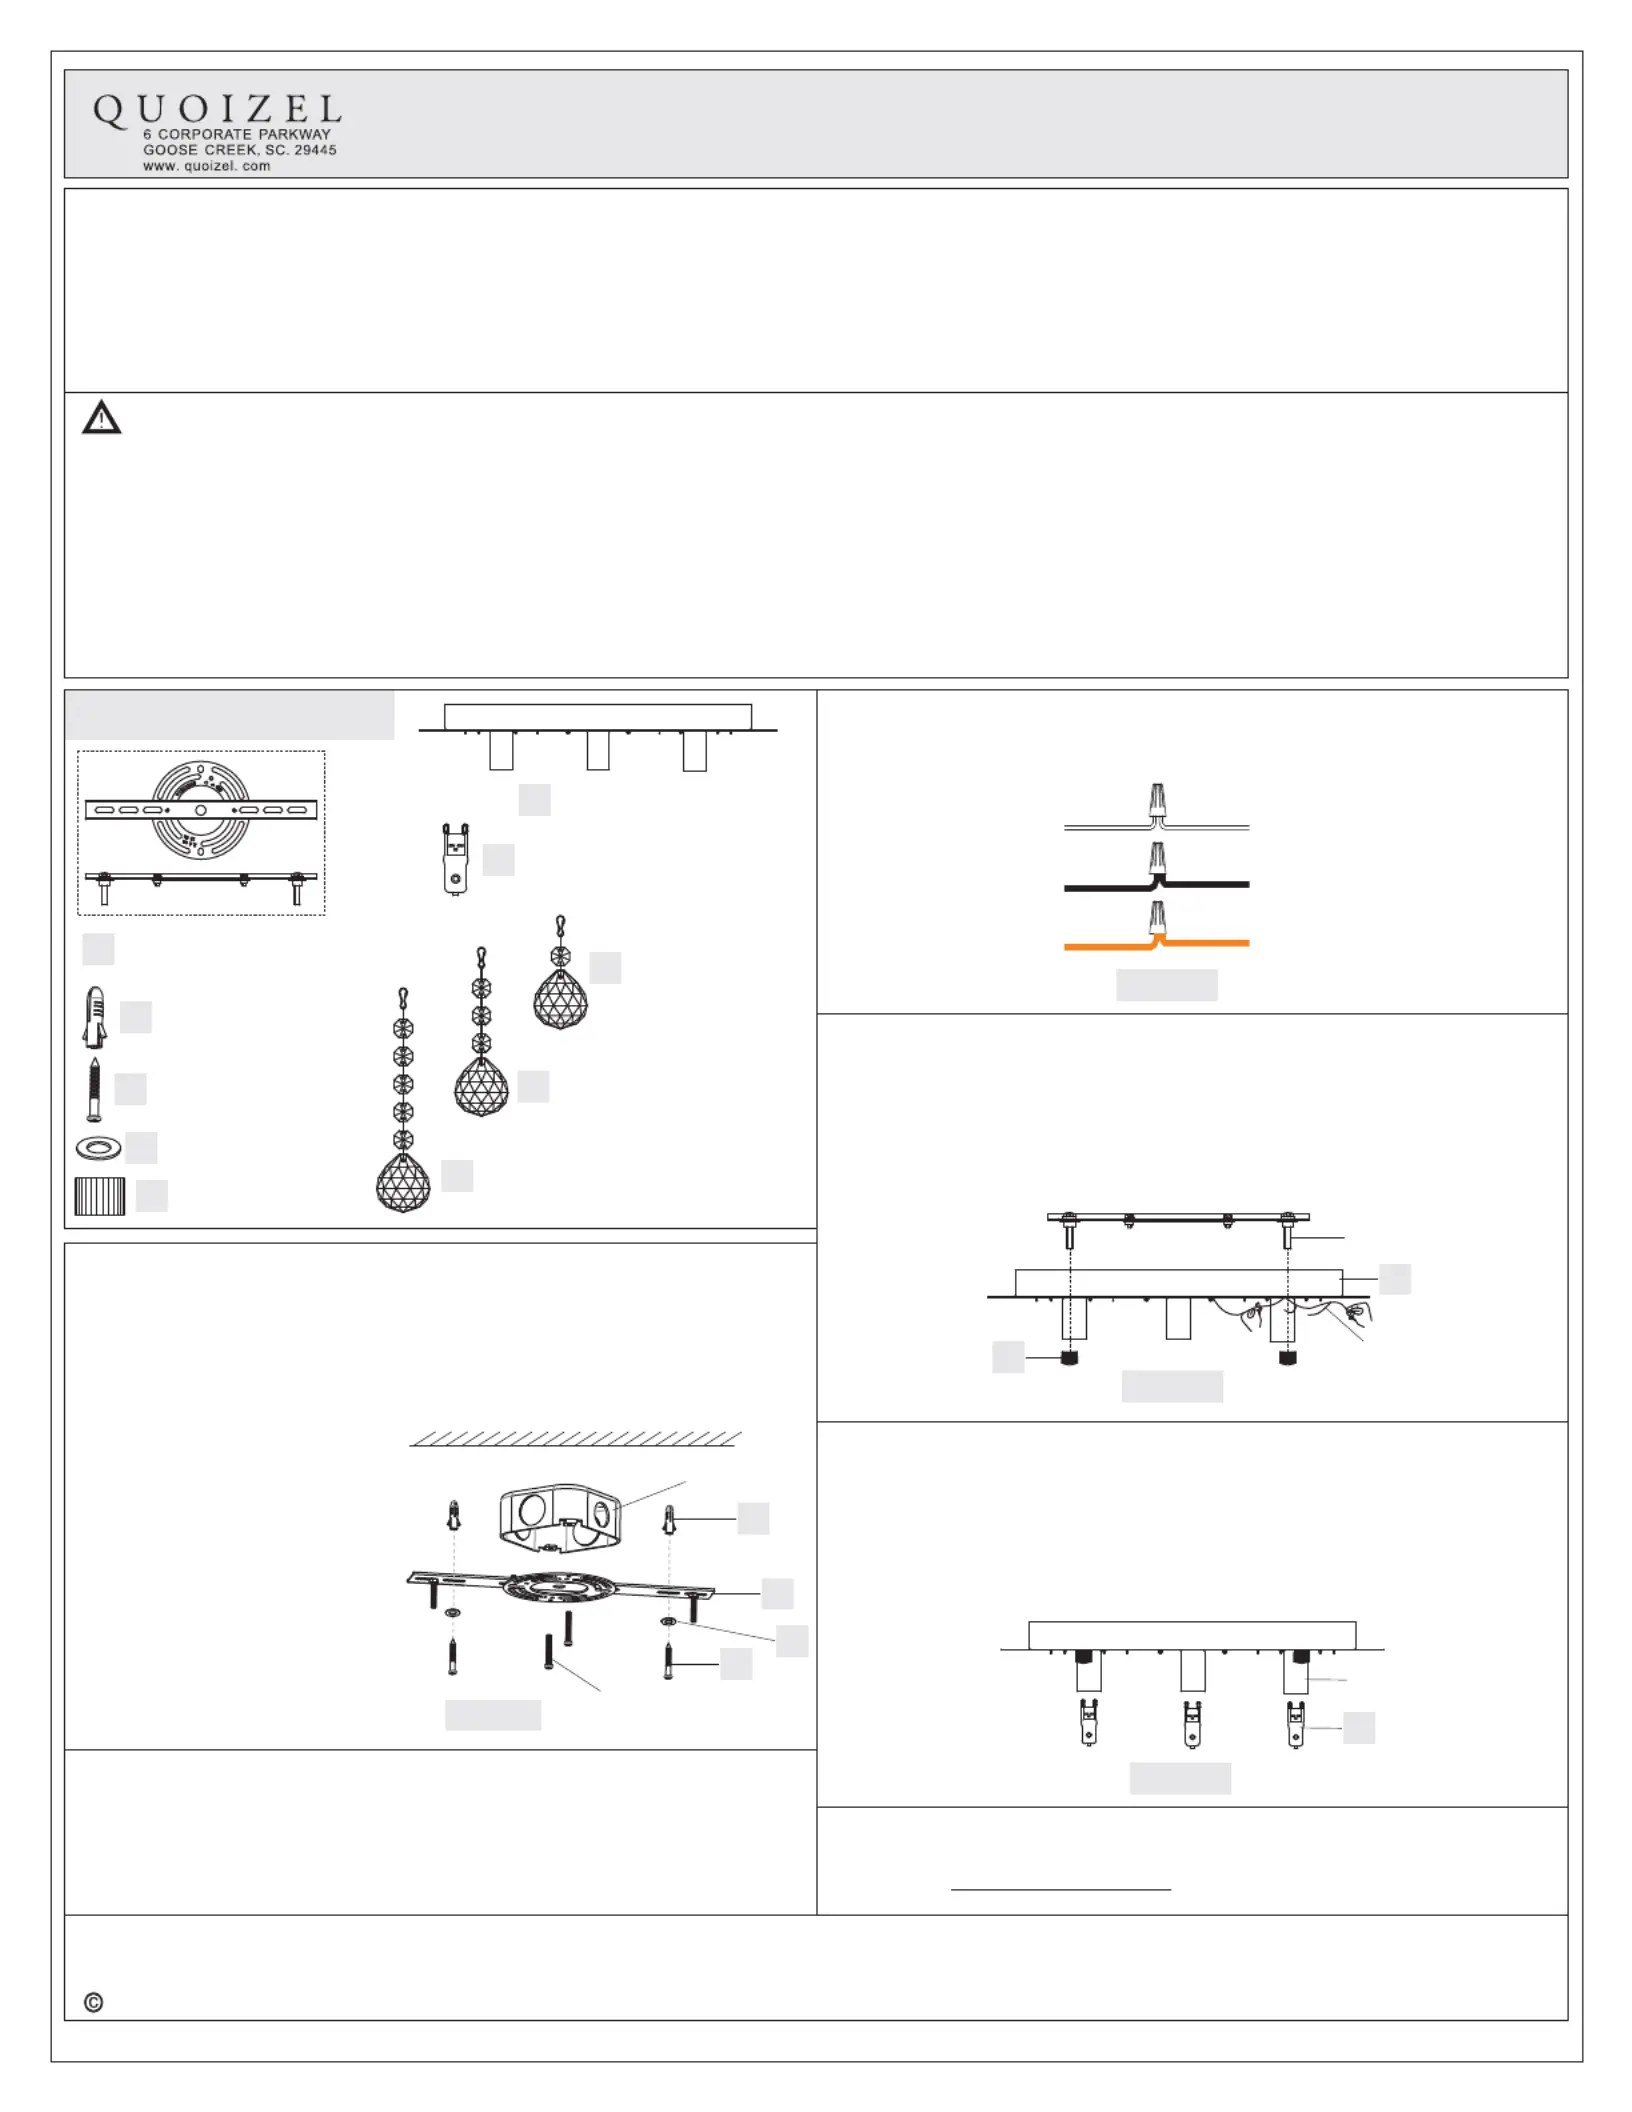
PackageContents
Pleasegotoforproductcleaningtips.Gototheselection.
(4)G9XenonClearBulbs(supplied),40WMaximum
www.quoizel.comCare+Maintenance
LightSource:
ToolsRequired:Flatheadscrewdriver,Phillipsscrewdriver,pliers,wirecutters,wirestrippers,electricaltape,safetyglasses.
EstimatedAssemblyTime:
Preparation:
30-45minutes
Identifyandinspectallpartsbeforebeginninginstallation.Checkpackagecontentlistanddiagramsbelowtobesureallpartsare
present.Ifanypartsaremissingordamaged,donotattempttoassemble,install,oroperatethefixture.Contactcustomerserviceforreplacement
parts.
1of2
AssemblyInstructionSheet#IS-BRX1614C
ForStyleBRX1614C
ThankyouforpurchasingaQuoizelproduct.
Needassistancewithpartsorassembly?CallQuoizelcustomerserviceat1-631-273-2700
orvisituson-lineatwww.quoizel.com
2015QuoizelInc.
WarningsandCautions
CrossbarAssembly
x1
B
FixtureBody
x1
Turnoffelectricityatcircuitbreakerormainfuseboxbeforeinstallation.Consultalicensedelectricianifindoubt.
Theseinstructionsareprovidedforyoursafety.Itisveryimportantyoureadthemcompletelybeforeinstallingthefixture.Westrongly
recommendthatalicensed,professionalelectricianperformtheinstallation.
Disconnectfixturefrompowersourcebeforereplacingbulbs.Makesurebulbsaregivensufficienttimetocoolbeforeremoval.Donotsubject
glasspartstoanyshockwhileinoperationorshatteringmayresult.
Donottouchthebulbwithbarehandsuseaclothorglove.
C
WallAnchor
x2
D
Self-tappingScrew
x2
STEP1AttachCrossbarAssemblytoOutletBox-
A.PlacetheCrossbarAssembly(A)ontotheCeilingsurfaceandline
uponesetofholesontomountingholesonOutletBox.Usinga
pencil,markthelocationsforWallAnchors(B).
B.RemovetheCrossbarAssembly(A)anddrillholesfromthemarks
andthenpushtheWallAnchors(B)intotheholes.
FlatWasher
x2
MountingBall
x2
G9XenonClearBulb
x4
ClearCrystal
L:3-3/8"
x14
ClearCrystal
L:5"
x6
ClearCrystal
L:6-5/8"
x1
E
F
G
H
I
J
Whitewire
fromsupply
Whitewire
fromfixture
Blackwirefrom
supply(orRed)
Blackwire
fromfixture
Groundwire
fromsupply
Groundwire
fromfixture
Figure2
STEP3-AttachCeilingCanopytoMountingScrew
A.RemoveProtectiveFilmfromCeilingCanopy.
Note:Glovesarerequiredtoavoidleavingfingerprintsorscratches
onCeilingCanopy.
B.PlacetheCeilingCanopyontheFixtureBody(F)overtheMounting
ScrewsandsecurewithMountingBalls(E).Handtightenuntilsnug.
A
STEP4-InstallBulb
IMPORTANT:
A.ThisfixtureusesG9XenonClearBulbs(G).Maximum40watts.
Insertbulbandseatproperlyintoplace.
Donottouchthebulbwithbarehandsuseaclothor
glove.
Figure4
Socket
G
C.PositiontheCrossbar
Assembly(A)backontothe
Ceiling.ThreadtheOutletBox
Screws(notsupplied)intothe
mountingholesontheOutlet
Boxtosecureit.Handtighten
untilsnug.
D.PassFlatWashers(D)over
Self-tappingscrews(C)and
thenthreadself-tapping
screws(C)intoWallAnchors
(B).Handtightenuntilsnug.
STEP2-WireConnections
A.Usestandardwireconnectors(notincluded)tomakeallwire
connections.(Connectorsarenotincludedwithfixture.)Twist
connectorsuntilwiresaretightlyjoinedtogether.Wrapeach
connectionwithapprovedelectricaltapeandcarefullystuffallthe
ProtectiveFilm
E
F
MountingScrew
Figure3
STEP5-InstallCrystaltoFixture
A.(Referto)AttachtheClearCrystalL6-5/8”(J)CrystalDistribution
July2015
Figure1
Ceiling
OutletBox
OutletBoxScrew
(notincluded)
B
A
C
D
(Step2Continued)
connectedwiresintotheOutletBox.
Tuotetiedot
| Merkki: | Quoizel |
| Kategoria: | Helpotus |
| Malli: | BRX1614C |
Tarvitsetko apua?
Jos tarvitset apua merkille Quoizel BRX1614C esitä kysymys alla ja muut käyttäjät vastaavat sinulle
Helpotus Quoizel Käyttöohjeet

1 Huhtikuuta 2025
25 Lokakuuta 2024
16 Lokakuuta 2024
16 Lokakuuta 2024
16 Lokakuuta 2024
16 Lokakuuta 2024
16 Lokakuuta 2024
16 Lokakuuta 2024
16 Lokakuuta 2024
16 Lokakuuta 2024
Helpotus Käyttöohjeet
Viimeisimmät Helpotus Käyttöohjeet
9 Huhtikuuta 2025
8 Huhtikuuta 2025
8 Huhtikuuta 2025
8 Huhtikuuta 2025
8 Huhtikuuta 2025
7 Huhtikuuta 2025
5 Huhtikuuta 2025
5 Huhtikuuta 2025
5 Huhtikuuta 2025
5 Huhtikuuta 2025