Intermatic BIT25-B1S3E-BI Käyttöohje
Intermatic Ei luokiteltu BIT25-B1S3E-BI
Lue alta 📖 käyttöohje suomeksi merkille Intermatic BIT25-B1S3E-BI (2 sivua) kategoriassa Ei luokiteltu. Tämä opas oli hyödyllinen 37 henkilölle ja sai 4.3 tähden keskimäärin 3 käyttäjältä
Sivu 1/2
TECHNICAL DATA
Power supply
BIT25...E 230Vac±10%, 50/60Hz, 3W
BIT25...U 115Vac±10%, 50/60Hz, 3W
BIT25…W 100…240Vac±10%, 50/60Hz, 3W
Relay output max loads
Compressor 12(12)A 240Vac
Auxiliary loads 1 16A 240Vac
Auxiliary loads 2 4A 240Vac
Input
NTC 10KΩ@25°C Intermatic Part No. SN4...
Measurement Range
-50 / -9.9 … 19.9 / 110°C
-50…110°C, -58…180°F
Measurement accuracy
<0.5°C within the measurement range
Operating conditions
-10 … +50°C; 15%...80% r.H.
CE (Approvals and Reference norms)
EN60730-1; EN60730-2-9; EN55022 (Class B);
EN50082-1
IISM = MAN or DI2
IISL
-50... IISH
Minimum limit for IISP setting .(-25°C)
IISH
IISL... 110°C
Maximum limit for IISP setting .25°C)
IISP
IISL... IISHSetpoint in mode 2 .(5°C)
IIHY
1.0... 10.0°COFF/ON differential in mode 2 .(3°C)
IIFC
NON;
TMP;
TIM
Fan control in mode 2. See FCM .(NON)
IIDF
0...99 hoursBuilt-in timer value for an automatic defrost to take place, in mode 2 (0).
SB
NO/YES
Stand-by button enabling (YES).
DI1
NON;
DOR;
ALR;
RDS.
DI1 digital input operation (NON)
NON : digital input 1 not active.
DOR : door input.
ALR : when contact opens an alarm is generated (if AHM=STP, the compressor is stopped and defrosts are
suspended).
RDS : when contact makes a defrost is started (remote control).
DI2
NON;
DOR;
ALR;
RDS;
IISM;
T3;
PSP
DI2 digital input operation (NON)
NON : digital input 2 not active.
DOR : door input.
ALR : when contact opens an alarm is generated (if AHM=STP, the compressor is stopped and defrosts are
suspended).
RDS : when contact makes a defrost is started (remote control).
IISM : when contact makes the second parameter group is active.
T3 : probe T3 input.
PSP : potentiometer setpoint input.
DI2 = T3
T3M
DSP;
CND.
Auxiliary probe T3 operation (DSP)
DSP : temperature T3 to be displayed.
CND : condenser temperature measurement.
OS3
-12.5..12.5°CProbe 3 offset .(0°C)
DI2 = PSP
PSL
-50...70°CMinimum setpoint adjusted via potentiometer .(0°C)
PSR
0.0...15.0 °CRange of setpoint adusted via potentiometer (0°C)
Example: with PSL=2.0 and PSR=8.0, the setpoint changes between 2.0°C and 10.0°C (PSL+PSR).
POF
NO/YESPotentiometer standby enabling .(NO)
With POF=YES, when the potentiometer is turned to the minimum, the controller will be put on standby.
LSM
NON;
MAN;
D1O;
D2O;
D2C.
Light control mode (NON)
NON : light output not controlled.
MAN : light ouput controlled through button
D1O : when DI1 is open, light output is on.
D2O : when DI2 is open, light output is on.
D2C : when DI2 is closed, light output is on.
OA1
NON;
FAN;
DEF;
LGT;
0-1;
ALO;
ALC
AUX 1 output operation (NON)
NON : output disabled (always off).
FAN : output enabled for fan control.
DEF : output enabled for defrost control.
LGT : output enabled for light control.
0-1 : the relay contacts follow the on/standby state of controller.
ALO : contacts open when an alarm condition occurs.
ALC : contacts make when an alarm condition occurs.
OA2
See OA1AUX2 output operation. See OA1 .(NON)
OS1
-12.5..12.5°CProbe T1 offset (0°C).
T2
NO/YESProbe T2 enabling (evaporator) .(NO)
OS2
-12.5..12.5°CProbe T2 offset (0°C).
TLD
1...30 minDelay for minimum temperature (TLO) and maximum temperature (THI) logging .(5)
SCL
1°C;
2°C;
°F
Readout scale .(2°C)
1°C : measuring range -50…110°C (0.1°C resolution within -9.9 ÷ 19.9°C interval, 1°C outside)
2°C : measuring range -50…110°C
°F : measuring range -58…180°F
SIM
0...100Display slowdown .(3)
ADR
1...255BIT25 address for PC communication .(1)
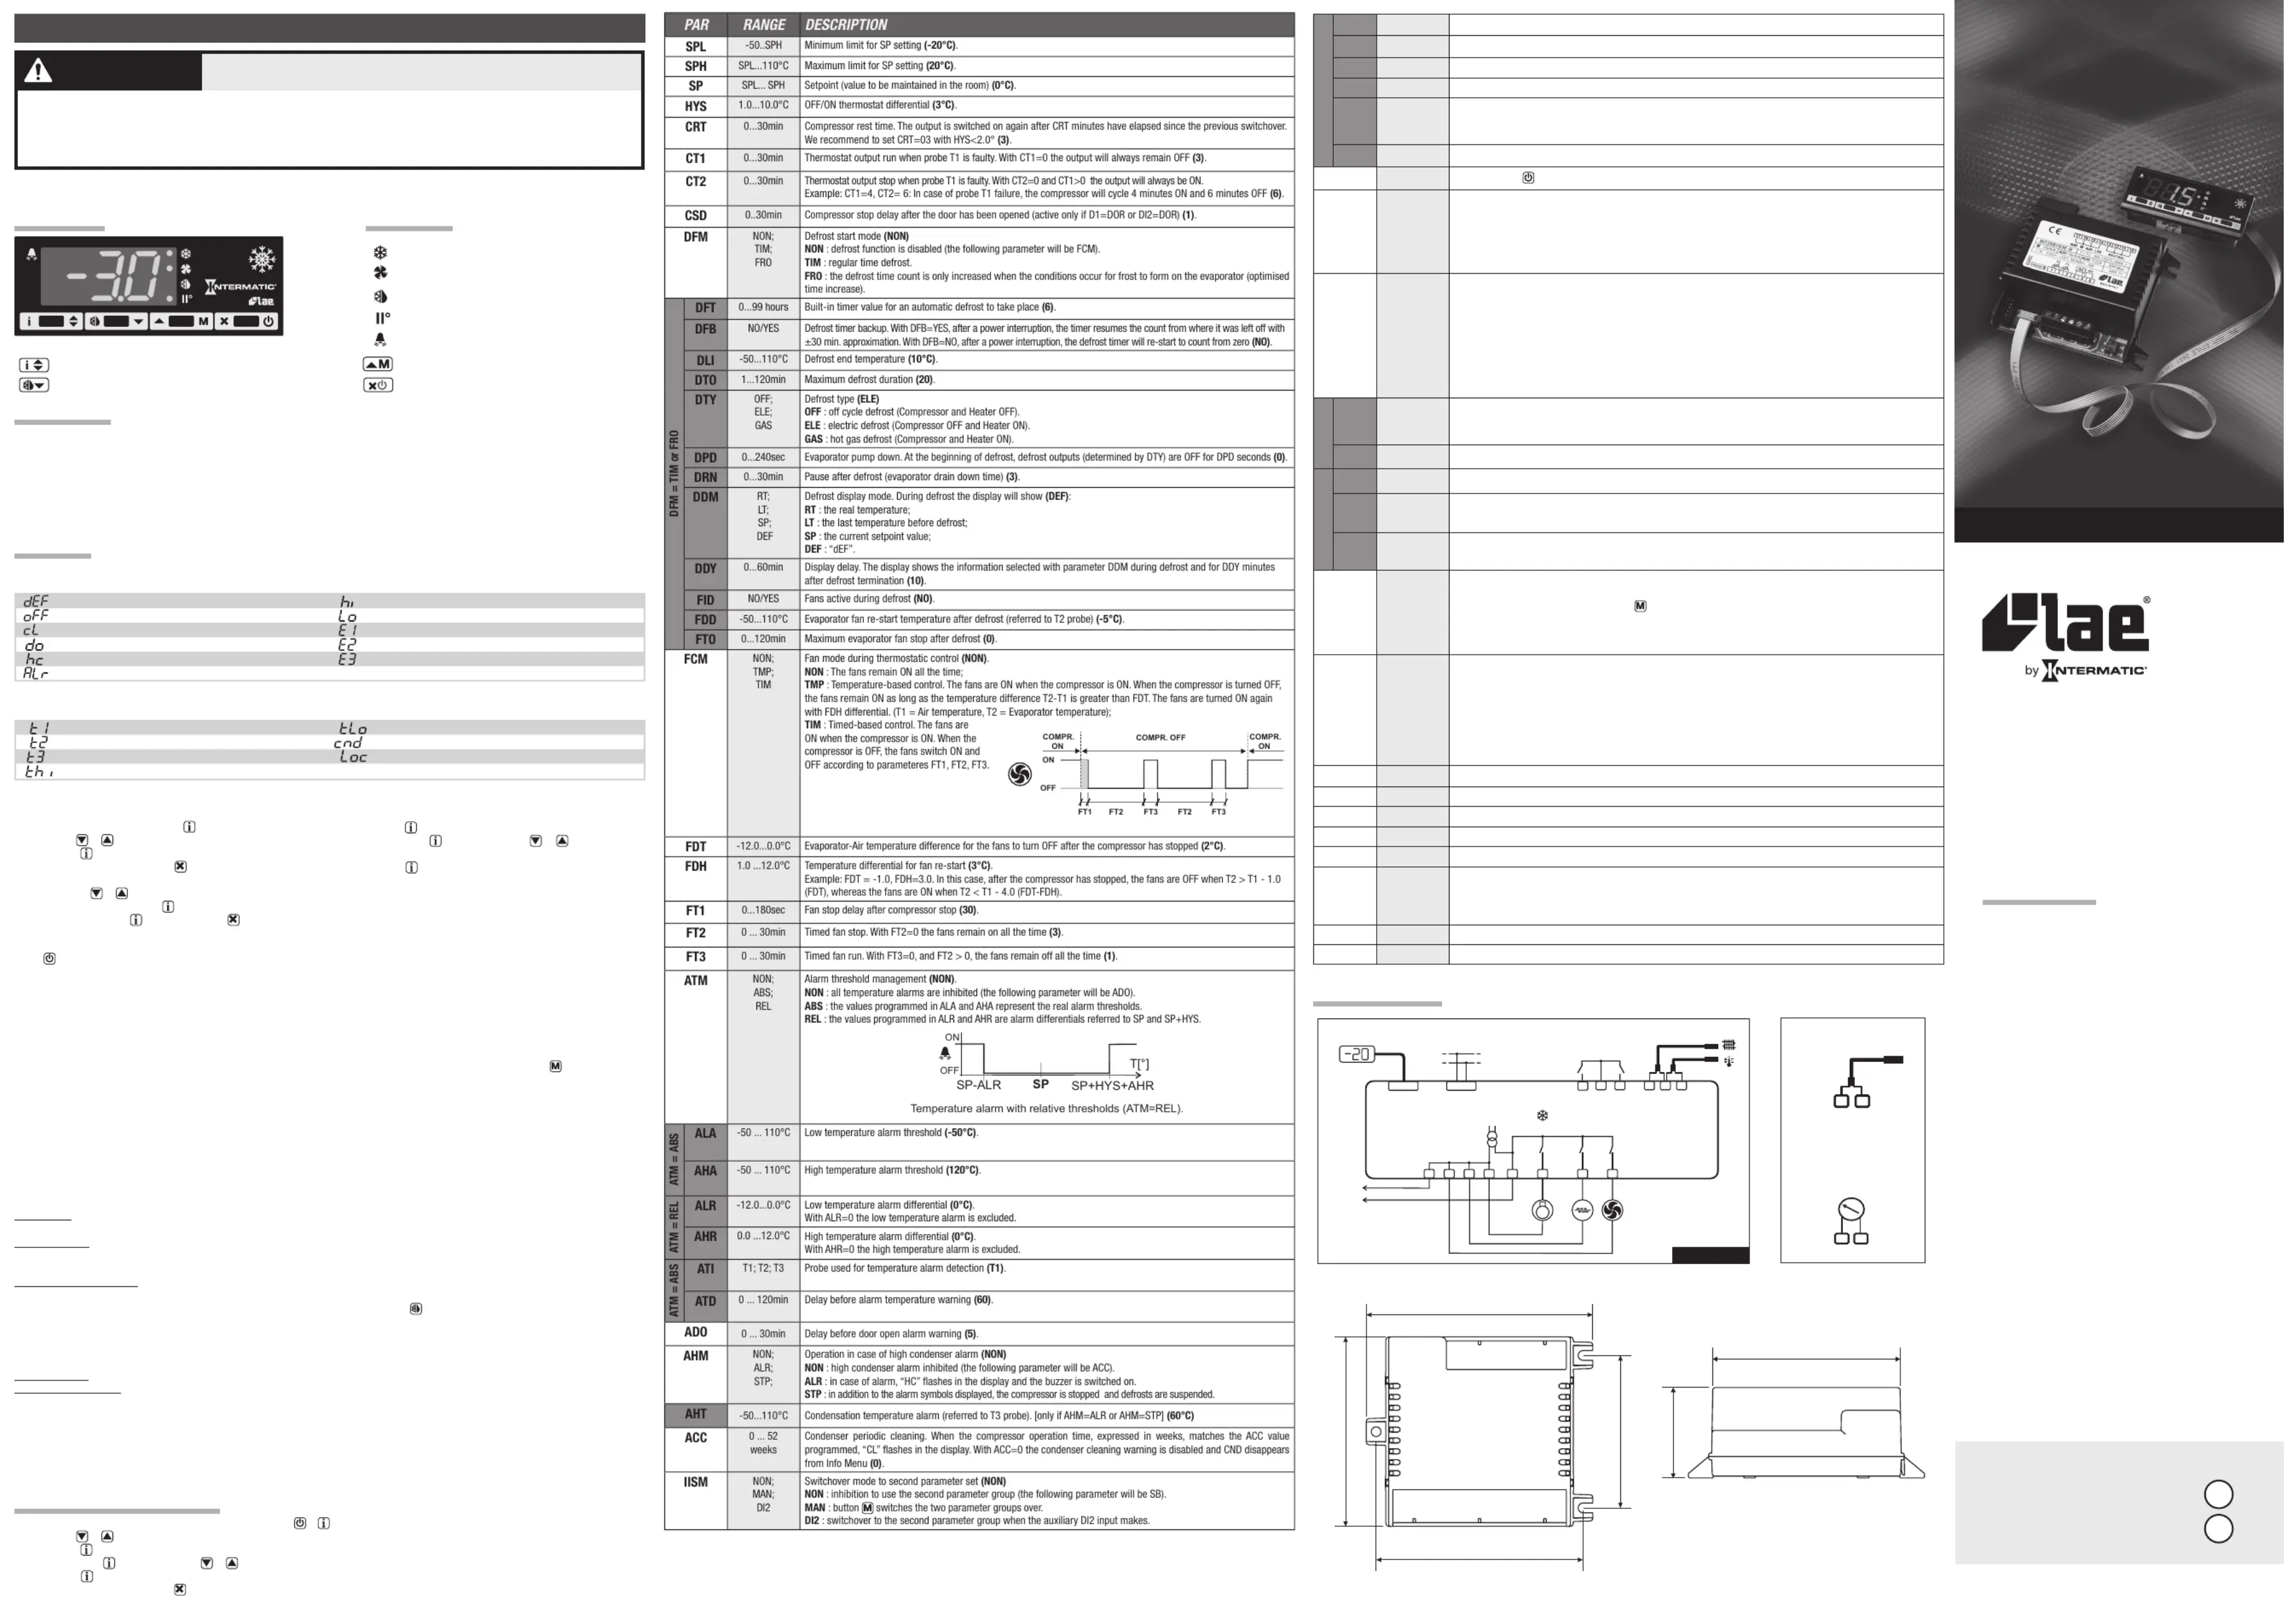
WIRING DIAGRAMS
BIT25B1S3E-B
Power
Supply
L2/Neutral
L1
dataI/O
RS485
PCcomm.
16A
12(12)A
Maxtotalcurrent16A
A
B
4A
remote
AUX1
DI 2
DI 1
AUX2
T2T1
LCD-5S
65
412
3
14
1615
17
13
1211
10
OPERATION
DISPLAY
During normal operation, the display shows either the temperature measured or one of the following indications:
Defrost in progressRoom high temperature alarm
Controller in stand-byRoom low temperature alarm
Condenser clean warningProbe T1 failure
Door open alarmProbe T2 failure
Condenser high temperature alarmProbe T3 failure
Generic Alarm
INFO MENU
The information available in this menu is:
Instant probe 1 temperatureMinimum probe 1 temperature recorded
*
Instant probe 2 temperature
**
Compressor working weeks
*
Instant probe 3 temperatureKeypad state lock
Maximum probe 1 temperature recorded
*: displayed only if enabled (see §Configuration Parameters) ** : displayed only if ACC > 0
Access to menu and information displayed.
■Press and immediately release button .
■With button or select the data to be displayed.
■Press button to display value.
■To exit from the menu, press button or wait for 10 seconds.
Reset of THI, TLO, CND recordings
■With button or select the data to be reset.
■Display the value with button .
■While keeping button pressed, use button .
STAND-BY
Button , when pressed for 3 seconds, allows the controller to be put on a standby or output control to be resumed (with SB=YES only).
KEYPAD LOCK
The keypad lock avoids undesired, potentially dangerous operations, which might be attempted when the controller is operating in a public place. In the INFO
menu, set parameter LOC=YES to inhibit all functions of the buttons. To resume normal operation of keypad, adjust setting so that LOC=NO.
SELECTION OF SECOND PARAMETER GROUP
It’s possible to select control parameters between two different pre-programmed groups, in order for the fundamental control parameters to be adapted
quickly to changing needs. Changeover from Group I to Group II (and vice versa) may take place MANUALLY by pressing button for 2 seconds (with
IISM=MAN), or AUTOMATICALLY when IISM=DI2 and the AUXILIARY INPUT DI2 is activated (the activation of DI2 selects Group II). If IISM=NON, switchover
to Group II is inhibited. The activation of Group II is signalled by the lighting up of the relevant LED on the controller display.
SETPOINT ADJUSTMENT VIA POTENTIOMETER
With DI2=PSP the setpoint is set via a 10KΩ linear potentiometer connected to DI2. The setpoint changes between PSL (10KΩ) and PSL+PSR (0Ω)
proportionally. With POF=YES, if the potentiometer is turned to the minimum (0Ω), the controller will be put on standby. If the second parameter group is
active, the setpoint used will be IISP.
DEFROST
Automatic defrost.DFT Defrost starts automatically when the defrost timer matches the time value set with .
Timed defrost=TIM defrosts take place at regular intervals of DFT hours. For example, with =TIM and =06, a defrost will take place . With DFMDFMDFT
every 6 hours.
Optimized defrost.=FRO the timer is increased only when the condition for frost to form in the evaporator occurs. Once thevalue is reached, With DFM DFT
defrost takes place. If the evaporator works at 0°C, defrost frequency depends on the thermal load and climatic conditions. With setpoints much lower than
0°C, defrost frequency mainly depends on the refrigerator operating time.
Defrost time count backup. At the power-up, if =YES, the defrost timer resumes the time count from where it was left off befoDFB-
re the power interruption. Vice versa, with =NO, the time count re-starts from 0. In stand-by, the accumulated time count is frozen.DFB
Manual or remote defrost start.It’s possible to manually start a defrost, by pressing button for 2 seconds, or defrost may be started remotely, if
DI1DI2=RDS (=RDS), through the making of the auxiliary contact DI1 (DI2).
Defrost type. Once defrost has started, Compressor and Defrost outputs are controlled according to parameter DTY. If =YES, the evaporator fans are FID
active during defrost.
Defrost termination. The actual defrost duration is influenced by a series of parameters.
Time termination: =NO. the evaporator temperature is not monitored and defrost will last as long as time T2DTO.
Temperature termination: =YES. In this case, if the sensor T2 measures the temperature before the time elapses, defrost will be terminated in T2DLI DTO
advance.
Resuming thermostatic cycle. When defrost is over, if is greater than 0, all outputs will remain off for DRN minutes, in order for the ice to melt DRN
completely and the resulting water to drain. Moreover, the fans will re-start only when the evaporator temperature is lower than (if =YES), or after FDDT2
FTO minutes have elapsed.
Caution: if =NON all defrost functions are inhibited; if =0, automatic defrost functions are excluded; during a high pressure alarm or a DI1 (DI2) DFMDFT
generic alarm, defrost is suspended; during defrost, high temperature alarm is bypassed.
CONFIGURATION PARAMETERS
■To get access to the parameter configuration menu, press button + for 5 seconds.
■With button or select the parameter to be modified.
■Press button to display the value.
■By keeping button pressed, use button or to set the desired value.
■When button is released, the newly programmed value is stored and the following parameter is displayed.
■To exit from the setup, press button or wait for 30 seconds.
INSTALLATION
■The BIT-25 controller has a size 87x83x40 mm (WxHxD).
■Make sure that electrical connections comply with the paragraph “wiring diagrams”. To reduce the effects of electromagnetic disturbance, keep the
sensor and signal cables well separate from the power wires.
■Place the probe T1 inside the room in a point that truly represents the temperature of the stored product.
■If present, place the probe T2 on the evaporator where there is the maximum formation of frost.
■If probe T3 is connected to DI2, its function is determined by the parameter T3M. With T3M=DSP the probe measures the temperature to be displayed.
With T3M=CND the probe measures the condenser temperature, it must therefore be placed between the fins of the condensing unit.
Thermostat output
Fan output
Alarm
Defrost output
Activation of 2nd parameter set
Info / Setpoint button
Fig.1 - Front panel
Manual defrost / Decrease button
Increase button / Manual activation
Exit / Stand-by button
DESCRIPTION
INDICATIONS
BIT25 INSTRUCTIONS FOR USE
SETPOINT : display and modification
■Press button for at least half second, to display the setpoint value.
■By keeping button pressed, use button or to set the desired
value (adjustment is within the minimum SPL and the maximum SPH limit).
■When button is released, the new value is stored.
70 mm
87 mm
104 mm
95 mm
83 mm
40 mm
DI2asinputforT3
probe(DI2=T3)
DI2asinputforsetpoint
potentiometeradjustment
(DI2=PSP)
1
2
3
4
4
5
5
6
DI2
DI2
5
4
Thank you for having chosen an Intermatic electronic product. Before installing the instrument, please read this instruction booklet carefully in order to
ensure safe installation and optimum performance.
■Disconnect power at the circuit breaker(s) or disconnect switch(es) before installing or servicing.
■More than one circuit breaker or disconnect switch may be required to de-energize the equipment before servicing.
■Installation and/or wiring must be in accordance with National and Local Electrical Code requirements.
■The device shall be installed in compliance with the enclosure, mounting, spacing and segregation requirements of the ultimate enclosure.
WARNING
Risk of Fire or Electric Shock
7777 Winn Road
Spring Grove, IL 60081
Intermatic Customer Service:
815-675-7000
www.intermatic.com
INSTRUCTIONS FOR USE
BIT25
BIT25
INSTRUCTIONS FOR USE
EN
MODE D’EMPLOI
FR
0L0023R00-03
158--01984
Tuotetiedot
| Merkki: | Intermatic |
| Kategoria: | Ei luokiteltu |
| Malli: | BIT25-B1S3E-BI |
Tarvitsetko apua?
Jos tarvitset apua merkille Intermatic BIT25-B1S3E-BI esitä kysymys alla ja muut käyttäjät vastaavat sinulle
Ei luokiteltu Intermatic Käyttöohjeet

8 Huhtikuuta 2025
8 Huhtikuuta 2025
8 Huhtikuuta 2025
8 Huhtikuuta 2025
8 Huhtikuuta 2025
8 Huhtikuuta 2025
7 Huhtikuuta 2025
7 Huhtikuuta 2025
7 Huhtikuuta 2025
7 Huhtikuuta 2025
Ei luokiteltu Käyttöohjeet
Viimeisimmät Ei luokiteltu Käyttöohjeet
9 Huhtikuuta 2025
9 Huhtikuuta 2025
9 Huhtikuuta 2025
9 Huhtikuuta 2025
9 Huhtikuuta 2025
9 Huhtikuuta 2025
9 Huhtikuuta 2025
9 Huhtikuuta 2025
9 Huhtikuuta 2025
9 Huhtikuuta 2025