Advance WTX-500 Käyttöohje
Advance Vastaanotin WTX-500
Lue alta 📖 käyttöohje suomeksi merkille Advance WTX-500 (4 sivua) kategoriassa Vastaanotin. Tämä opas oli hyödyllinen 43 henkilölle ja sai 4.4 tähden keskimäärin 7 käyttäjältä
Sivu 1/4
QuickStart WTX-500
3 ÉTAPES POUR RÉGLER VOTRE SYSTÈME
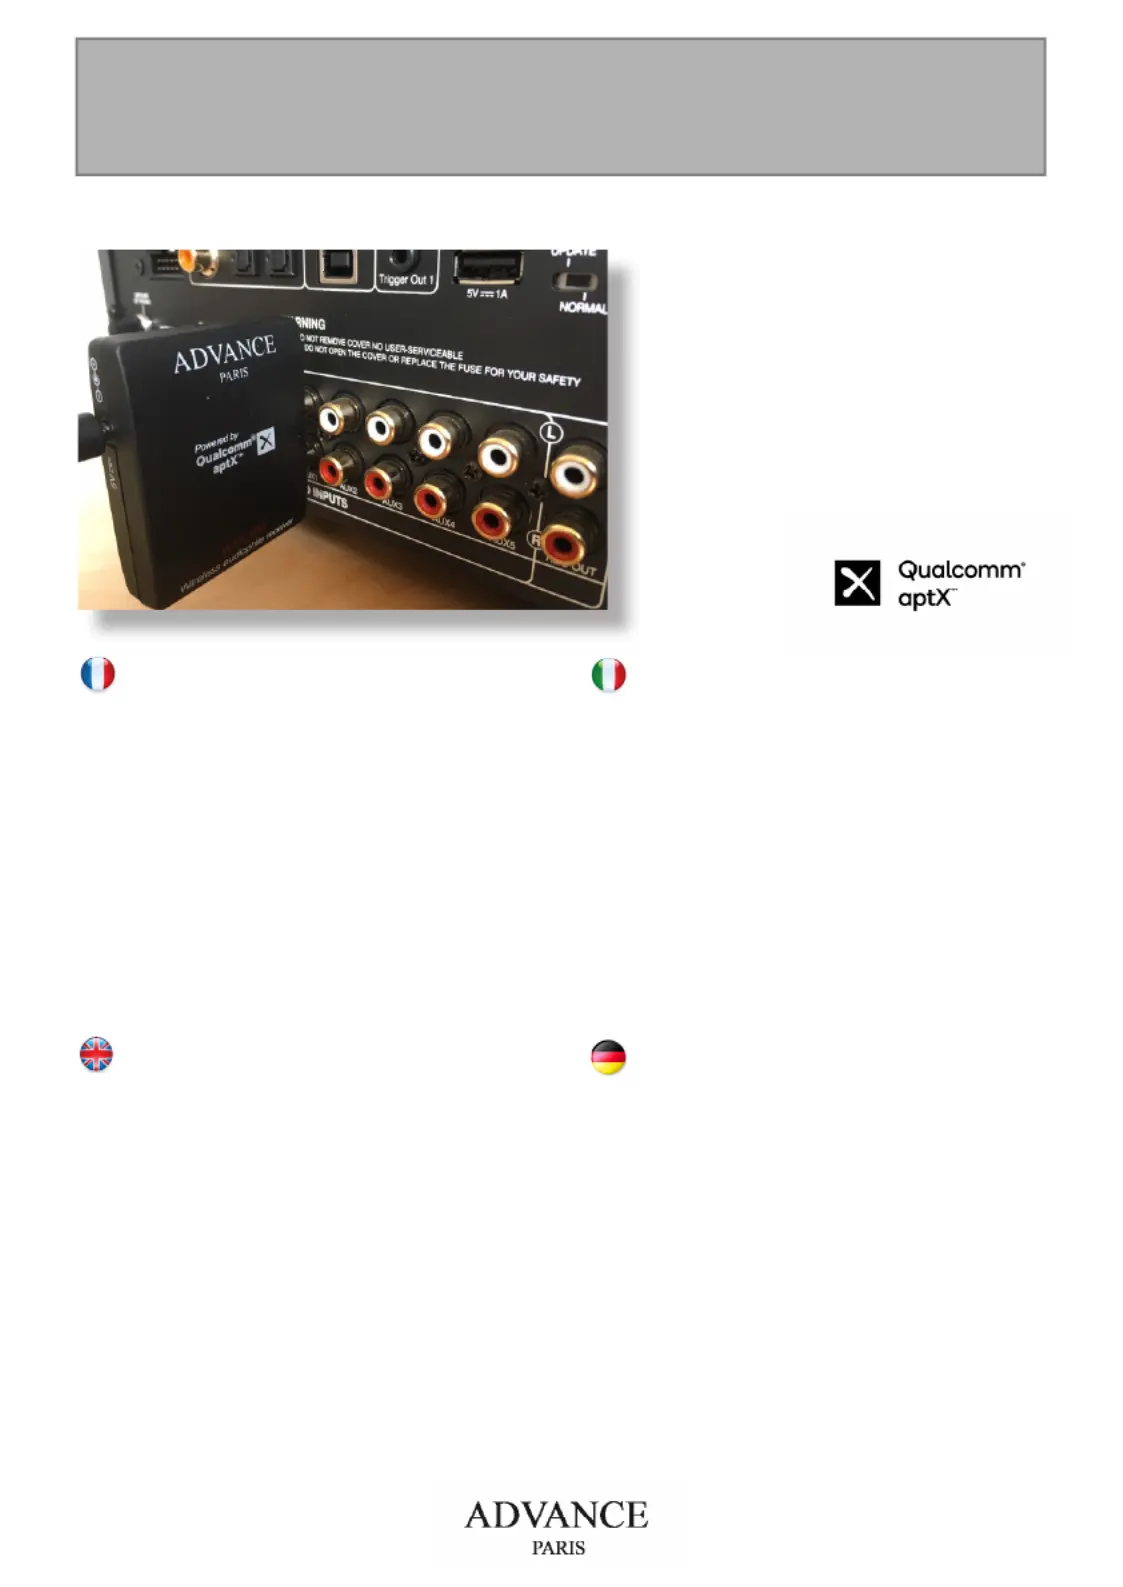
1 - Connecter le WTX-500 sur une entrée auxiliaire de votre amplificateur
HiFi comme indiqué sur la photo.Branché l’adaptateur secteur. La led bleu
doit clignoter.
2 - Allez dans le menu réglage, sous-menu bluetooth, de la source audio
que vous souhaitez appairer avec votre WTX-500. Après quelques instants,
le WTX-500 apparaitra sous le nom WTX-500. Sélectionnez le et valider
sa connexion. Aucun code Pin n’est nécessaire. Lorsque l’appairage est
réalisé, la led bleu devient fixe.
3 - Passer votre périphèrique audio en mode lecture et profitez d’une
restitution sonore de qualité “Airblue Certified“ grâce à la technologie Apt-X
Bluetooth.
Si vous vous éloignez votre périphèrique audio à une distance hors de por-
tée de votre système Air, la liaison bluetooth se désactivera et vous devrez
répéter l’étape 2 pour vous reconnecter. Si vous souhaitez changer de
périphèrique Bluetooth, vous devez désactiver la connexion du premier et
activer la connexion du second via les menus réglages respectifs.
TO FINE TUNE, FOLLOW THOSE 3 STEPS
1 - Connect the WTX-500 on an auxiliary input of your HiFi amplifier or AV
receiver. Plug on an outlet the power supply adapter. The blue led of your
WTX-500 is flashing.
2 - Go to the Bluetooth Manager of your iPhone, iPod touch, iPad, tablet,
smartphone, PC or MAC computer, then go on the bluetooth settings. You
will see a new bluetooth connection under WTX-500 name. Confirm that
you choose it, after few seconds, your audio device is pairing with the WTX-
500. If pairing is ok, then, the blue led of the Air amplifier will be fixed. You
don’t need any Pin code confirmation.
Your WTX-500 is now connected and ready to play music! Just play music
on your device as you normally would and the sound will come out of your
HiFi system.
If you move out of range or turn off the Bluetooth feature on your audio
device, the Bluetooth Music Receiver will disconnect from your device.
To reconnect, simply access the Bluetooth Manager on your device and
select the WTX-500 connection.
PER SINTONIZZARE IL VOSTRO
SISTEMA, SEGUIRE QUESTI TRE PASSAGGI
1 - Collegare il WTX 500 su un ingresso ausiliario del vostro amplificatore
hifi o ricevitore. Collegare l’alimentatore. Il led blu del vostro WTX500
lampeggerà.
2 - Entrare nel menu bluetooth del vostro iPhone, iPod touch, iPad, tablet,
smartphone, PC o computer MAC, poi andare nelle impostazioni Bluetooth.
Vedrete una nuova connessione bluetooth sotto il nome WTX-500.
Confermare la scelta, dopo alcuni secondi il collegamento è completato
e il led blu dell’amplificatore Air diventerà fisso. Non è necessario nessun
codice Pin per la conferma.
3 - Ora il Vostro WTX500 è pronto per funzionare. E’ sufficiente riprodurre il
suono dal Vostro apparecchio e questo sarà emesso dal Vostro sistema. Se
uscite dall’area di copertura del Bluetooth o lo spegnete, il Bluetooth music
receiver si disconnetterà dal vostro apparato per riconnettersi accedete
al Bluetooth manager del vostro apparato e selezionate la connessione
WTX-500.
UM DAS GERÄT ZU NUTZEN, BEFOLGEN SIE BITTE
DIE FOLGENDEN 3 SCHRITTE
1 - Verbinden Sie das WTX-500 Modul mit dem AUX Eingang ihres
Verstärkers oder AV Receivers. Verbinden Sie nun das Netzteil mit dem
Adapter (kleiner Stecker) und danach mit der Stromzufuhr. Die blaue LED
am Modul blinkt nun.
2 - Wählen Sie nun die Bluetooth Einstellungen Ihres iPhones, iPod Touchs,
iPads, Tablets, Smartphones, PCs oder MAC Computers. Sie erkennen nun
als verfügbare Bluetooth-Verbindung «WTX-500». Wählen Sie diese
Verbindung aus, nach einigen Sekunden wird Ihre Audioquelle mit dem
WTX-500 Modul gepaart. Bei erfolgreicher Verbindung leuchtet die LED am
Modul dauerhaft. Sie brauchen keinen Code zur Verbindung einzugeben!
3 - Ihr WTX-500 Modul ist jetzt verbunden und Sie können Musik abspielen.
Geben Sie die Musik wie gewohnt auf Ihrer Audioquelle wieder, die Musik
wird dann von Ihrem HiFi System wiedergegeben. Sollten Sie außerhalb der
Reichweite kommen oder die Bluetooth-Verbindung an Ihrer Audioquelle
abschalten, wird das Modul von der Audioquelle getrennt.
Um wieder eine Verbindung herzustellen wiederholen Sie wieder Punkt 2.
www.advanceparis.com
Tuotetiedot
| Merkki: | Advance |
| Kategoria: | Vastaanotin |
| Malli: | WTX-500 |
Tarvitsetko apua?
Jos tarvitset apua merkille Advance WTX-500 esitä kysymys alla ja muut käyttäjät vastaavat sinulle
Vastaanotin Advance Käyttöohjeet

19 Lokakuuta 2024
19 Lokakuuta 2024
17 Lokakuuta 2024
17 Lokakuuta 2024
17 Lokakuuta 2024
17 Lokakuuta 2024
17 Lokakuuta 2024
17 Lokakuuta 2024
17 Lokakuuta 2024
17 Lokakuuta 2024
Vastaanotin Käyttöohjeet
Viimeisimmät Vastaanotin Käyttöohjeet
9 Huhtikuuta 2025
9 Huhtikuuta 2025
5 Huhtikuuta 2025
4 Huhtikuuta 2025
2 Huhtikuuta 2025
2 Huhtikuuta 2025
1 Huhtikuuta 2025
30 Maaliskuuta 2025
30 Maaliskuuta 2025
29 Maaliskuuta 2025